S
p
a
r
x
S
y
s
t
e
m
s
I
n
d
i
a

Contacts

No 58A, New No 73,
Thirumangalam Road,
Villivakkam,
Chennai-600 049

info@sparxsystems.in

Category: Integrations

Integrations

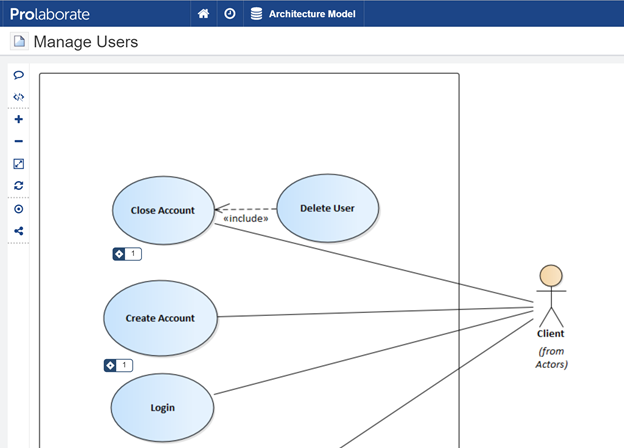
ServiceNow Integration with Sparx Enterprise Architect

Sparx Enterprise Architect can be used to capture models that are associated with the ServiceNow tables and other artifacts. The capacity to connect the components of all models to one another is the key strength of Sparx Systems Enterprise Architect, the more time analysts and designers spend in creating attractive, well specified models, the greater the potential future benefit from any further changes to the systems. With Sparx Systems Pro Cloud Server users can easily integrate with ServiceNow to fetch tables into their Cloud model.

ServiceNow

ServiceNow is a ticketing system for customer service that processes and catalogues service requests. You can create queries for incidents, changes, problems, and other services using tools like ServiceNow. ServiceNow has had its roots in ITSM since 2012. With the advent of cloud computing and changing technology, however, it carved out a niche as a cross-departmental platform that operates as an enterprise cloud solution built on top of all other applications. Its method of developing business processes that optimize information extraction distinguishes it as a one-of-a-kind provider in today’s modern cloud space.

Key features of Integrating ServiceNow with Sparx Enterprise architect

  • Map Enterprise Architect elements to their ServiceNow counterparts.
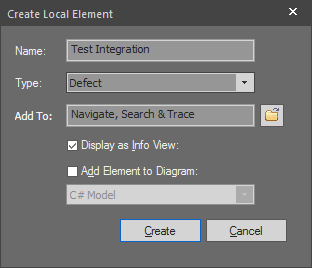
  • Users can easily create a new Enterprise Architect element linked to a ServiceNow item.
  • It provides better customer service while lowering maintenance costs.
  • Customization is simple and easy with the help of ServiceNow integration.
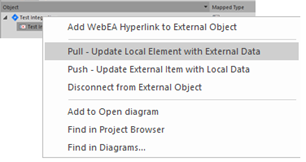
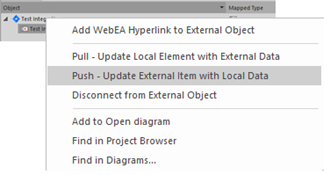
  • Users can link an existing element in Enterprise Architect to a ServiceNow item or create a new element in Enterprise Architect linked to a ServiceNow item.
  • Changes to the Enterprise Architect element can be reflected in the ServiceNow item.
  • Users can create a new ServiceNow item that is linked to an Enterprise Architect element.
  • Conduct a traceability analysis.
Simple steps for configuring Snow Integration in PCS:
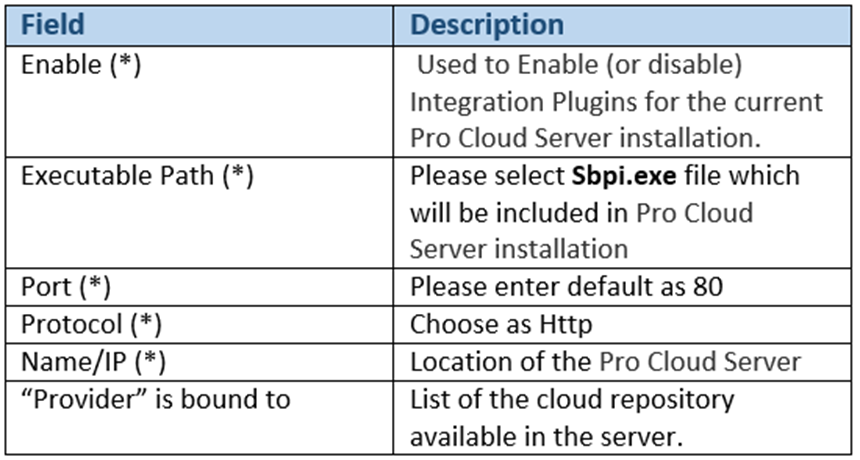
  1.  Open Pro Cloud Config Client in Desktop.
  2.  Click on the Integrations Tab in the config client window and enable the Integrations button.
  3.  Click on Add button to Add the data provider
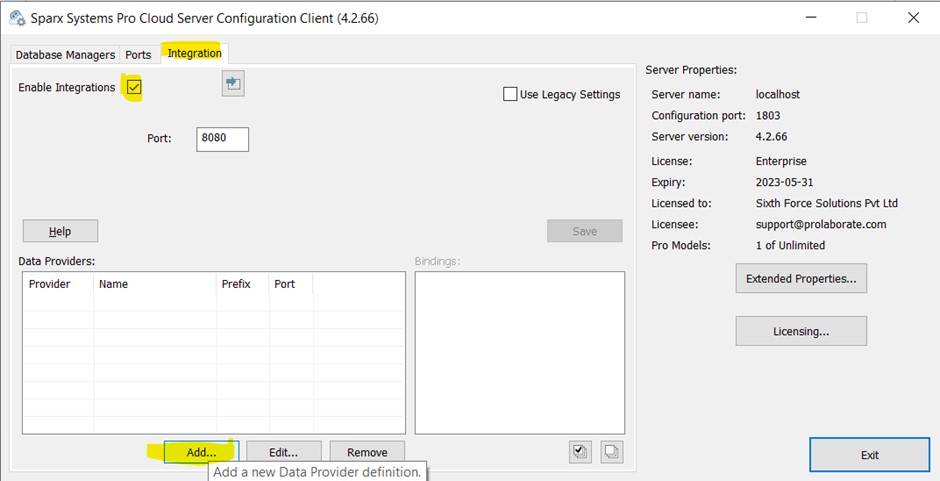
  4.  Check ‘Enabled’ option
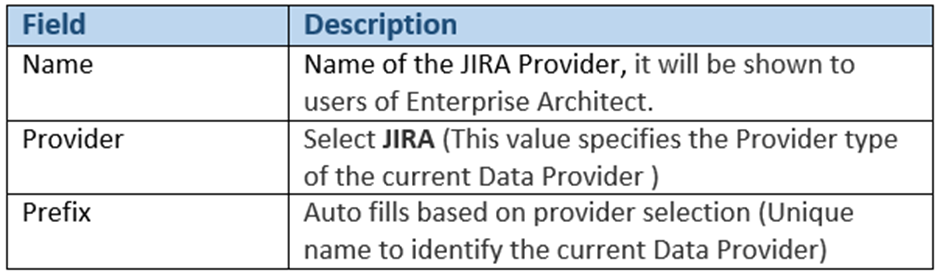
  5.  Type the name for the provider (For ex: ServiceNow) in the field.
  6.  Select ServiceNow in the provider drop down box
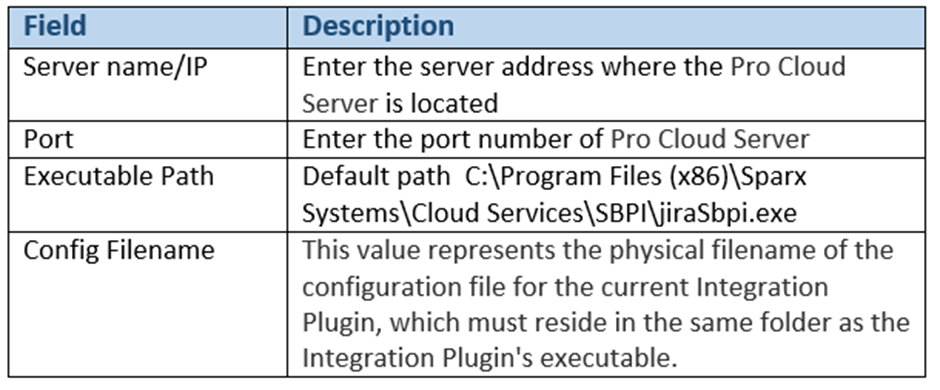
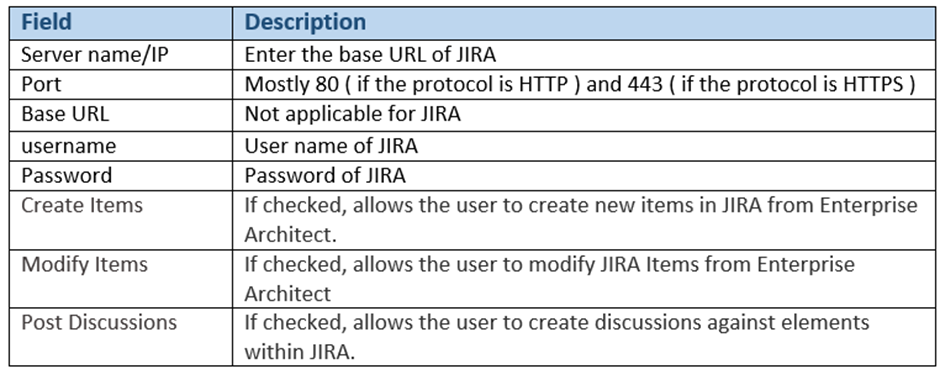
  7.  In the ‘Server Name/IP’ field, type the server name or IP address that the ServiceNow Plug-in will use to communicate with ServiceNow
  8.  In the port field Enter “443”
  9.  In User Name field and Password enter the given credentials, (Under provider Server)
  10. If needed, select the check box create items and modify items to create elements and modify
  11.  Leave the check box ignore SSL Errors
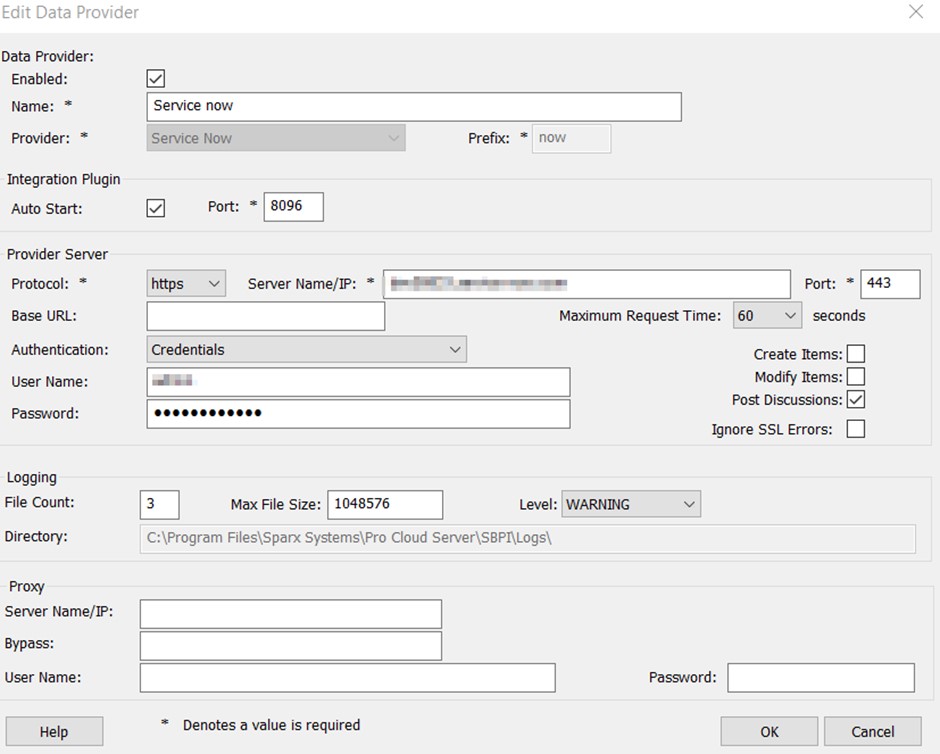
  12.  You can ignore other options and once you have finished. Click the “OK” button, which redirects to the Integration tab.
  13. The ServiceNow Data Provider will be active, you must bound it to the Db by checking the check box or you can select all checkbox by selecting this option.
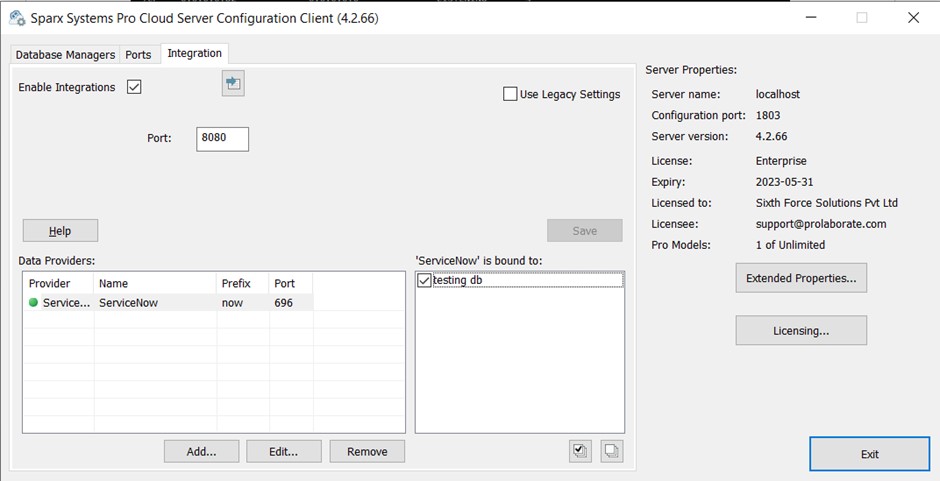
  14.  Once you have selected, you must restart the PCS by heading to the task manager, click on the services tab and restart “Sparx Systems Professional Cloud”.

Further Information

Please contact us or write an email to info@sparxsystems.in to have a live demo about the new EA 16 features and capabilities.

Integrations

Enterprise Architect Jira Integration

Sparx Enterprise Architect now allows integration of data from a variety of third-party providers into an Enterprise Architect model. This article explains the configuration and possible ways to integrate Jira with the enterprise architect model.

Jira Integration can be done in two ways

  • Creating Virtual links between Enterprise Architect and Jira using Prolaborate
  • Importing Data and synchronizing between Jira and Enterprise Architect model using Pro Cloud Server

Creating Virtual links between Enterprise Architect and Jira using Prolaborate

You can now integrate Enterprise Architect with Jira through Prolaborate. Creating a two-way link between Enterprise Architect elements and Atlassian Jira items just got easier through Prolaborate. Prolaborate is a web collaboration platform for Enterprise Architect that makes model sharing simple, efficient and collaborative. Prolaborate lets end-users work on live EA diagrams and model information over an agile collaboration portal.

Key Features

  • Create Live links between Jira Items and Enterprise Architect Objects
  • Any Jira item from any of your Projects can be accessed
  • View details of Jira items inside Prolaborate
  • Visual Cues in diagrams for easy visualization and navigation for the items Linked with Jira

Refer to this article to learn more about Jira Integration using Prolaborate.

The workflows involved are

  1. Configure Jira Account
  2. Add Jira Attribute
  3. Add Jira Attribute to a Stereotype’s Form
  4. Link Jira issues to Enterprise Architect elements
  5. Preview Jira Items
  6. View Jira issue links from Enterprise Architect
  7. Manage Integrations
  8. Manage Integration Attributes

For detailed documentation refer Enterprise Architect Jira Integration through Prolaborate

Importing and Synchronizing Jira Data using Pro Cloud Server

One of the recent features in Sparx Pro cloud server is the ability to integrate Enterprise Architect model with external software like Jira. Linking and updating between Enterprise Architect items and Jira items made easier with the pro-cloud server integration.

Key Features

  • Import and export of Jira objects to connected Enterprise Architect model
  • Creating a link between Jira Objects and Enterprise Architect elements

Prerequisite

  • Enterprise Architect Corporate, Unified or Ultimate edition v14 or later
  • Pro Cloud Server licensed
  • Physical network access to a server hosting the external data
  • User credentials to access the external data

Mandatory Details:

  • Server name\IP address of Pro cloud Server ( same machine then localhost )
  • Port number of Pro cloud Server
  • Server name\IP address of Jira ( base URL )
  • Port number of Jira 80 ( if the protocol is HTTP ) and 443 ( if the protocol is HTTPS )
  • Credentials of Jira account

Configure Pro Cloud Server

The SBPI.exe application is the Integration Bridge between the Pro cloud server and Jira which is installed by default into pro cloud server installed folder. For each integration with third-party tools like Jira a data provider must be created in the Pro Cloud Client Configurations.

To Create Integration Bridge

The Integration tab in the Cloud Configuration Client allows the definition and maintenance of Integration Data Provider details.

Step 1: Configure SBPI with Cloud Model:

Open Pro Cloud Config Client -> Integrations (Tab Shown Below)

Click on Save to add the new Integration setting.

 Step 2: Create a data provider for Jira .

To communicate with an external application (like Jira) a data provider must be created in the pro-cloud Configuration.

Click on the Add. You will be taken to the Data Provider Page (refer below)

Configure Data Provider:

Configure Pro Cloud Server & Cloud Settings:

Configure Jira Account:

Click on Save to add the new data provider configuration.

Once done with the above configuration as shown in the above image, please make sure Sparx Systems Professional Cloud is restarted under services.

Integrating Jira and Enterprise Architect

To View Jira Items in Enterprise Architect

Navigate to Specialize Tab-> Integration (in tool section) Jira -> select a provider (Created Provider will be displayed) -> Jira Project -> Filters (favorites in Jira)

All the items labeled in the Favorite filters will be displayed below.

Any local Enterprise Architect elements that are linked to the Jira item will be shown as a child of the Jira item.

Import Jira Items in Enterprise Architect

Jira items can be directly created in Enterprise architect with the pro-cloud server integration.

To create a new element in the Enterprise Architect model from Jira:

  • Right-click on a Jira item in the list.

  •  Select Create Local Element                                                                                                                Click on create, to add the Jira item in Enterprise Architect. Once created (linked), the element will be displayed under the Jira Item

To Link Enterprise Architect Element with Jira Item

An existing element in Enterprise Architect can be linked to an existing item in the Jira by dragging the local element from the Project Browser and dropping it onto the Jira Item.

Export Enterprise Architect Elements to Jira

Pro cloud server integration for Jira even allows creating new Jira items from existing elements in the Enterprise Architect. Create Items must be enabled in the integration provider

  1. Select the local Enterprise Architect element (in the Project Browser).
  2. Browse the external provider and select the required destination location.
  3. In the External Data Menu, select ‘Create Linked Item’.

Synchronize changes from Jira in Enterprise Architect

If any of the Jira item has been modified since the items created or linked in enterprise architect an indicator will be displayed on top of the item’s icon.  Right-click on the linked Enterprise Architect element and select the ‘Pull – Update Local Element with External Data’ option. (Any existing changes in the Enterprise Architect element will be overwritten with Jira data)

Update Jira with changes from Enterprise Architect

If any of the local element has been modified since the items created or linked is an indicator will be displayed on top of the item’s icon.  Right-click on the linked Enterprise Architect element and select the ‘Push – Update External Item with Local Data’. (Any existing changes in the Jira Object will be overwritten with Enterprise Architect data)

For more details please contact info@sparxsystems.in 

IntegrationsSparx Systems Enterprise Architect

Enterprise Architect Export Excel

Enterprise Architect Excel Exporter allows users to export Model information as Excel documents.

Excel Exporter can be used to publish elements, connectors, tagged values, test cases, scenarios and various other model information, into Excel spreadsheets, for easy review and updates by the wider team.

Steps to Export EA Model Information to Excel:

Step 1: Select the EA Model that contains the information to be exported.

Step 2: Create/Choose the Specification for the EA Model to be exported.

Step 3:Create/Choose the Output document to be exported.

Step 4:Select the Worksheet from the output document to be exported.

Step 5:Generate the model elements in Enterprise Architect to Export the document.

Export Excel Profile

To Export data from  EA Model, choose ‘Export to Excel’. The following dialog appears,

Select highlighted icon to create a new profile,

Home Tab

home-tab

home-tab2

Mandatory Mappings:

  • Specify document to Export (Can use existing document or create new Excel document) using two nearby button icon.
  • Select the concerned work sheet from the dropdown or create a “New Work Sheet”

Optional Mappings:

  • Generate Headers: Select this option to Export properties along with column name.
  • Include Synchronization Information: Select this to Export Unique (GUID) information for every Object and Classifiers (Attributes and Methods).
  • Include Diagram Elements in Report: Select this and also select the appropriate diagram type’s in Diagram Tab, this will leads to include the element in the export from external Packages that are referenced in a diagram under each package.
  • Write Log File: It maintain, every Object Export Status.

Note: User can also export the data through unsaved profiles

Elements Tab

elements-tab

Model Data to be exported: All the properties are selected by default. User can,

  • Select/Unselect the properties.
  • Defined Tag Properties globally.
  • Create Custom Tag using “Add Custom Tag” button.

Types to be chosen for Exporting: All the Object types will be selected by default. User can,

  • Arrange the Order of export.
  • Select/Unselect the Object Types.

Note: Should select minimum one object type and Object properties to Export.

Stereotype to Export: Specifying stereotype filters the exporting elements.

  • All: Exports all the elements under the selected Object from Enterprise Architect.
  • Non-Stereotype: Objects without stereotypes are exported.
  • Specify Stereotype in CSV Format: User can define multiple stereotypes in CSV Format; the exporting objects must contain these stereotypes.
  • Prompt during Export: While starting Export, its pop-up the dialog, that shows all the stereotypes under the selected node from Enterprise Architect.
Attributes Tab

attributes-tab

Selecting “Include Attributes” will enable “Export Settings” group.

Must select separate worksheet or choose to export in the Main Worksheet.

Select the attribute properties to export. Users can also define “Custom Tag” to include any additional tagged values defined in the model.

Methods Tab

methods-tab

Selecting “Include Method” will enable “Export Settings” group.

Must select separate worksheet or in Main Worksheet and select minimum one Method property to export. It also loads Global Tag, we can define “Custom Tag” also.

Test Scripts Tab

test-scripts-tab

Selecting “Include TestScript” will enable “Export Settings” group.

Must select separate worksheet or in Main Worksheet and select minimum one TestScript property to export.

Glossary Tab

glossary-tab

Selecting “Include Glossary” will enable “Export Settings” group.

Select Worksheet to export Glossary and also select minimum one property to export.

Diagram Type Tab

diagram-type-tab

It is used to export all the objects available in diagram, irrespective of objects available under selected node. We must select “Include Diagram Elements in Report” in Home Tab and also select suitable diagram type to export the objects.

Connector Tab

connector-tab

Context End: Used to define the settings of one end of connector.

  • Column Name: The name is connector column name, which will be displayed in the generated Excel document.
  • Context End: Select the element type for one end of the connector.
  • Delimited By: Exporting the Object Name into the corresponding Connector Column in Excel should be separated by this delimited value.

Other End: Used to define the settings of another end of the connector,

  • Type: Select the element type for another end of connector.
  • Stereotype: It defines the stereotype for the other end of the connector.it support CSV Format.it filter out the connector to Export.
  • Value: It used to search, that which type of the property should match the connectors that needs to be exported.

Connector: Used to define connector settings,

  • Direction: Specify direction of the connector.
  • Stereotype: It defines connector Stereotypes
  • Type: It defines type of Connector

Note: Except Stereotype input, all other inputs are mandatory!!!

Export Process

While selecting Export button, two options will be displayed.

  • To Local System: Allows user to export document to the local system.
  • To SharePoint: Allows user to export document to the SharePoint folder. For more information regarding SharePoint export, refer “C:\ProgramData\MDG Integration for Microsoft Office\Help Document\UserGuide\index.html”

It gives a pop-up, like

confirm-export

Prompt during Export option, will prompt here, it shows all the object stereotypes available under selected Node from Enterprise Architect

select-export

Select Export, to export non-stereotyped Object.


Exported Document

  • Elements are exported with GUID information.

exported-in-guid-information

  • Attributes are exported with GUID information and parent object information under “GUID” and “ELEMENT NAME” column, respectively, which is highlighted.

methods-are-exported-as-guid-information-1

  • Methods are exported with GUID information and parent object information under “GUID” and “ELEMENT NAME” column, respectively, which is highlighted.

exported-with-parent-object-informaton-1

  • TestScripts are exported with Parent object information in “ELEMENT NAME” column, which is highlighted.
  • Glossary Exported with Term, Type and Meaning column. It is Model defined.glossary-exported-with-term
  • Connector Column Exported.
  • export-column-exported
  • Scenarios are exported with GUID information and parent object information under “GUID” and “ELEMENT NAME” column, respectively, which is highlighted.
  • Constraints are exported with Parent object information in “ELEMENT NAME” column, which is highlighted.constraints-are-exported
  • Export profile haswant-to-export-connector
    Description: Want to export Connector Other end Name. It has to filter out the connector ends while exporting,

    • Source and Destination are Usecase type.
    • Connector Type should be “Dependency”.
    • Connector Direction should be “Incoming”.

    Comparing results,

    • “Login” has Incoming Connector from “Create Account” of “Dependency” Type.
    • “View Account Details” has Incoming Connector from “Close Account” of “Dependency” Type.
    • “Close Account” has Incoming Connector from “Delete User” of “Dependency” Type.

    Connector Other End names are exported successfully!

    Above, section Examine Overall Export Process.


IntegrationsSparx Systems Enterprise Architect

Publish model contents to PowerPoint presentations

PowerPoint integration provides easy access to Enterprise Architect’s model within PowerPoint presentations. Insert diagrams and elements from the Enterprise Architect model in PowerPoint slides with references. These diagrams and elements can be synchronized anytime to reflect the latest snapshot from the model!

Prerequisites

  • MDG Integration for Microsoft Office

Key Features

  • Insert Packages, Elements, and Diagrams details directly from the Enterprise Architect repository by double-clicking or drag and drop.
  • Ensure the presentation stays current with the latest model from Enterprise Architect.

Functions

  • Packages, Elements, and Diagram names can be inserted.
  • Child Packages and Child Elements details can be inserted in a table format.
  • Relationship details can be inserted in a table format.
  • Diagrams can be inserted.

To publish content in PowerPoint

1. After the installation of MDG Office Integration ( Inbuilt with EA Ultimate Edition ), Open a PowerPoint presentation and you can find a new ribbon named Enterprise Architect as shown below

Image -Power point Presentation

2. Connect to an Enterprise Architect model – Both EAP files and database models can be selected. (If the model contains security, then the Enterprise Architect login credential’s dialog will be shown)

3. After successfully connecting to the Enterprise Architect repository, Enterprise Architect’s Project Browser will be displayed in the Powerpoint as below with the connected repository objects.

Image 2 Use Case Model in Project Browser

4. Objects can be easily inserted into Powerpoint by Dragging and Dropping or by Double Clicking the elements from the project browser.

  • Insert options may differ based on the items.
  • For Packages, it will display as below.

For example, if we double click the Manage Users package and selected Text, then the output will be like below

Figure 3 - Manage Users Package

Figure 4 Manage Users

  • Text – Drop the Package Name as Text
  • Details In Table – Drops the details of child elements in table format

For example, if we double click the Manage Users package and select details in the table, then the output will be like below

Figure 5 - Select type - Manage Users

Figure 6 - Login Creation

  • Include Sub Package – If checked, will add all child packages recursively.
  • Include Sub Elements – If checked, will add all child elements recursively.
  • Relationships – Drop the links of the selected package in table format.

C.     For Elements, the below wizard will be displayed.

Figure 7 Include Sub Package Sub elements

  • Text – Drop the Element Name as Text
  • Details In Table – Drops the details of its child elements in table format

For example, if we double click the Login from Manage Users package and select details in the table, then the output will be like the below.

Figure 8 Output window for Login from manage Users Package

Figure 9 - Window

  • Include Sub Package – Will be disabled ( Package won’t exist under an Element )
  • Include Sub Element – If checked, will allow dumping all the child elements recursively.
  • Relationships – Drop the link details of the selected element in table format

For example, if we double click the Login from the Manage Users package and select relationships, then the output will be like below

Figure 10 Select type - Relationships

Figure 11 -

d. For Diagrams, the below wizard will be displayed

Figure 13

  • Text – Drop the Diagram Name as Text
  • Diagram Image – Add a Diagram image to the slide.

For example, if we double click the Manage Users diagram from Manage Users and select the diagram image, then the output will be like below

Figure 15

  • Relationships – Used to drop the link details of the selected element in table format. It will list all the elements that are connected with the selected element.

Synchronization:

  • All the Items which are inserted from the repository can be updated in PowerPoint using a single click (Sync with Model).
  • In the Below diagram, have inserted the Package name and diagram into PowerPoint from the EAExample repository.

Sample Diagram: (Before Sync)

Figure 16

Sample Package Contents: (Before Sync)

Figure 17

  • In the future, if the details in the repository have changed, those changes can be synchronized in PowerPoint by just connecting the repository.

For example, in the diagram repositioned all the objects and in the table, contents have added alias for all the objects in enterprise architect. After all the changes in EA, I just connected the model in PowerPoint and used Sync with Model option and the sync will be started (refer below diagram).

Figure 18

  • After the items get synchronized, the PowerPoint contents will be updated with the details from the latest repository.

Sample Diagram: (After Sync)

Figure 19

Sample Package Contents: (After Sync)

Figure 20

Further Information
Please contact us or write an email to info@sparxsystems.in to have a live demo of the new EA 16 features and capabilities.