


Enterprise Architect 16 Menus and Shortcuts – A Detailed Comparison to EA 14 and EA 15
Sparx Systems has recently released its latest version of Enterprise Architect 16. Sparx Systems have added various new features in this version. Here is a guide with a list of menus frequently used by EA practitioners. This ultimate guide focuses highly on how to access those frequently used options from menu bars along with some shortcuts. Since there are many changes in menus for frequently used options like Report Generation, Model Exchange, Element Properties, and others.
The below table shows the full comparison between Enterprise Architect versions 14, 15, and 16.
|
Enterprise Architect Features |
Versions |
||
|
Enterprise Architect 14 |
Enterprise Architect 15 |
Enterprise Architect 16 |
|
|
Start Page |
|||
|
Model Wizard (Ctrl+ Shift +M) |
Design | Package | Insert | Insert using Model Wizard Right-click on Package | Add a Model using Wizard Project Browser caption bar menu | New Model from Pattern |
Design | Model | Add | Model Wizard Right-click on Package | Add a Model using Wizard Project Browser caption bar menu | New Model from Pattern |
Design | Package | Model Wizard Right-click on Package | Add a Model using Wizard Project Browser caption bar menu | New Model from Pattern Start | All Windows | Design | New Model from Pattern Start Page | Create from Pattern |
|
Process Guidance |
Model Wizard (Ctrl + Shift + M) | Process Guidance |
Model Wizard (Ctrl + Shift + M) | Process Guidance |
Start Page | Guidance Model Wizard (Ctrl + Shift + M) | Guidance |
|
File – Save as type |
*.eap, *.eapx, *.feap |
*.eap, *.eapx, *.feap |
*.qea, *.qeax, *.eap, *.eapx, *.feap, *.eadb |
|
Start |
|||
|
Project Browser |
Start | Browse | Project Browser |
Start | Desktop | Design | Browser Explore | Portals | Windows | Project Browser Ctrl+1 |
Start | All Windows | Design |Browser Start | Explore | Portals | Windows | Explore | Project Browser Ctrl+1 |
|
Context Browser |
Start | Browse | Context Browser |
Start | Desktop | Design | Browser | Context Explore | Portals | Windows | Explore | Context Browser |
Start | All Windows | Design | Browser | Context Start | Explore | Portals | Windows | Explore | Context Browser |
|
Diagram Browser |
NA |
Start | Desktop | Design | Browser | Diagram Explore | Portals | Windows | Project Browser | Diagram |
Start | All Windows | Design | Browser | Diagram Start | Explore | Portals | Windows | Project Browser | Diagram |
|
Element Browser |
Start | Browse | Element Browser |
Design | Element | Editors | Element Browser |
Start | All Windows | Properties | Element Browser |
|
Preferences / Settings |
Start | Preferences Ctrl+F9 |
Start |Preferences | Preferences Ctrl+F9 |
Start | Appearance | Preferences | Preferences Ctrl+F9 |
|
Menu Customize |
Start | Visual Style | Customize |
Start | Desktop | Preferences | Other Options |
Start | Appearance | Preferences | Other Options |
|
Summary |
Start | Properties | Summary |
Start | Desktop | Design | Details | Summary |
Start | All Windows | Design | Summary |
|
Resources |
Start | Browse | Resources |
Start | Desktop | Share | Publish | Resources |
Start | All Windows | Design | Browser |Resource Start | Explore | Portals | Windows | Explore | Resource |
|
Notes (Ctrl + Shift + 1) |
Start | Properties | Notes |
Start | Desktop | Design | Common | Notes |
Start | All Windows | Design | Notes |
|
Tagged Values (Ctrl + Shift + 6) |
Start | Properties | Tagged Values |
Design | Element | Editors | Properties | Tags Start | Desktop | Design | Details | Properties (Tags Tab) |
Start | All Windows | Properties | Tagged Values |
|
Relationships |
Start | Trace | Relationships |
Start | Desktop | Design | Details | Relationships |
Start | All Windows | Properties | Relations |
|
Element Properties (Alt + 1) |
Start | Properties |
Start | Desktop | Design | Details | Properties |
Start | All Windows | Properties | Properties Start | All Windows | Properties | Properties Dialog |
|
Find in Project (Ctrl + f) |
Start | Search | Model |
Start | Explore | Search | Model |
Start | Explore | Search | Model |
|
Workspace |
Start | Workspace |
Start | Explore | Workspace |
Start | All Windows | Workspace |
|
Visual Style |
Start | Visual Style |
Start | Desktop | Visual Style |
Start | Appearance | Visual Style |
|
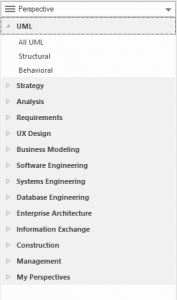
Perspective |
Start | Perspective |
Start | Portals | Perspective |
Start |Explore | Portals | Perspective |
|
View |
NA |
NA |
Start | Appearance | View |
|
Scriptlet |
NA |
NA |
Start | Explore | Portals | Perspective | Construction | Scriptlets Toolbox | Dynamic Viewpoints | Scriptlet |
|
Grid-Style Diagram |
NA |
NA |
Start | All Windows | Properties | Enable Grid Style (Appearance) |
|
Design |
|||
|
Traceability |
Design | Impact | Traceability |
Design | Impact | Trace | Traceability |
Design | Impact Analysis | Trace | Traceability |
|
Relationship Matrix |
Design | Impact | Relationship Matrix |
Design | Impact | Matrix | Relationship Matrix |
Design | Impact Analysis | Package/Matrix | Relationship Matrix |
|
Gap Analysis Matrix |
Design | Impact | Gap Analysis Matrix |
Design | Impact | Gap Analysis | Gap Analysis Matrix |
Design | Impact Analysis | Gap Analysis | Gap Analysis Matrix |
|
Toolbox |
Design | Toolbox |
Design | Diagram | Toolbox |
Design | Diagram | Toolbox Start | All Windows | Design | Toolbox |
|
Change Diagram Type |
Design | Diagram | Edit | Change Type |
Design | Diagram | Manage | |
Design | Diagram | Options | Change Type |
|
Specification View |
Design | Specification |
Design | Model | Specification Manager |
Design | Package | Specification View |
|
List View |
Design | List Design | View as | List |
Design | Model | ListView Design | Diagram | View as | List |
Design | Package | List View Design | Diagram | Views | List |
|
Gantt View |
Design | Gantt Design | View as | Gantt |
Design | Model | Gantt Design | Diagram | View as | Gantt View |
Design | Package | Gantt View Design | Diagram | Views | Gantt View |
|
Change Element Type |
Design |Element | Edit | Change Type |
Design | Element | Manage | Advanced | Change Type |
Design | Element | Manage | Change Type |
|
Auto Reload Changed Diagrams |
NA |
NA |
Design | Diagram | Options | Auto Reload Changed Diagrams |
|
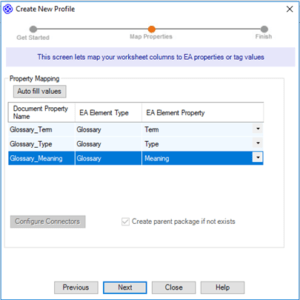
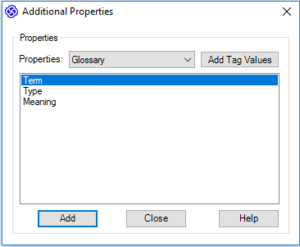
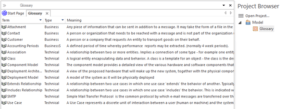
Glossary |
Publish | Glossary |
Publish | Dictionary | Glossary |
Design | Dictionary | Glossary |
|
Layout |
|||
|
Diagram Layout |
Layout | Tools | Diagram Layout |
Layout | Tools | Diagram Layout |
Layout | Tools | Diagram Layout |
|
Pan and Zoom |
Layout | Pan, and Zoom |
Layout | Tools | Pan, and Zoom |
Layout | Tools | Pan and Zoom |
|
Diagram Filter |
Layout | Tools | Diagram Filters |
Layout | Tools | Filters and Layers |
Layout | Tools | Filters and Layers |
|
Auto Refresh |
NA |
NA |
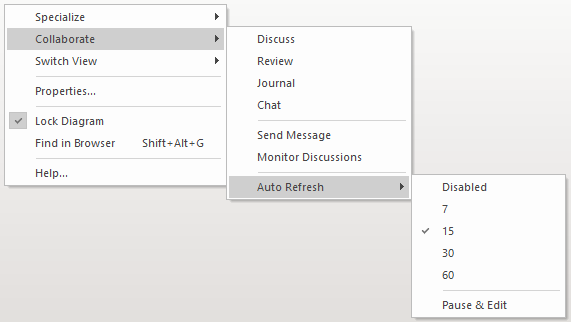
Layout | Auto Refresh | Auto Refresh Right-click on diagram background | Collaborate | Auto Refresh |
|
Publish |
|||
|
Export XMI |
Publish | Export XMI |
Publish | Model Exchange | Export-XMI |
Publish | Model Exchange | Export Package | Export Current Package to Native/XMI File |
|
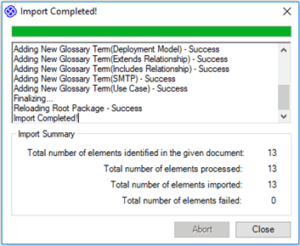
Import XMI |
Publish | Import XMI |
Publish | Model Exchange | Import-XMI |
Publish | Model Exchange | Import Package | Import Package from Native/XMI File |
|
Configure (Settings EA 16) |
|||
|
Project Options |
Configure | Options |
Configure | Model | Options |
Settings | Model | Options |
|
UML Types (Stereotypes / Tagged Values / Cardinality Values) |
Configure | UML Types |
Configure | Reference Data | UML Types |
Settings | Reference Data | UML Types |
|
Project Types |
Configure | Project Types |
Configure | Reference Data | Model Types |
Settings | Reference Data | Model Types |
|
Database Datatypes |
Configure | Settings | Database Datatypes |
Configure | Reference Data | Settings | Database Datatypes |
Settings | Reference Data | Settings | Database Datatypes |
|
Namespace Roots |
Configure | Settings | Namespace Roots |
Configure | Reference Data | Settings | Namespace Roots |
Settings | Reference Data | Settings | Namespace Roots |
|
Preprocessor Macros |
Configure | Settings | Preprocessor Macros |
Configure | Reference Data | Settings | Preprocessor Macros |
Settings | Reference Data | Settings | Preprocessor Macros |
|
Manage Security |
Configure | Administer |
Configure | Security | Administer |
Settings | Security | Administer |
|
Project Transfer |
Configure | Transfer | Project Transfer |
Configure | Model | Transfer | Project Transfer |
Settings | Model | Transfer | Project Transfer |
|
EAP/EAPX Project Transfer |
NA |
NA |
Settings | Model | Transfer | EAP/EAPX Project Transfer |
|
EAP To QEA Project Transfer |
NA |
NA |
Settings | Model | Transfer | EAP To QEA Project Transfer |
|
EAP Replication |
Configure | Model | Integrity Check| Manage .EAPX/.EAP file | Create New Replica |
Configure | Model | Integrity | Manage.EAPX/.EAP file | Create New Replica |
Settings | Model | Transfer | EAP Replication |
|
QEA Replication |
NA |
NA |
Settings | Model | Transfer | QEA Replication |
|
Export Reference Data |
Configure | Transfer | Export Reference Data |
Configure | Model | Transfer | Export Reference Data |
Settings | Model | Transfer | Export Reference Data |
|
Import Reference Data |
Configure | Transfer | Import Reference Data |
Configure | Model | Transfer | Import Reference Data |
Settings | Model | Transfer | Import Reference Data |
|
Enable Audit |
Configure | Auditing |
Configure | Model | Auditing |
Settings | Model | Auditing |
|
Project Integrity |
Configure | Integrity Check | Project Integrity |
Configure | Model | Integrity | Project Integrity |
Settings | Model | Integrity | Project Integrity |
|
Reset ID |
Configure | Integrity Check | Reset IDs |
Configure | Model | Integrity | Reset IDs |
Settings | Model | Integrity | Reset IDs |
|
Repair .EAPX/.EAP File |
Configure | Integrity Check | Manage .EAPX/.EAP file | Repair .EAPX/.EAP file |
Configure | Model | Integrity | Manage .EAPX/.EAP file | Repair .EAPX/.EAP file |
Settings | Model | Integrity | Manage .EAPX/.EAP File | Repair .EAPX/.EAP File |
|
Compact .EAPX/.EAP File |
Configure | Integrity Check | Manage .EAPX/.EAP file | Compact |
Configure | Model | Integrity| Manage .EAPX/.EAP file | Compact .EAPX/.EAP file |
Settings | Model | Integrity | Manage .EAPX/.EAP File | Compact.EAPX/.EAP File |
|
Update .EAPX/.EAP File Indexes |
Configure | Integrity Check | Manage .EAPX/.EAP file | Update .EAPX/.EAP file Indexes |
Configure | Model | Integrity | Manage .EAPX/.EAP file | Update .EAPX/.EAP file Indexes |
Settings | Model | Integrity | Manage .EAPX/.EAP File | Update.EAPX/.EAP File Indexes |
|
Construct |
|||
|
Discussion |
Start | Discussions |
Start | Collaborate | Discussions |
Start | Collaborate | Discuss |
|
Team Review |
Start | Reviews |
Start | Collaborate | Reviews |
Start | Collaborate | Review |
|
Resource Allocation |
Construct | Resources |
Construct | Resource Management | Resources |
Construct | Resource Management | Resources |
|
Develop |
|||
|
Code Templates |
Code | Options | Edit Code Templates |
Develop | Preference | Options | Edit Code Templates |
Develop | Source Code | Options | Edit Code Templates |
|
Code Engineering Datatypes |
Code | Options | Configure Code Engineering Datatypes Or Configure | Settings | Database Datatypes |
Develop | Options | Preference | Configure Code Engineering Datatypes |
Develop | Source Code | Options | Configure Code Engineering Datatypes |
|
Import Source Code |
Code | File | Import |
Develop | Source Code | Files | Import Source Directory |
Develop | Source Code | Files | Import Source Directory |
|
Specialize |
|||
|
Manage Add-ins |
Specialize | Add-Ins | Manage |
Specialize | Add-Ins | Manage – Addin |
Specialize | Add-Ins | Manage – Addin |
|
PCS Integrations |
Specialize | Tools |integrations | Open External Data |
Specialize | Tools | Systems integrations |Open External Data |
Specialize | Tools | Systems integrations |Open External Data |
|
Import MDG Technology |
Specialize | Technologies | Publish | Import MDG Technology |
Specialize | Technologies | Publish-Tech |
Specialize |Technologies | Publish-Tech Resources | MDG Technologies | Model Technologies | Right Click | Import Technology |
|
Generate MDG Technology |
Specialize | Technologies | Publish | Generate MDG Technology |
Specialize | Technologies | Publish-Tech | Generate MDG Technology |
Specialize | Technologies | Publish-Tech | Generate MDG Technology |
|
Scripting |
Specialize | Tools | Scripting |
Specialize | Tools | Script Library |
Specialize | Tools | Script Library |
|
Manage Technology |
Specialize | Technologies | Manage |
Specialize | Technologies | Manage-Tech |
Specialize | Technologies | Manage-Tech |
|
Others |
|||
|
Linked Document |
Start | Properties | Linked Document |
Start | Desktop | Design | Details | Document |
Start | All Windows | Design | Document |
|
Apply Auto Naming to Elements |
Design | Edit | Package | |
Design | Model | Manage | Options | Auto Naming |
Design | Package | Manage | Auto Naming |
|
Turn on Level Numbering |
Design | Edit | Package | |
Design | Model | Manage | Level Numbering |
Design | Package | Manage | Level Numbering |
|
Package Baseline – New |
Design | Edit | Package | |
Design | Model | Manage | Manage |
Design | Package | Manage | Manage Baselines |
|
Package Control |
Publish | Package Control |Configure |
Publish | Model Exchange | Package Control | Package Configure |
Publish | Model Exchange | Package Control | Package Control |
|
Generate Source Code |
Code | Generate |
Develop | Source Code | Generate |
Develop | Source Code | Generate |
|
Project Browser Search |
Project Browser | Hamburger Icon | |
Project Browser | Hamburger Icon | |
Project Browser | Hamburger Icon | |
|
Document Generation |
Publish | Documentation | Generate Rich Text Documentation Project Browser | Hamburger Icon | |
Publish | Model Reports | Report Builder | Generate Documentation Project Browser | Hamburger Icon | Documentation | Generate Documentation (RTF/PDF/DOCX) |
Publish | Model Reports | Report Builder | Generate Documentation Project Browser | Hamburger Icon | Documentation | Generate Documentation (RTF/PDF/DOCX) Start | All Windows | Publish | Generate Package Report |
|
Diagram Properties Dock |
Start | Properties |
Start | Desktop | Design | Properties |
Start | All Windows | Properties | Properties |
|
Context Browser |
Start | Browse | Context Browser |
Start | Desktop | Design | Browser | Context Explore | Portals | Windows | Explore | Context Browser |
Start | All Windows | Design | Browser | Context Start | Explore | Portals | Windows | Explore | Context Browser |
|
Inline Specification |
Design | View As | Toggle Inline Specification View |
Design | Diagram | View As | Inline Specification View |
Design | Diagram | Views | Inline Specification |
Commonly Used Ribbon Updates in Enterprise Architect 16
Sparx provides Quick Access Panels in Enterprise Architect 16 to make it easier to choose and access a window.
Design: Contains lists of windows for browsing the structure and content of the model (Alt + 1).

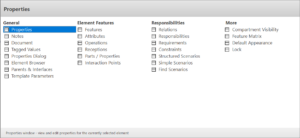
Properties: Contains a list of windows of Elements tools (Alt + 2).
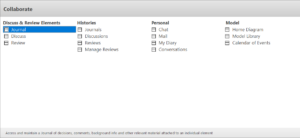
Collaborate: Contains lists of windows for performing discussions, reviews, and collaborations (Alt + 3).
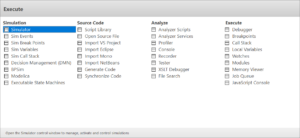
Execute: Contains lists of windows for performing execution analysis, profiling, simulation, scripting, and debugging (Alt + 4).
Construct: Contains a list of windows for all project management transactions (Alt + 5).

Publish: Contains lists of windows for report generator and model exchange (Alt + 6).

Further Information
Please contact us or write an email to info@sparxsystems.in to have a live demo about the new EA 16 features and capabilities.