


Enterprise Architect Jira Integration
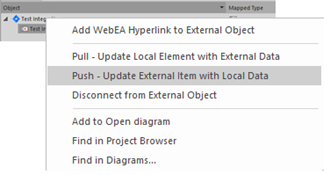
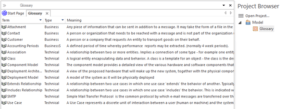
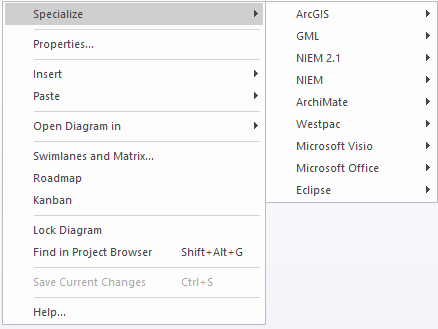
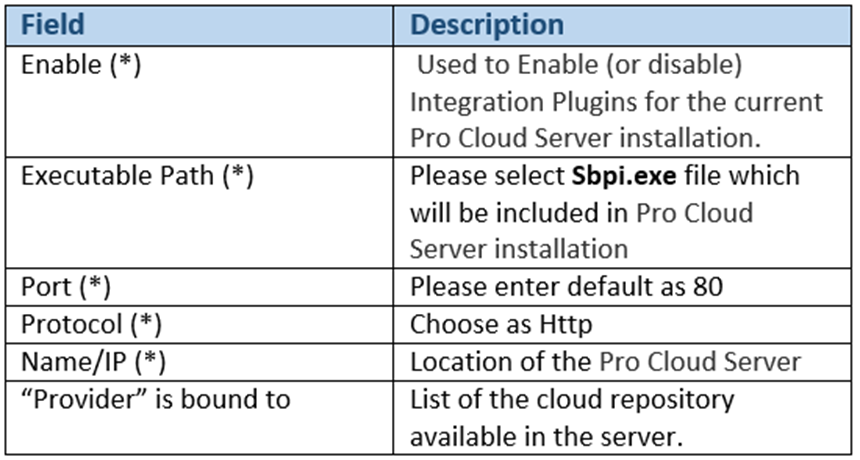
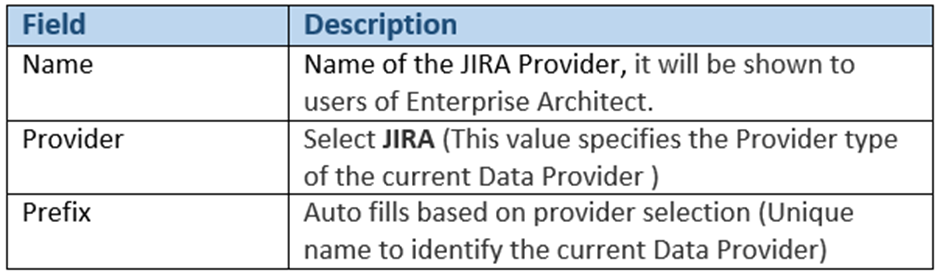
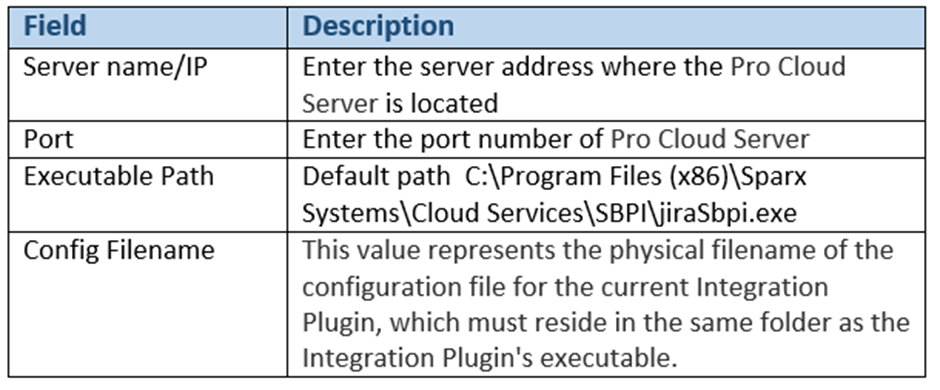
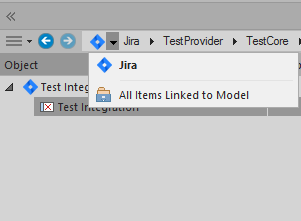
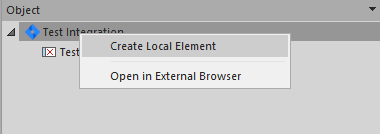
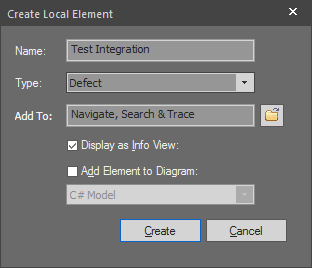
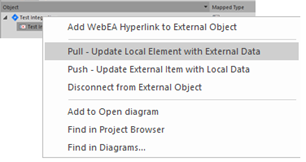
Sparx Enterprise Architect now allows integration of data from a variety of third-party providers into an Enterprise Architect model. This article explains the configuration and possible ways to integrate Jira with the enterprise architect model. Jira Integration can be done in two ways You can now integrate Enterprise Architect with Jira through Prolaborate. Creating a two-way link between Enterprise Architect elements and Atlassian Jira items just got easier through Prolaborate. Prolaborate is a web collaboration platform for Enterprise Architect that makes model sharing simple, efficient and collaborative. Prolaborate lets end-users work on live EA diagrams and model information over an agile collaboration portal. Refer to this article to learn more about Jira Integration using Prolaborate. The workflows involved are For detailed documentation refer Enterprise Architect Jira Integration through Prolaborate One of the recent features in Sparx Pro cloud server is the ability to integrate Enterprise Architect model with external software like Jira. Linking and updating between Enterprise Architect items and Jira items made easier with the pro-cloud server integration. The SBPI.exe application is the Integration Bridge between the Pro cloud server and Jira which is installed by default into pro cloud server installed folder. For each integration with third-party tools like Jira a data provider must be created in the Pro Cloud Client Configurations. The Integration tab in the Cloud Configuration Client allows the definition and maintenance of Integration Data Provider details. Step 1: Configure SBPI with Cloud Model: Open Pro Cloud Config Client -> Integrations (Tab Shown Below) Click on Save to add the new Integration setting. Step 2: Create a data provider for Jira . To communicate with an external application (like Jira) a data provider must be created in the pro-cloud Configuration. Click on the Add. You will be taken to the Data Provider Page (refer below) Click on Save to add the new data provider configuration. Once done with the above configuration as shown in the above image, please make sure Sparx Systems Professional Cloud is restarted under services. Navigate to Specialize Tab-> Integration (in tool section) Jira -> select a provider (Created Provider will be displayed) -> Jira Project -> Filters (favorites in Jira) All the items labeled in the Favorite filters will be displayed below. Any local Enterprise Architect elements that are linked to the Jira item will be shown as a child of the Jira item. Jira items can be directly created in Enterprise architect with the pro-cloud server integration. To create a new element in the Enterprise Architect model from Jira: An existing element in Enterprise Architect can be linked to an existing item in the Jira by dragging the local element from the Project Browser and dropping it onto the Jira Item. Pro cloud server integration for Jira even allows creating new Jira items from existing elements in the Enterprise Architect. Create Items must be enabled in the integration provider If any of the Jira item has been modified since the items created or linked in enterprise architect an indicator will be displayed on top of the item’s icon. Right-click on the linked Enterprise Architect element and select the ‘Pull – Update Local Element with External Data’ option. (Any existing changes in the Enterprise Architect element will be overwritten with Jira data) If any of the local element has been modified since the items created or linked is an indicator will be displayed on top of the item’s icon. Right-click on the linked Enterprise Architect element and select the ‘Push – Update External Item with Local Data’. (Any existing changes in the Jira Object will be overwritten with Enterprise Architect data) For more details please contact info@sparxsystems.in
Creating Virtual links between Enterprise Architect and Jira using Prolaborate
Key Features
Importing and Synchronizing Jira Data using Pro Cloud Server
Key Features
Prerequisite
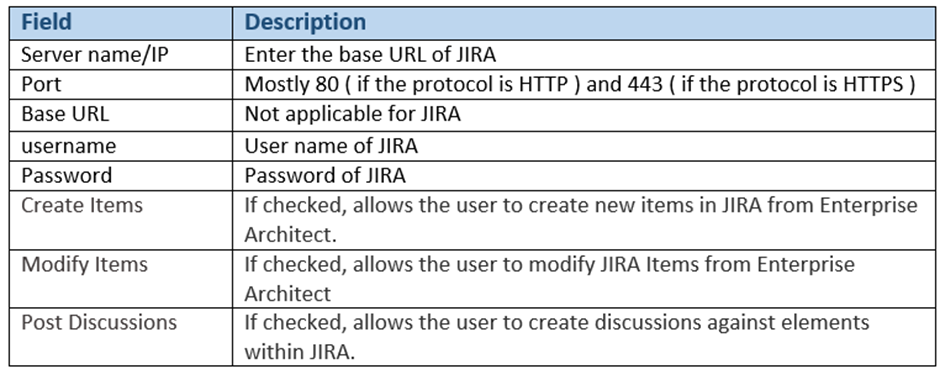
Mandatory Details:
Configure Pro Cloud Server
To Create Integration Bridge


Configure Data Provider:
Configure Pro Cloud Server & Cloud Settings:
Configure Jira Account:
Integrating Jira and Enterprise Architect
To View Jira Items in Enterprise Architect
![]()
![]()
Import Jira Items in Enterprise Architect
To Link Enterprise Architect Element with Jira Item
Export Enterprise Architect Elements to Jira
Synchronize changes from Jira in Enterprise Architect
Update Jira with changes from Enterprise Architect