S
p
a
r
x
S
y
s
t
e
m
s
I
n
d
i
a

Contacts

No 58A, New No 73,
Thirumangalam Road,
Villivakkam,
Chennai-600 049

info@sparxsystems.in

Sparx Systems Enterprise Architect 16

Strengthen Live Traceability with Enterprise Architect’s new Jama Integration.

Sparx Enterprise Architect can be used to capture business requirements, develop and manage all subsequent models, algorithms, process flows and workflows, design business data objects, and create other artifacts. 

The capacity to connect the components of all models to one another is the key strength of Sparx system’s Enterprise Architect, the more time analysts and designers spend in creating attractive, well specified models, the greater the potential future benefit from any further changes to the systems. 

Jama Integration with Sparx Enterprise Architect

  • Jama Connect is a cutting-edge, team-based system for managing requirements and tests. It helps engineering, and software development teams to keep updated (in real-time) about their requirements and test plans throughout the course of a project.
  • Jama integration through Pro cloud server is an amazing feature offered by Sparx Enterprise Architect.
  • The seamless integration offers real-time synchronous access to the Enterprise Architect repositories. From any location in the world, users can work on the same model concurrently.

Key highlights of the Sparx Enterprise Architect integration with Jama

  • Teams may connect Jama Connect with their ALM, PLM, development, and QA tools using Sparx Enterprise Architect.
  • Connect with resources like QATest or Microsoft Project.
  • Requirements and test cases between Jama Connect and Sparx Enterprise architect can be seamlessly synchronized between tools.
  • Enhance collaboration, visibility, and traceability across your organization.
  • Architect teams adopting a Model-Based Systems Engineering (MBSE) methodology can preserve Live Traceability inside Jama Connect while being integrated into another best-of-breed solution.

New Enhancements in Jama Integration with Sparx Enterprise Architect 16

  • Enhanced Type and Field Mapping in System Integration.
  • Optimized loading time of System Integration Comments tab in Inspector window
  • Sync fields to newly created items.
  • Improved tooltips for the System Integration windows navigation breadcrumb control.

Quick Jama Integration through PCS in 3-simple steps

  • Open “Sparx Systems Pro Cloud Server Configuration Client”. Select the Add button in the Database Managers tab to add a database. Enable the Pro Feature for the database to enable Jama Integration under custom integration. Other third-party applications can also be integrated with the EA Cloud Model.
  • Go to the Integration tab and create a Data Providers profile. Set a unique port for SBPI.exe, which is used for Integration feature, and enable Integration Feature.
  • Select Add in Data Providers and Enter the required information.

Further Information

Please contact us or write an email to info@sparxsystems.in to have a live demo about the new EA 16 features and capabilities.

Add-insSparx Systems Enterprise Architect 16

SysML Requirements Editor in Sparx Enterprise Architect 16

  • The MDG Integration for Microsoft Office enables users to quickly import the data created in Microsoft Word & Excel documents within Sparx Enterprise Architect. 
  • Sparx EA Users can easily upgrade existing static documents into rich traceable models with the help of MDG Integration for Microsoft Office.
  • Users can automatically associate Sparx Enterprise Architect element properties and tagged values with the appropriate document sections and tables with ease. 
  • With the new version of MDG office a key feature for SysML Requirement elements is added. The “SysML Requirements on Excel” feature would be a fantastic addition for System Engineering Users.

Key features in SysML Requirement in MDG office Integration 

  • Import & Export a large amount of SysML requirements data from Excel, which avoids manual error.
  • With the latest SysML requirement editor, Users can export the mapping data (derived SysML requirements) from their EA model to Excel in a Relationship matrix style, providing a convenient analysis of how the requirements are related to each other within the EA model.
  • Users can easily push the contents of SysML Requirements from an Excel document to an EA or vice versa by selecting “SysML Requirement Manager” from the Feature menu.

SysML Requirements in Enterprise Architect

Using the “SysML Requirements on Excel” menu, users can export the data of SysML Requirement elements gathered in the EA Model as Excel documents.

Figure 1   –  SysML Requirements on Excel Feature

  • Exported SysML Requirements data/information from Sparx Enterprise Architect contains the Name with its predefined properties id & text in the Requirements sheet.
  • In the case of Requirement Matrix sheet, resembles a relationship matrix style contains Derived Requirements (mapped information of specific SysML Requirements).

Figure 2   –  SysML Requirements – Exported Information

Figure 3   –  SysML Requirements – Matrix Information

Further Information

Please contact us or write an email to info@sparxsystems.in to have a live demo about the new EA 16 features and capabilities.

Sparx Systems Enterprise ArchitectSparx Systems Enterprise Architect 16

Importing Tagged value from Sparx EA into Prolaborate

In Sparx Enterprise Architect, the tagged values are exported and they are imported into Prolaborate as custom properties. In Prolaborate V4.2, we can import the tagged values xml file which is exported from Sparx EA. Custom colours can be applied for the Enumeration Tagged value.

  • Export the Tagged value from Sparx EA
    • Once the tagged values are created, select “Configure > Transfer > Export Reference Data…” in Ribbon.
    • In the “Export Reference Data” window, Check the UML Types a Tagged Value Types and click Export button.
  • Import the Tagged value in Prolaborate
    • Under Menu, select the “Modelling Languages”.
    • In the Modelling Languages window, Select the “Custom Properties” (Top Right Corner).
    • Select the “Import Custom Property” option in the Custom Properties window and choose the exported EA tagged value XML file.
  • Add the Custom Property to corresponding UML Type element or Technology Type element.
    • Go to Modelling Languages and select the corresponding technology, For example ArchiMate 3.1 and select Default Profile.
    • Select the corresponding Stereotype Name to which the tagged values needs to be updated from the profile list.
    • Next, Add the New Group to the Form Designer (by clicking the ‘+’ icon), then drag and drop the tagged value from the Custom Properties.
    • Next, click save and go to the home page, To check for the default colour that is applied for the tagged value, select the appropriate stereotype (to which the tagged values is assigned) in the Prolaborate Project Browser.

Further Information

Please contact us or write an email to info@sparxsystems.in to have a live demo about the new EA 16 features and capabilities.

Sparx Systems Enterprise Architect 16

Inspector Window in Sparx Enterprise Architect 16

  • The ability to examine the specifics of a single element, whether it is stored in the current model or in an external data source, is made possible by the Inspector window. 
  • In most cases, the window has a “Details” tab that lists all the features and traits that apply to the element type. 
  • Even if they don’t have any items, the categories of features and attributes are listed. 
  • The Inspector window has got a new update on the latest release of EA 16. Let’s understand this new feature.

What’s new in Sparx Enterprise Architect 16?

  • The Inspector window’s “Status” tab now gives a brief summary of the status and priority of each element of the “Requirement” type in a diagram. 
  • With the aid of this triage tool, you can clearly see what can wait/ what can take a backseat while concentrating on what is most crucial right now.

Key Features

  • Display a list of all diagram elements.
  • Pay attention to each element’s Status, and Priority settings.
  • Concentrate on the most critical challenges.
  • To drive modeling and design, add Priority, and Status types to the model.

Note: The Priority tab is available for Requirement, Feature, Change, Issue

A section in the “Status” tab of a diagram contains the information of artifacts. They are as follows:

  • Element name
  • Status icon
  • Priority icon

Status Types

 A workflow step or a significant turning point in project management procedures like business analysis or product development can be determined by an element’s status. One can choose from the below mentioned stages that are available in the drop down list.

  • Approved
  • Implemented
  • Mandatory
  • Proposed  and
  • Validated.

Note: Any of these parameters can be supplemented or altered with your own unique values. Additionally, you can specify the types of elements that can display the type of each status associated with color band.

Customize element properties using the General Types window

When you add or modify an element’s properties, you can specify the type or status of the property by choosing from a drop-down list that initially includes values provided by the system. Any of these system settings can be supplemented or altered with your own unique values. Properties like Status, Constraint, Constraint Status, Difficulty, Priority, Test Status, requirement, Scenario and Maintenance Status can also be customized.

Further Information

Please contact us or write an email to info@sparxsystems.in to have a live demo about the new EA 16 features and capabilities.

Sparx Systems Enterprise Architect 16

Code Analyzer in Sparx Enterprise Architect 16

  • The Code Analyzer is a must-have tool when working with source code. It runs extremely complex queries on source code repositories at incredible speeds, when used locally or on a Sparx Intel cloud service.
  • The Code analyzer uses a high-level query language developed by Sparx systems. It also has a large vocabulary that allows code metrics to be queried quicker than traditional methods.
  • It is highly effective for large-scale code bases. This is because it allows the user to rigorously check any minor changes using a distinct cross-reference analysis of the code to verify that all effects are clearly visible.

Code Miner Framework

  • In Sparx Enterprise Architect 16, users can compile their code base into a Code Miner repository. Code Miner system provides instant and comprehensive access to existing source code information.
  • It enables complete access to all features of the original source code in a machine-readable manner. This is done by parsing all source code and storing the resulting “Abstract Syntax Tree” in a read-optimized database.
  • The main purpose of the Code miner is to give quick and effective access to data concealed within the source code.
  • The interfaces have been designed to be as simple as possible while ensuring optimal performance.
  • As a result, the system can assess the program’s structure, calculate metrics, track relationships, and even refactor the code.

What’s New in Sparx Enterprise Architect 16?

Sparx Intel Service

  • The Sparx Intel service program enables development projects and customers to learn more about the code bases and software frameworks they’re working with.
  • Multiple Enterprise Architect customers can use the service to access and (raise a query for the same data) query the same data from a variety of software domains and frameworks.
  • Clients of Enterprise Architect can use the service to have access to Intelli-sense in code editing and smart search results in search tools.
  • The Sparx Intel service is a division of Sparx Satellite Services. The service can be installed on a local network or in the cloud, plus it runs on Microsoft Windows.
  • The Sparx Intel Satellite service can be executed as a standalone process or as a Windows service.

Config File Format

DirectiveDescription
NameWhen a service is named on the command line, the service with the matching name attribute will commence.
StatusThe service will be starting only when status = ON
LazyloadWhen lazyload is ‘true’, any Code Miner database will delay loaded until an Intel request is made to the service.
LoglevelDefines the level of information logged, as a combination of keywords { information, warning, error} separated by a ‘|’.  For example:
     loglevel= Information|warning|error
LogoutputSpecifies the full pathname of the log file to write to. For example:
     logoutput=c:\logfiles\intel-service-project1.log
DatabaseSpecifies the full path name of the Code Miner database to be loaded. For example:
     database=c:\intel–service\project1.cdb
Multiple ‘database’ directives are allowed, each specifying a different database.
AllowIdentifies the IP address that is permitted to connect to the service on the Port. For example:
     allow=localhost
     allow=127.0.0.1
     allow=172.160.*  (wildcards are allowed when the ‘network’
                                  the directive has a value of ‘network’ or ‘public’,
                                  but not ‘local’)
NetworkAllows service connections to be restricted.
local – the service can’t be heard on any connection other than localhost
network – when used with the wildcard ‘allow’ directives, it allows clients on an allowed IP address wild card to connect
pubic – allows any connection
ShowWhen ‘true’, the Console window for the service will be shown; the default is ‘false’.
PortThe Port on which the service will be heard.

Further Information

Please contact us or write an email to info@sparxsystems.in to have a live demo about the new EA 16 features and capabilities.

Sparx Systems Enterprise Architect

GANTT Chart View in Resource Allocation Window

The Gantt View is a tool for visualizing the elements of a project, package, or diagram as well as the resources assigned to them. The tool will enable a traditional or agile project manager to ensure that a project’s resources are allocated to repository content and that high-value outcomes are achieved directly from the repository.

Where Can I Find the Project Gantt Chart?

Users can access the Project Gantt Chart through the following options :

  • Ribbon: Design > Package > Gantt View
  • Ribbon: Design > Diagram > Views > Gantt View
  • Diagram Context Menu:  Switch View | Switch to Gantt View
  • Browser window Package context Menu | Open Package in | Gantt View

What’s New in Enterprise Architect 16?

Gantt Chart view in the Resource Allocation window

The revised Resource Allocation docked window now works as a Gantt Chart, giving users a better visual experience while assigning and managing jobs in the model.

  • The users can get a clear picture of what’s going on with any element.
  • Drag and drop to quickly change the start and end dates.
  • It’s simple to add and change tasks.
  • On work items, the user can zoom in and out.
  • For rapid visual reference, percent completion is placed on tasks.

Project Gantt View Facilities

Option Action
Display tasks only for ‘today’ or ‘another day’ Right-click on the display and select the option:

  • ‘Show Only Active Tasks for Today’ – to show only tasks that are in progress today
  • ‘Show Only Active Tasks for Other Days’—to show only tasks that were in progress on a specific day in the past, or that are scheduled to be in progress on a day in the future; a calendar dialog displays from which you select the day to examine
Display the properties of the element to which a resource is assigned. Right-click on the element entry and select the ‘Show Element Properties’ option.

The ‘Properties’ dialog for the element displays.

Display the Resource Allocation details for an element or resource. Right-click on the entry and select the ‘Show Task Properties’ option.

The ‘Assigned Resources’ dialog gets displayed. You can now edit the details and, if necessary, change the resource allocated to the element.

Display the Resource Allocation records for an element. (Also available in the Report View.) Right-click on the entry and select either of the context menu options:

  • ‘Show Element Resource Allocation window’ (if the window is closed or hidden)
  • ‘Find Task in Element Resource Allocation window’ (if the window is visible but showing the details of another element)

The Resource Allocation window displays the details of the selected entry and other resource allocations for the element listed in the left-hand panel.

You can edit the details and, if necessary, change the resource allocated to the element.

Assign a new resource to an element. Right-click on an element in the display, and select the ‘Assign Resource’ option.

The ‘Assigned Resources’ dialog gets displayed.

Further Information

Please contact us or write an email to info@sparxsystems.in to have a live demo about the new EA 16 features and capabilities.

Sparx Systems Enterprise Architect

Enterprise Architect Tips and Tricks in Compilation

Tip #1: Highlight Connectors

To highlight the connectors, select an element in a diagram (workspace) and press “L” (keyboard) to highlight its incoming and outgoing flows. Incoming flows will be highlighted in Red and Outgoing in Green.

Enterprise Architect Tip 1

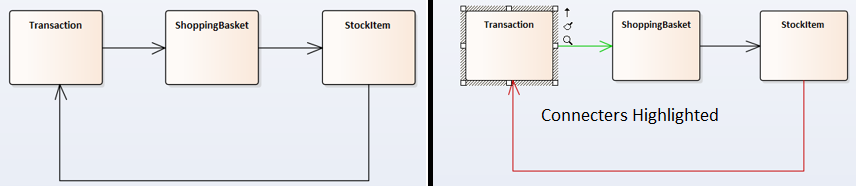
Figure 1 Highlight Connectors

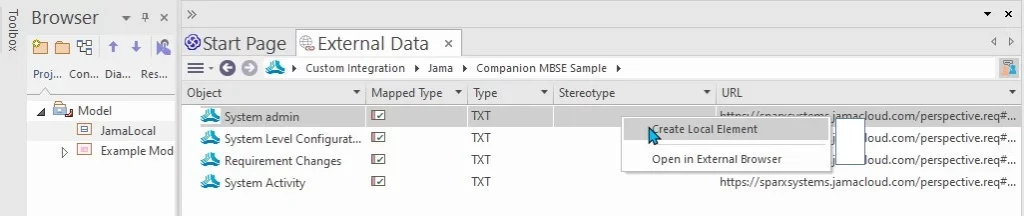
Tip #2: Insert Existing Element

Draw connector to an existing model Element. One can insert an existing model element and establish a relationship while drawing a new connector Follow usual steps to draw a connector, but press “Shift” before choosing the type of element to be created, this will invoke the “Select Existing Element” dialog to choose a model element instead of creating a new element.

Figure 2 - Insert Existing elements

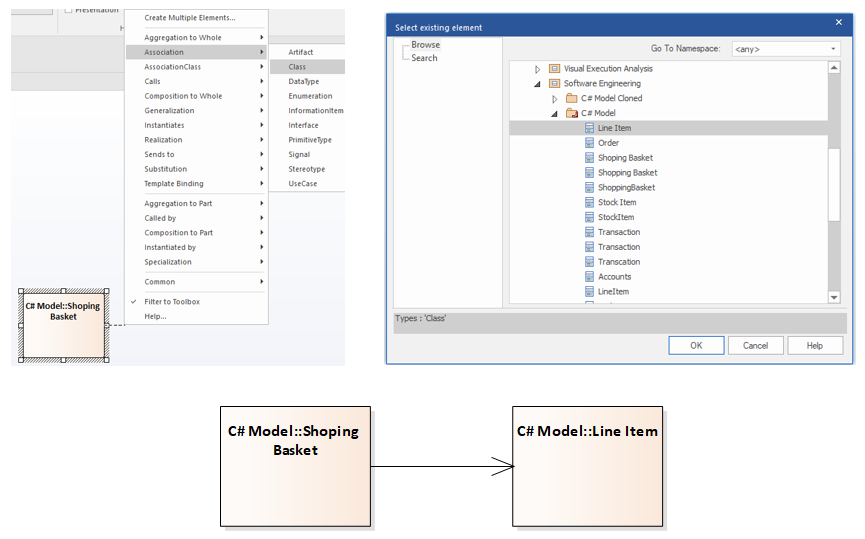
Figure 2 Insert Existing Element

Tip #3: Bend Connectors

Press “Shift” introduces a bend point while drawing a connector, enabling to draw a custom style connector.

EA Tips 3 - Contextual Menu

Figure 3 Bend Connectors

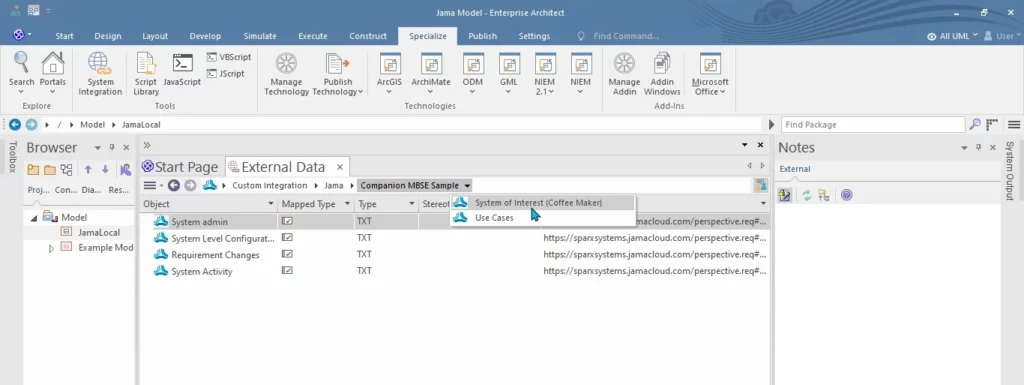
Tip #4: Generate Report from Diagram

Generate a report on elements in a diagram, switch to “List View”(Right-click on Diagram and select open in diagram🡪List View), select the elements and use the “Rich Text Report” button.

Generate Report from a Diagram

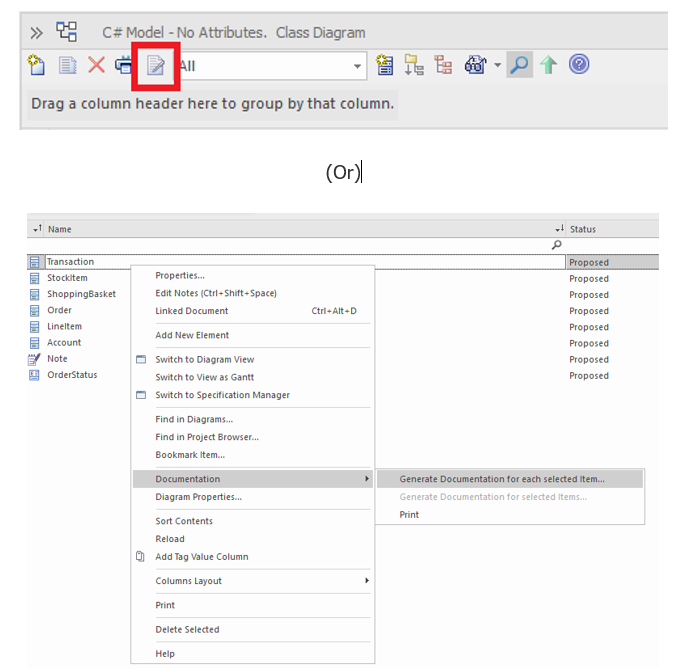
Figure 4 Generate Report from Diagram

Tip #5: Bookmark Elements

Select Element(s) and use “Shift” + “Space” to add bookmark. Bookmarked elements can then be retrieved in Model Search (Ctrl + F | Diagram Searches | Find Bookmarked Elements) and also be generated as RTF report.

Bookmark Elements

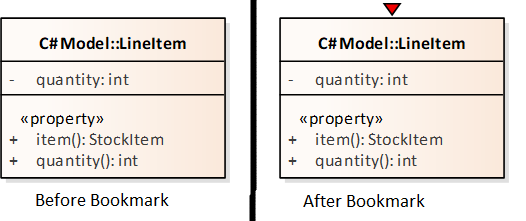
Figure 5 Bookmark Elements

Tip #6: Set Default Toolbox

Pin your favorite toolboxes using “More Tools -> Set Toolbox Visibility”. This enables the desired toolbox visible in all diagram pages.

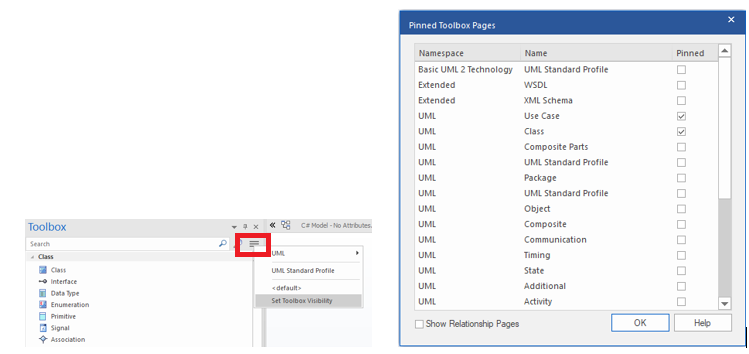
Figure 6 Set Default Toolbox

Tip #7: Bezier Style Connector

Create a Bezier Style Connector by adding a tagged value (_Bezier = 1).

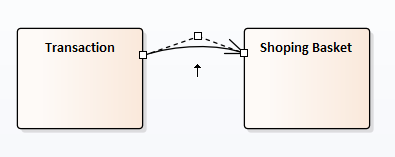
Figure 7 Bezier Style Connector

Tip #8: Document with Pre-defined settings

Creating a resource document lets you to Auto Generate documents with pre-defined settings.

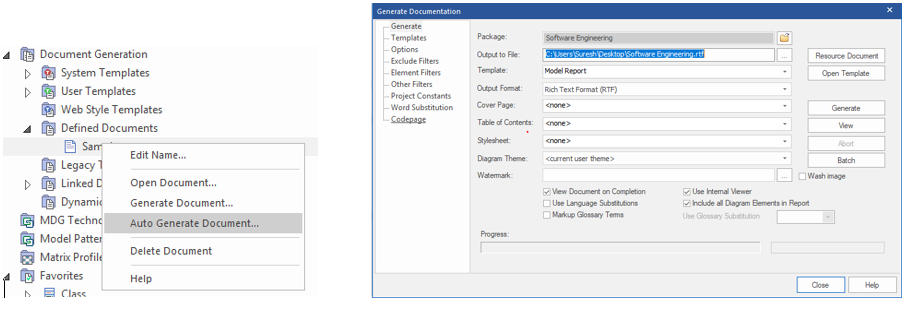
Figure 8 Document with Pre-defined settings

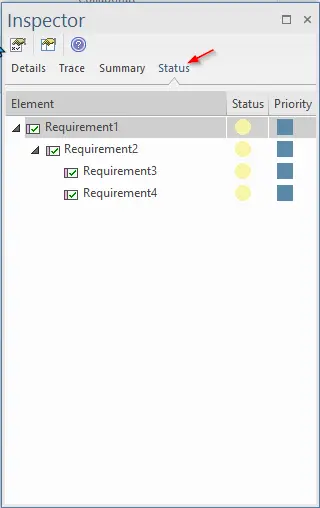
Tip #9: Update Elements Status

Update the status of all elements in a package and its child packages using ” Design | Edit | Advanced | Update Status”.

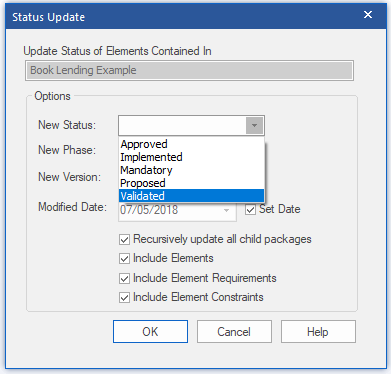
Figure 9 Update Elements Status

Tip #10: Favorites Folder

Create a favorites folder in the “Model Views” to quickly access your frequently used items.

Figure 10 Favorites Folder

Tip #11: Diagrams Slideshow

Create a Slideshow folder in the “Model Views” to run screen-based presentations of a set of diagrams.

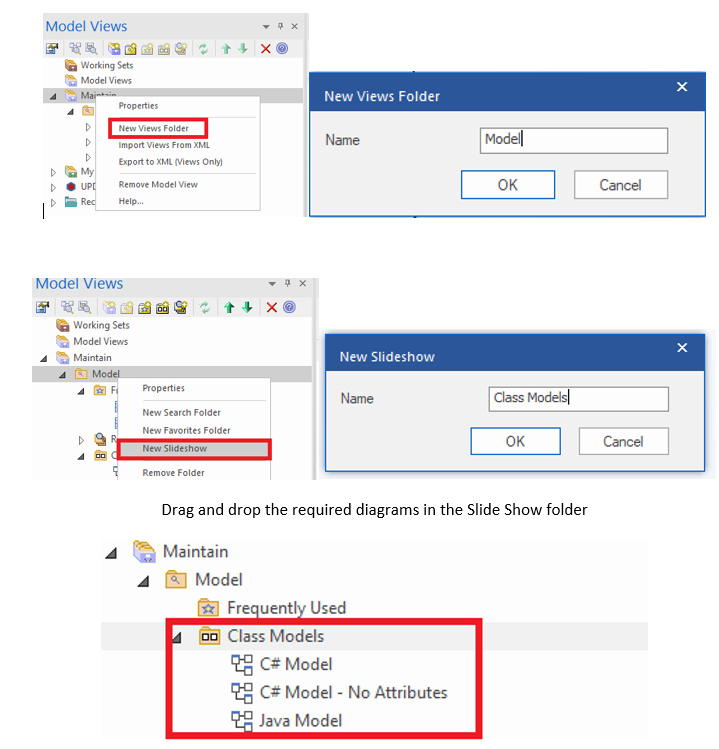
Figure 11 Diagrams Slideshow

Tip #12: Move elements along its axis

Select element and press “Shift” to move the element along its axis.

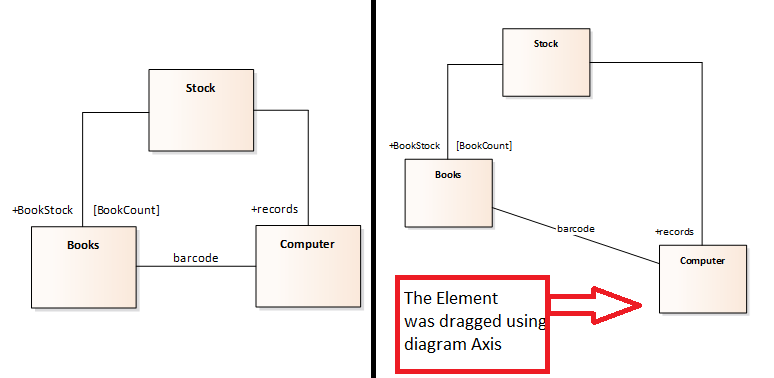
Figure 12 Move elements along its axis

Tip #13: Create Realization Relationship

Move an internal requirement (Element Properties Window | Requirements Tab) over any diagram element to implicitly create a realization relationship.

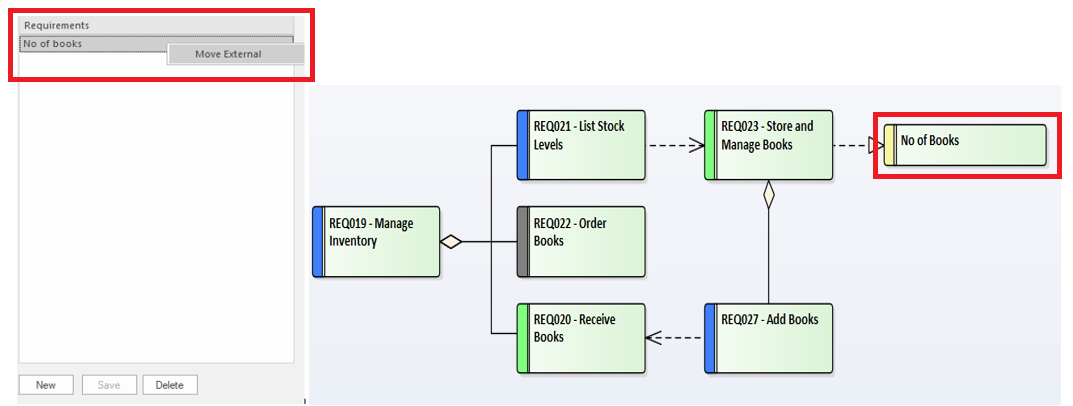
Figure 13 Create Realization Relationship

Tip #14: Change Element Type

Change type of an element. Select an element “Design | Element | Change Type”.

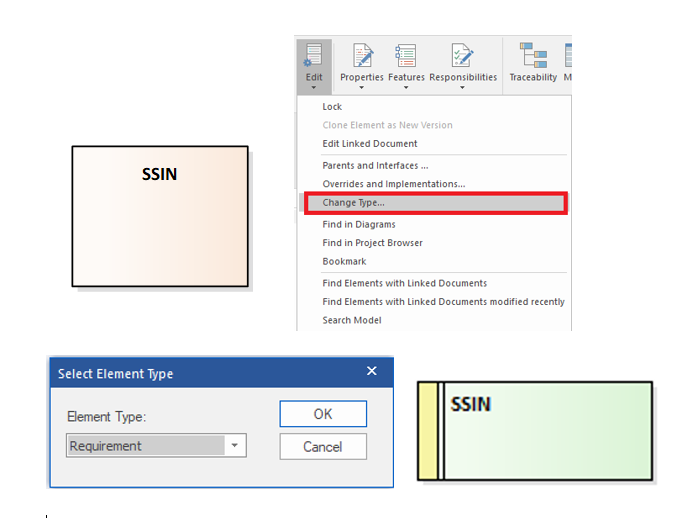
Figure 14 Change Element Type

Tip #15: Project Template Package

Add elements to a Package and configure it as Template package (Configure | Project Template Package | Select the Template Package) to create new elements based on a template package.

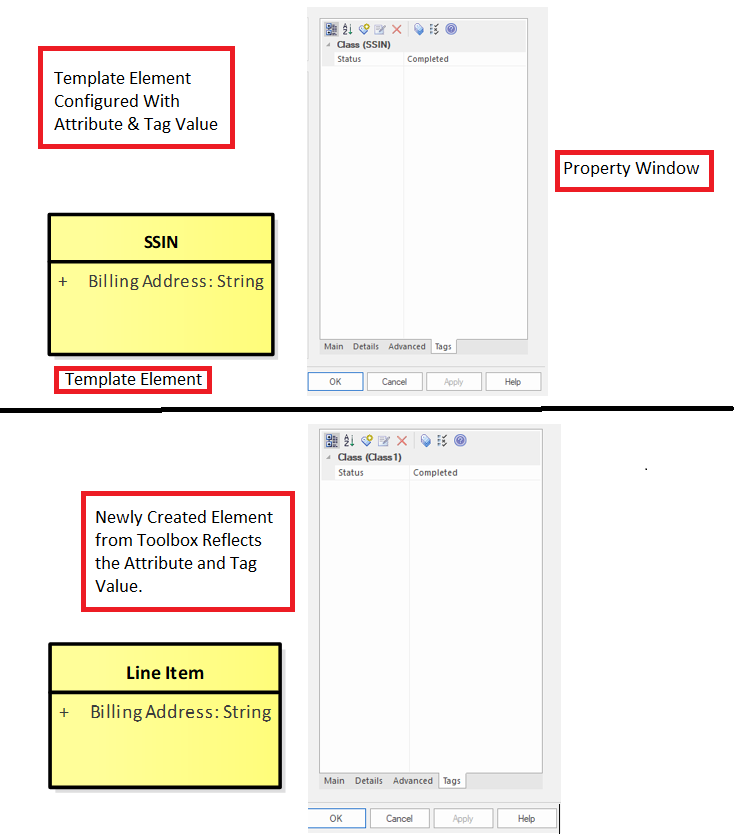
Figure 15 Project Template Package

Tip #16: Project Publish

Use “Publish |Technologies |Publish” to export a model in various XML formats.

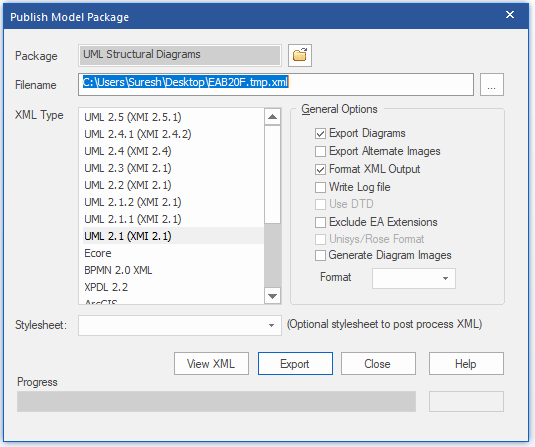
Figure 16 Project Publish

Tip #17: Filter Element Type on Diagram

Use “Layout | Edit | Select Elements by Type” to filter element by type and stereotype on a diagram.

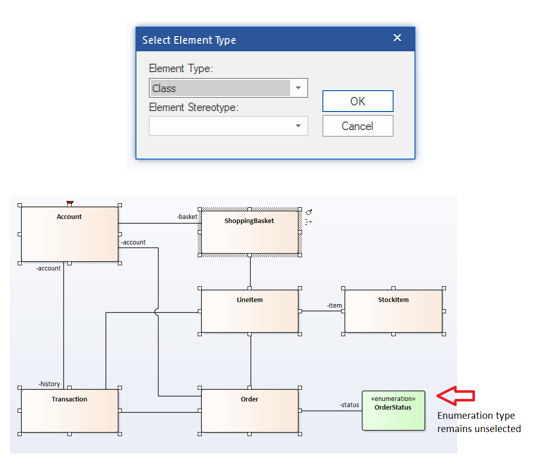
Figure 17 Filter Element Type on Diagram

Tip #18: Auto Names and Counters

Use “Auto Names and Counters” from Settings menu, to configure naming and numbering convention for elements.

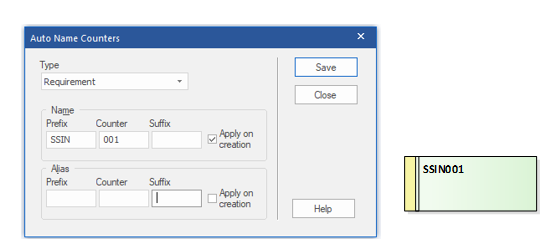
Figure 18 Auto Names and Counters

Tip #19: Show / Hide connectors

“Links” tab in Element Properties window can be used to Show / Hide a relationship in the diagrams.

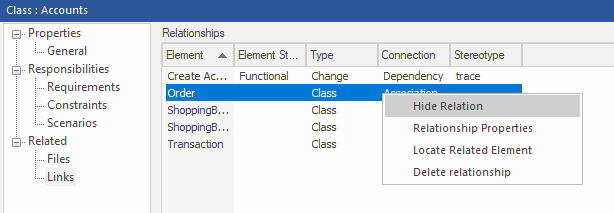
Figure 19 Show / Hide connectors

Tip #20: Export Diagrams to RTF Document

Generate a Diagrams Only report from Model using the “Export Diagrams to RTF Document” dialog (Ctrl + Shift + F8).

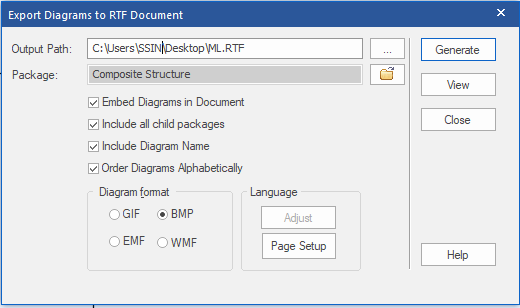
Figure 20 Export Diagrams to RTF Document

Tip #21: Stereotyped Nodes with Icons

Adorn your deployment diagrams with pre-defined stereotypes for Nodes. Use pc, pc client, pc server, server, storage, etc. to add custom icons

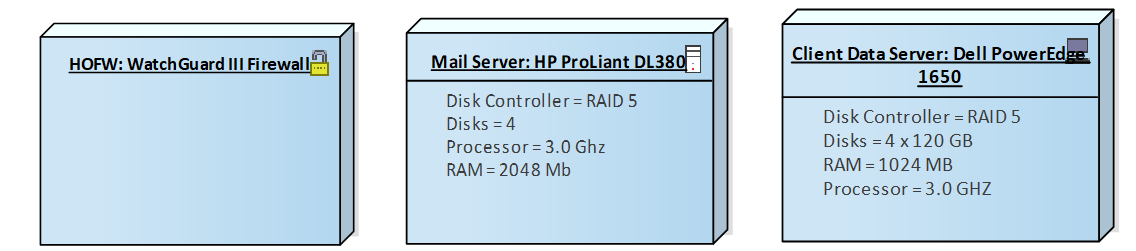
Figure 21 Stereotyped Nodes with Icons

Tip #22: UML Profiles

Save custom stereotypes with tagged values as profile items and import into Resources->UML Profiles to simplify modeling.

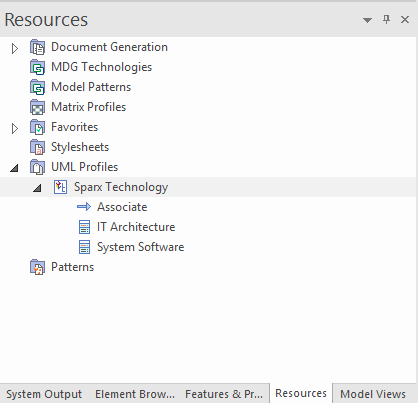
Figure 22 UML Profiles

Tip #23: Synchronize tagged values

Synchronize your tagged values associated with stereotypes using the “Synch Tagged Values and Constraints” option by right clicking the intended element in the toolbox.

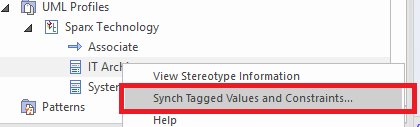
Figure 23 Synchronize tagged values

Tip #24: Convert Linked Element

Create a local copy of a referenced element in a diagram by using “Convert Linked Element to Local Copy” option in diagram context menu (Advanced). This will not maintain any relationship with existing elements.

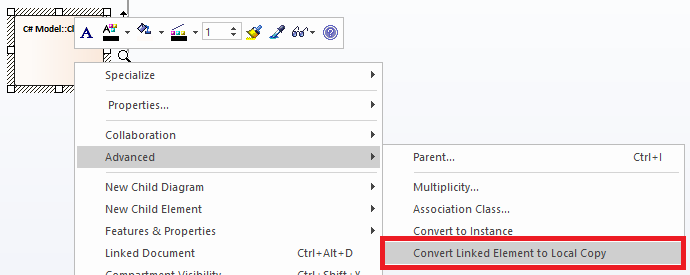
Figure 24 Convert Linked Element

Tip #25: Find in Diagrams

Use Find in Diagrams (Ctrl + U) from project browser to find the Link and classifier instances of an element in all diagrams.

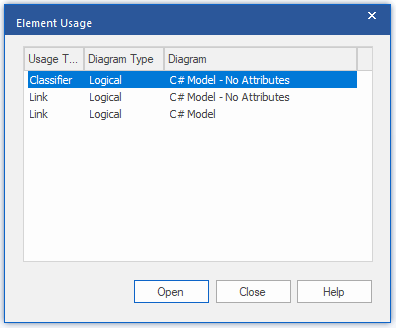
Figure 25 Find in Diagrams

Tip #26: Shortcuts for Tasks

Use “Shortcuts” menu item from “Learning Center” to begin Enterprise Architect tasks appropriate to the topic.

Tip #27: Incorporate Model Templates

Incorporate Model Templates in MDG Technology by following the guidelines

http://www.sparxsystems.com.au/enterprise_architect_user_guide/13.5/modeling_tools/model_templates2.html

https://www.sparxsystems.in/blogs/import-model-patterns-into-enterprise-architect-through-add-in/

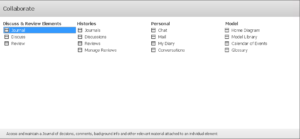
Tip #28: Project Calendar

Use Start | Collaborate | Calender to Add Events, Meetings and Milestones.

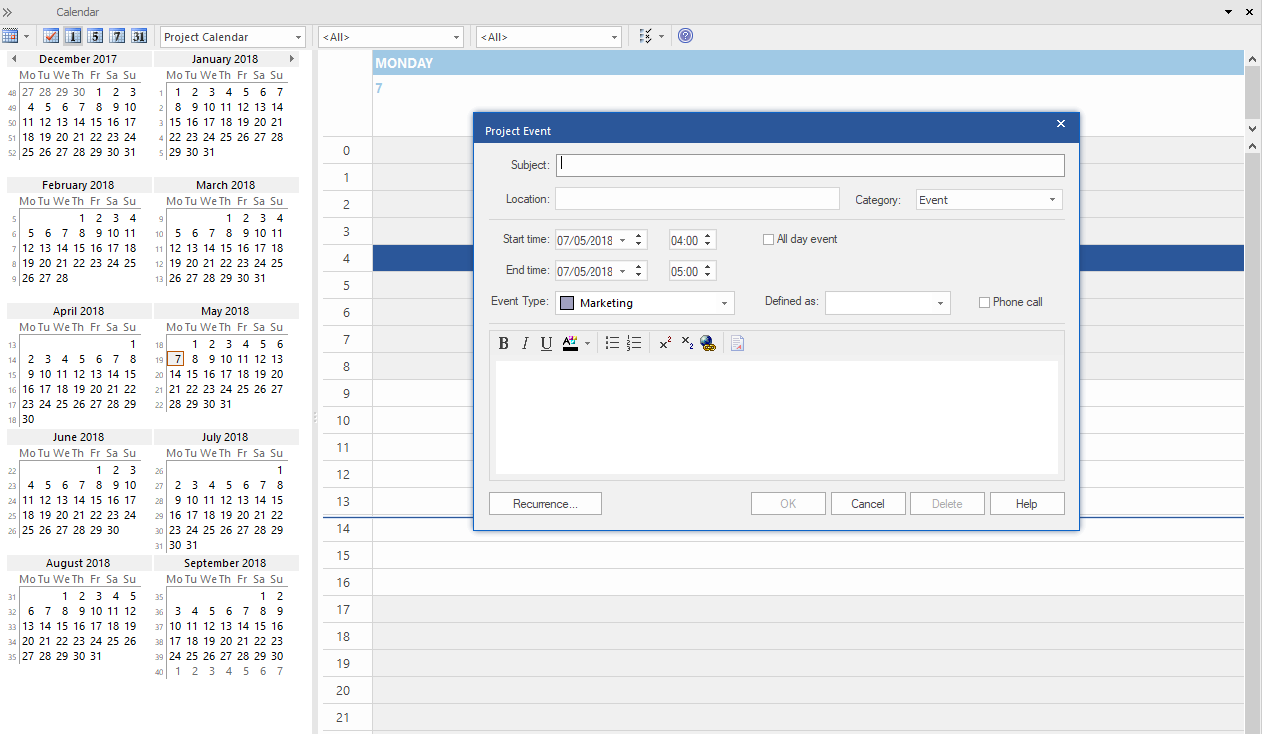
Figure 26 Project Calendar

Tip #29: Linked Note

Create individual “Linked Note” for an attribute and for an operation of a class element. Select attribute/operation and right-click from context menu choose Create Linked Note.

Figure Linked Note

Tip #30: Set Visible Relationships

To Show/Hide the connectors in a diagram use “Layout | Diagram | Appearance | Set Visible Relationships” or “Ctrl + Shift + I”

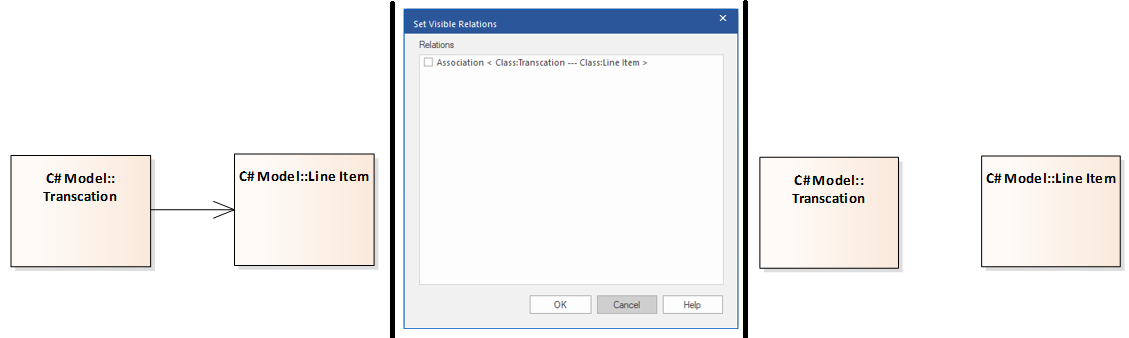
Figure 28 Set Visible Relationships

Tip #31: Exclude images from RTF document

Use Diagram | Properties “Exclude image from RTF documents” to exclude the diagram images from any RTF document generated on the parent package or element.

Figure 29 Exclude Image for RTF Document

Tip #32: Context Filter

Use Context Filter (Layout | Filter | Relationships) to play up the elements on the diagram that are directly related to the selected element. This one is very useful in complex diagrams.

Figure 30 Context Filter

Tip #33: Set Direction for Association

Use “Association default = source –> target” (Tools | Options | Links) to automatically set the direction of new Associations, flowing from source to target element.

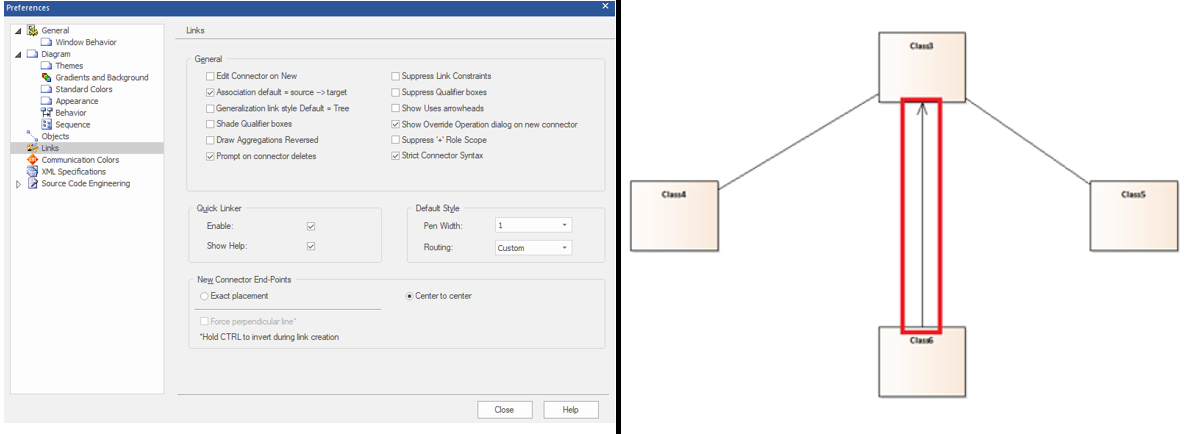
Figure 31 Set Direction for Association

Tip #34: Change Element Default Color

Use Element | Appearance | Default Appearance (F4), to change an element color on all diagrams except diagrams that override the appearance or use the format painter in the diagram toolbar to apply only on the current diagram.

Figure 32 Change Element Default Color

Tip #35: Export Tagged Values

Use Configure | Model | Transfer | Export Reference Data and select “Tag Value Types” from “UML Types” to export all the custom “Tagged Values” in the model.

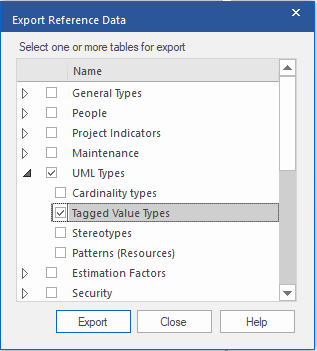
Figure 33 Export Tagged Values

Tip #36: Diagram Legend

Use “Diagram Legend” to assist in distinguishing different elements, connectors or systems in a diagram.

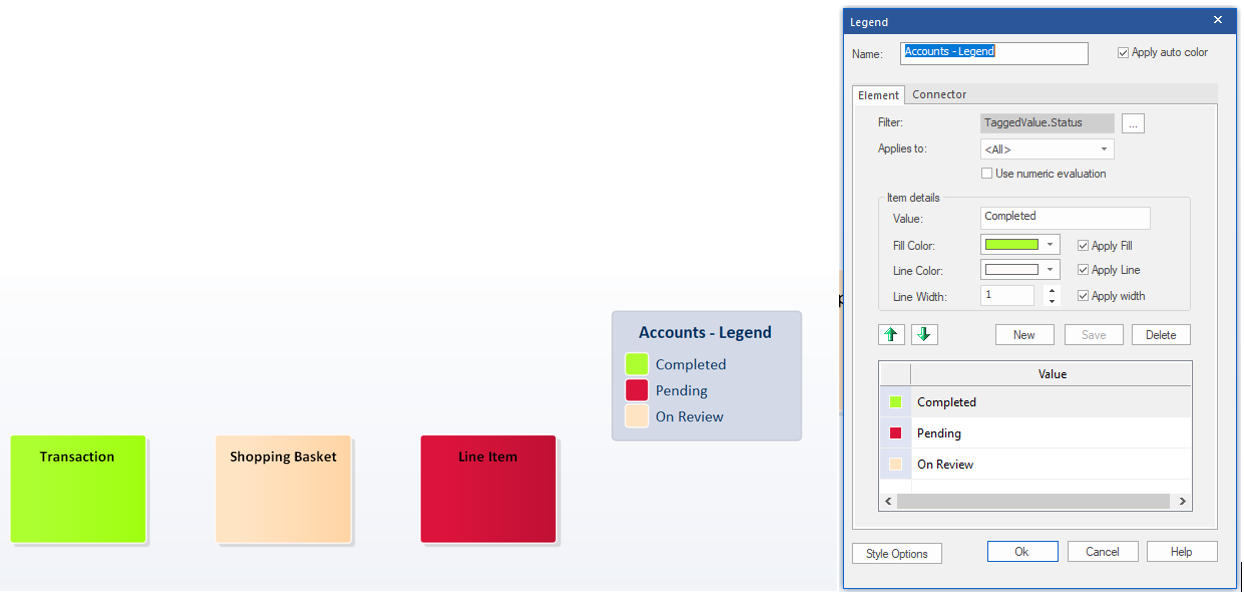
Figure 34 Diagram Legend

Tip #37: EA Command

Use Hyperlink of type “EA Command” to select and perform list of Enterprise Architect commands.

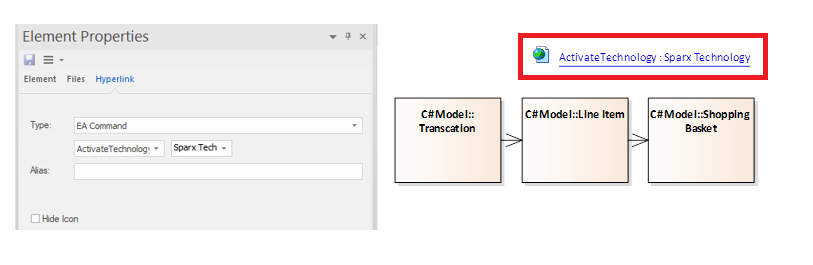
Figure Hyperlink “EA Command”

Tip #38: Execute a script

To execute a script, press Ctrl while you double-click on the script name.

Tip #39: Copy Script

To copy Script, select Script and drag and drop pressing Ctrl to create a copy of the script into the new user scripts folder.

Figure 36 Copy Script

Tip #40: Add Stereotypes

Configure | UML Types | Stereotype, to Add, Modify or Delete stereotypes.

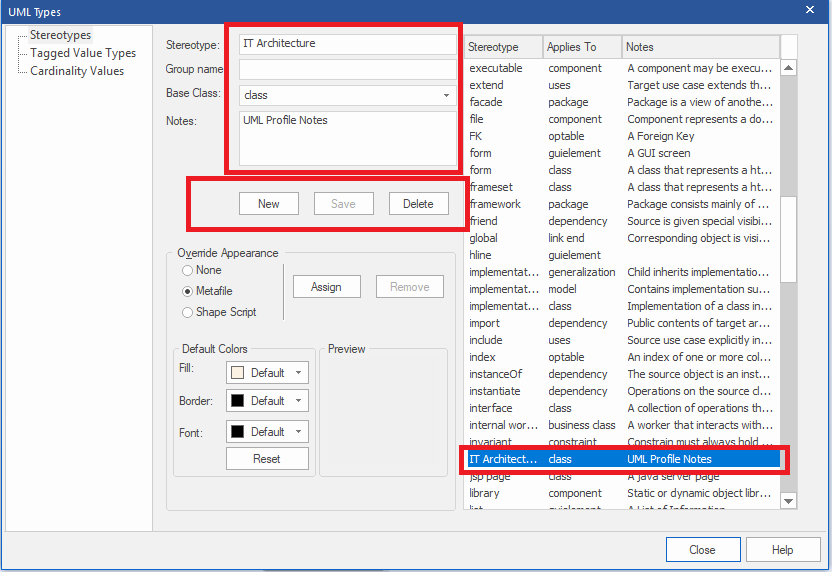
Figure 37 Add Stereotypes

Tip #41: Level Numbering

Use Design | Package | Edit | Advanced Toggle Level Numbering to display level numbering of elements of selected package in the project browser/list view.

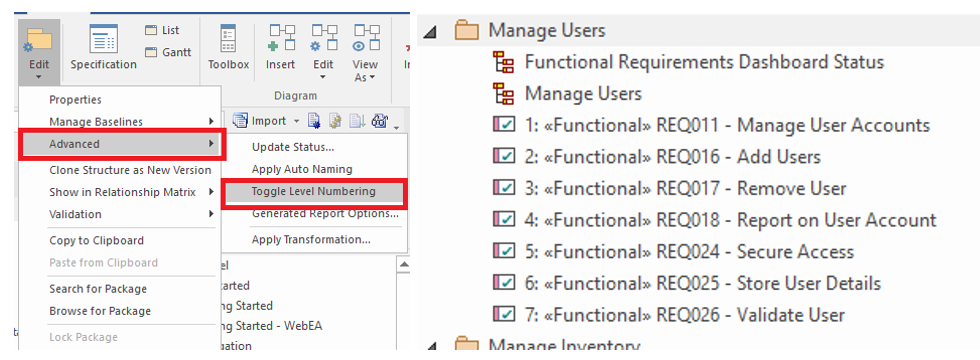
Figure 38 Level Numbering

Tip #42: Code Samples

Refer Code Samples to handle enterprise architect repository using external projects from “C:\Program Files (x86)\Sparx Systems\EA\Code Samples”.

Tip #43: Code Gen default Language

Set default Language for Code Generation using “Configure | Options “.

Figure 39 Code Gen default Language

Tip #44: Exact Placement

Use “Exact Placement” option from Tools->Options->Links to set the orientation of the new connectors to the exact point in the target element.

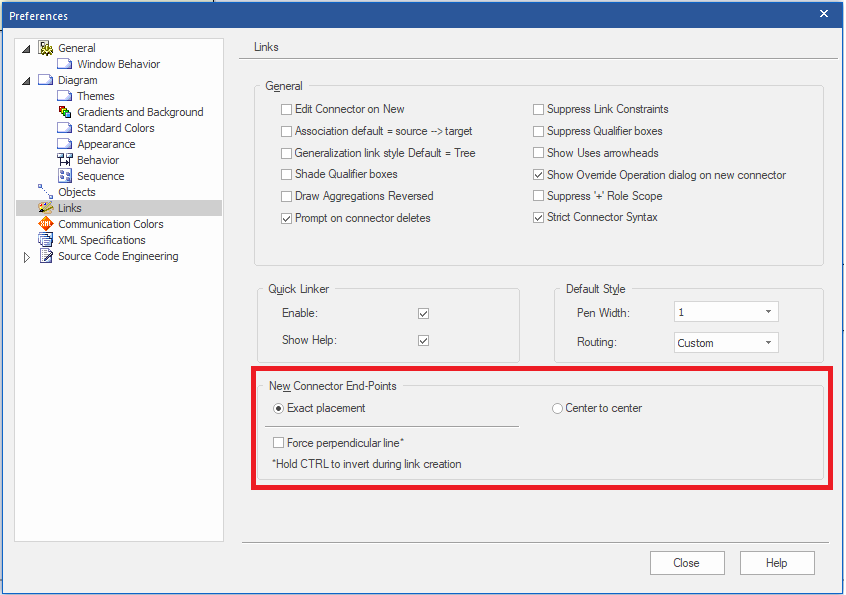
Figure 40 Exact Placement

Tip #45: Duplicate Element Properties

Use the “Element Browser” to copy element features from one element to another.

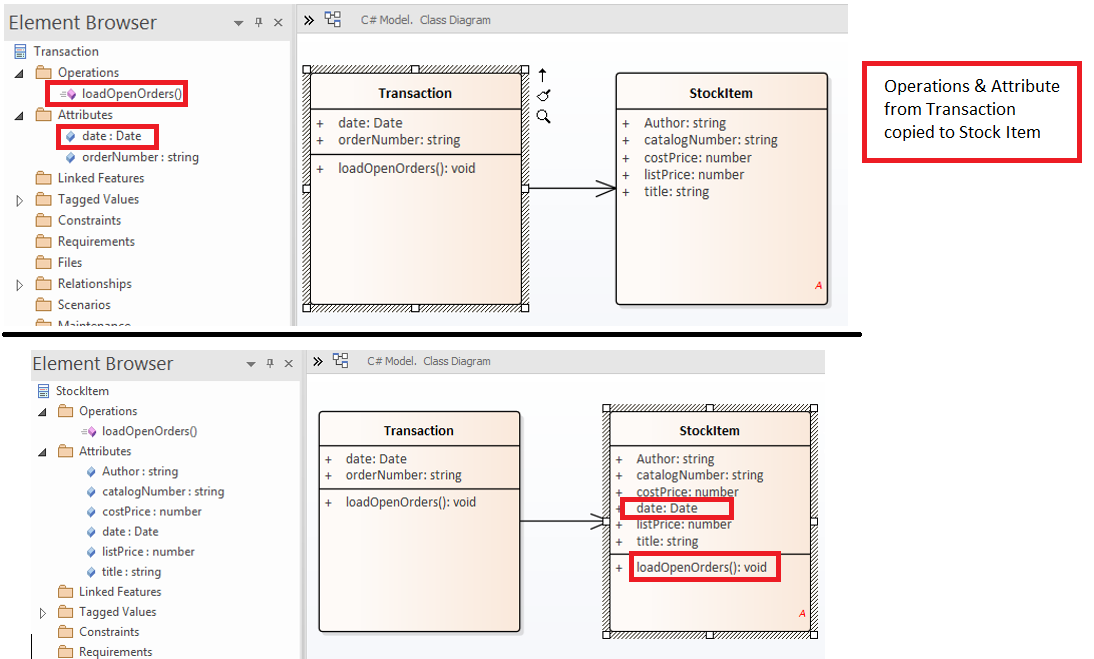
Figure 41 Duplicate Elements Properties

Tip #46: Model Default Diagram

Open a diagram choose “Layout | Diagram | Manage | Set as Model Default” to display it when you open the model.

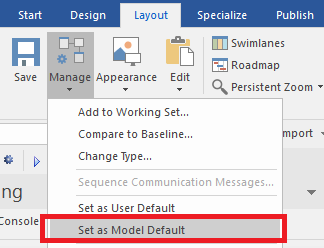
Figure 42 Model Default Diagram

Tip #47: User Default Diagram

Set a diagram as the User default from “Layout | Diagram | Manage | Set as User Default” to display the diagram, when the user opens the model.

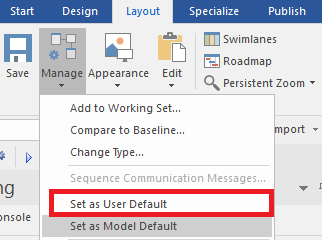
Figure 43 User Default Diagram

Tip #48: Add Tagged Value to Elements

Add the same tagged value to multiple elements. Select Multiple Element | Right Click | Add Tag Values.

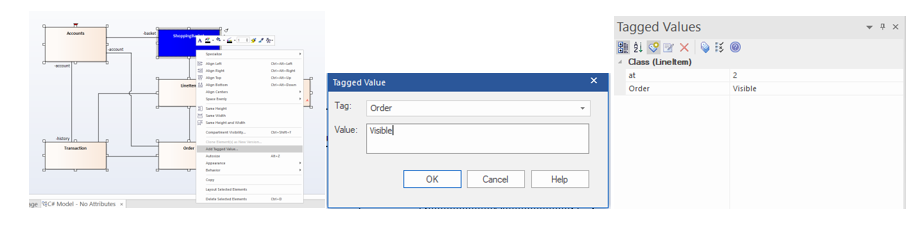
Figure 44 Add Tagged Value to Elements

Tip #49: Extend Data Types

Extend the set of inbuilt data types for a standard programming language from Code | Options | Configure Code Engineering Datatypes.

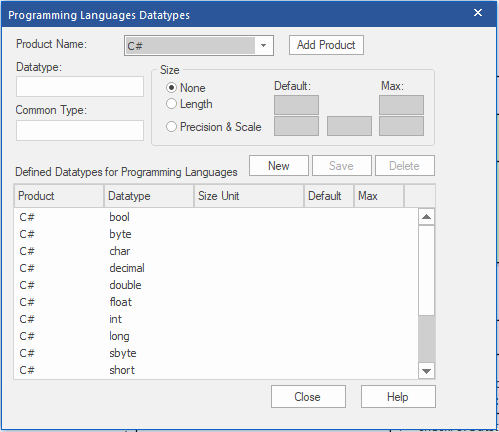
Figure 45 Extend Data Types

Tip #50: Display Diagram Property

Add Diagram Details in the Diagram. Open Diagram Properties window(Double – click on Diagram workspace) | Diagram Tab | click on checkbox Show Diagram Details

Figure Display Diagram Property

Tip #51: Add Macro Definition

Add New Macro definition to a language. “Setting | Preprocessor Macros”.

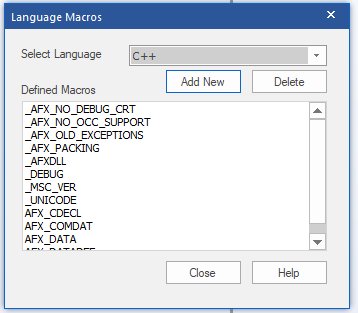
Figure 47 Add Macro Definition

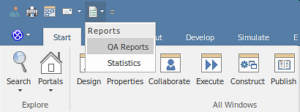
Tip #52: QA Reports & Metrics

Use “QA Reports & Metrics” to monitor and report, on the outstanding details on a package.

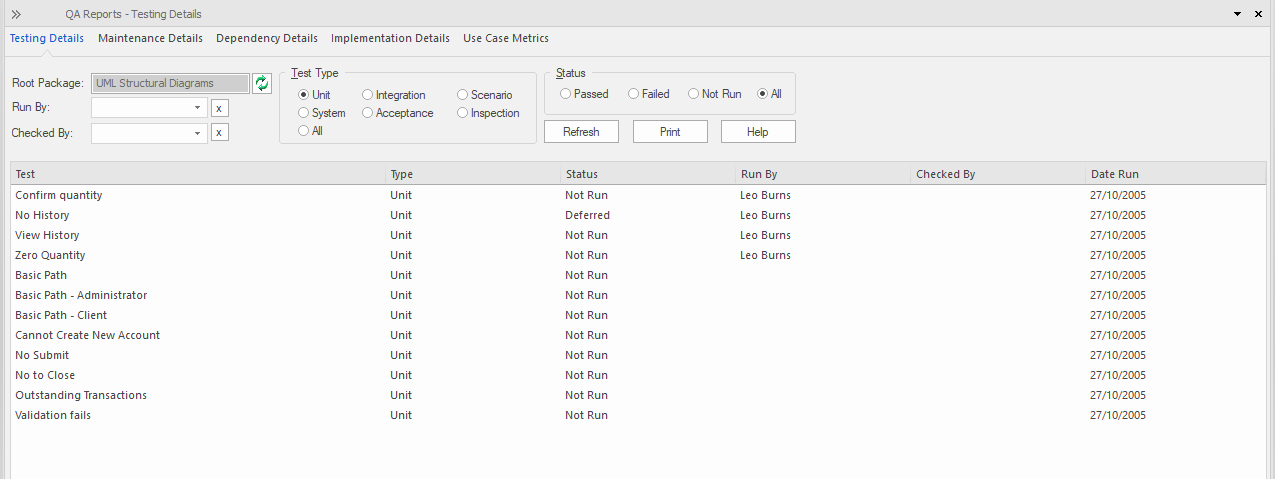
Figure 48 QA Reports & Metrics

Tip #53: Locate Element

Locate the diagram object in the Project Browser using “ALT+G”.

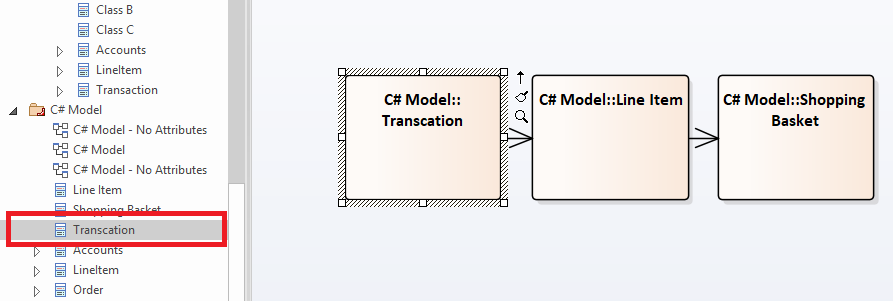
Figure 49 Locate Element

Tip #54: Element Usage

Find the element usage by selecting an element in “Project Browser” then press “CTRL + U”.

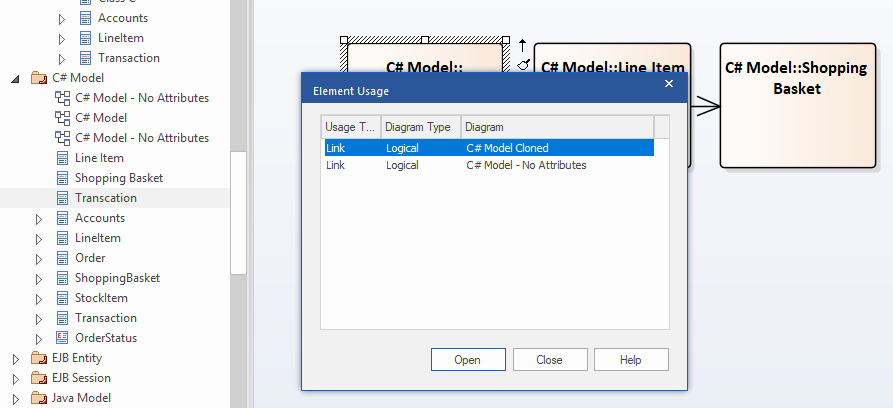
Figure 50 Element Usage

Tip #55: Find Orphan Elements

Find elements that are not used in any diagrams. Press Ctrl + F | Diagram Searches | Find Orphans.

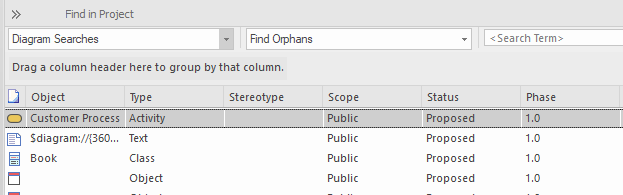
Figure 51 Find Orphan Elements

Tip #56: Audit History

Use “Configure | Auditing” to audit all the modifications in entire project. Audit view could be sort by Type & User.

Figure 52 Audit History

Tip #57: Place Related Elements

Place the related elements of an element in the diagram using “Traceability” (Start | Trace) window Right Click on an element. Place element on the Diagram.

Figure 53 Placed Related Elements

Tip #58: Validate Project

Use “Design | Package | Edit | Validation | Validate Current Package ” to validate model against known UML rules.

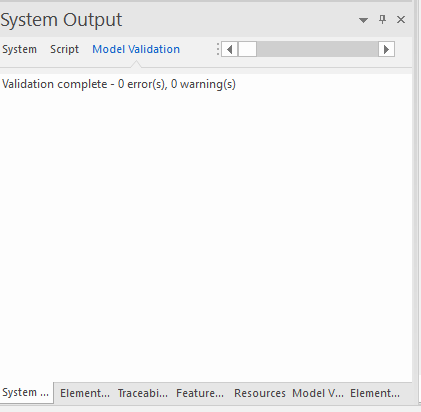
Figure 54 Validate Project

Tip #59: Create Shape Scripts

Use “Configure | Reference Data | UML Types” to apply Shape scripts to custom stereotypes.

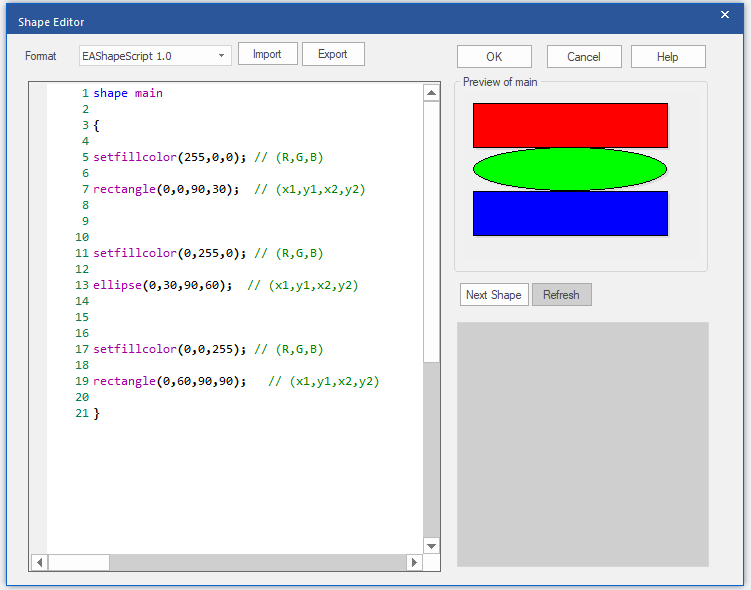
Figure 55 Create Shape Scripts

Tip #60: Instant Toolbox

Use “Shift and Right-Click” or space bar on diagram workspace to get the toolbox instantly.

Figure 56 Instant Toolbox

Tip #61: Create Multiple Elements

“Hold Ctrl and Right-Click” on the diagram workspace then select “Create Multiple Elements” to add multiple elements. Change the type of element from type drop-down.

Figure 57 Create Multiple Elements

Tip #62: Import Elements from Clipboard

Import names from clipboard by “hold Ctrl and Right-Click” on diagram workspace then select “Create Multiple Elements”. Right click on the blank space. Then click “Import Names from Clipboard”.

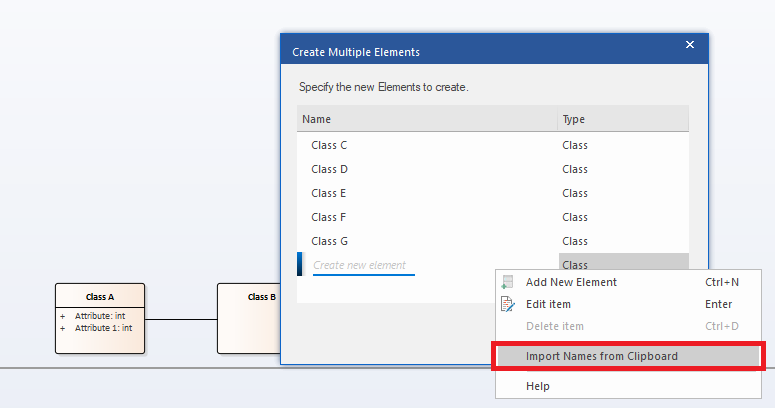
Figure 58 Import Elements from Clipboard

Tip #63: Repeat Element

To repeat the last created element type use “Ctrl + Click.”

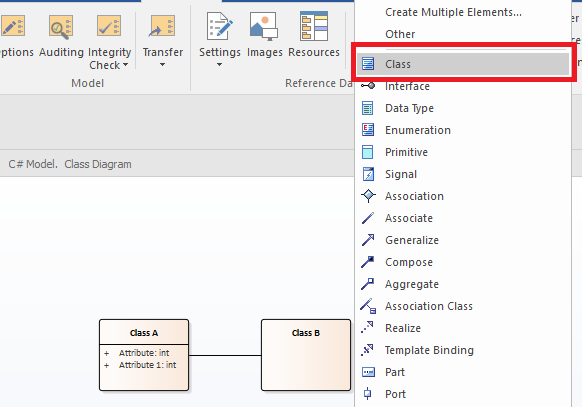
Figure 59 Repeat Element

Tip #64: Repeat Connecter

Use F3 to repeat the last created connector type.

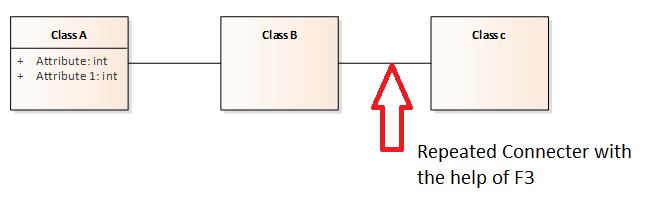
Figure 60 Repeat Connecter

Tip #65: Draw Elements without Toolbar

Draw elements without toolbar by simply using “ctrl +shift +arrow keys”.

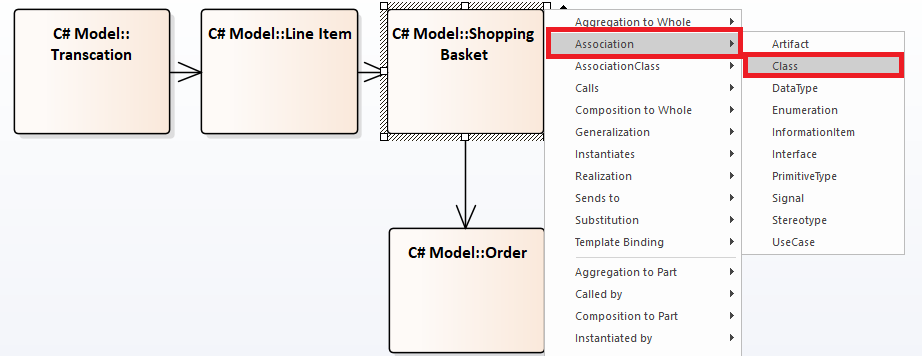
Figure 61 Draw Elements without Toolbar

Tip #66: Add New View/Package

Use “Ctrl + w” to add a new view or package to a currently selected model root view or package.

Figure 62 Add New View/Package

Tip #67: Auto Size Elements

Auto size (Alt + z) resizes objects to best fit. This can be quite handy when you enable / disable Element’s Features (Feature Visibility).

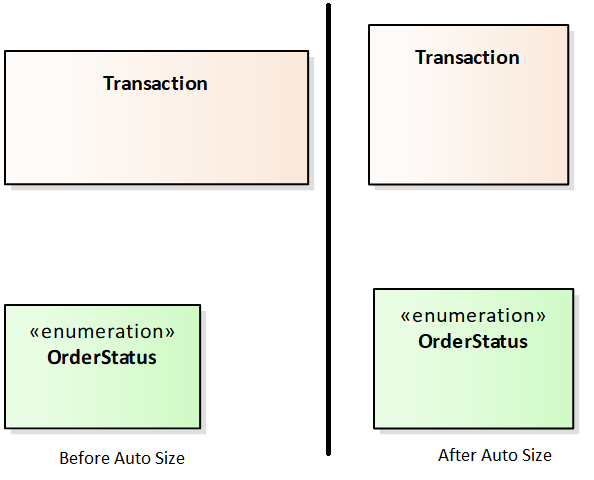
Figure 63 Auto Size Elements

Tip #68: Attributes Window

Use Features & Properties window to Add/Edit/Delete Attribute. Select the element and Press “F9” to open up attributes tab in features window.

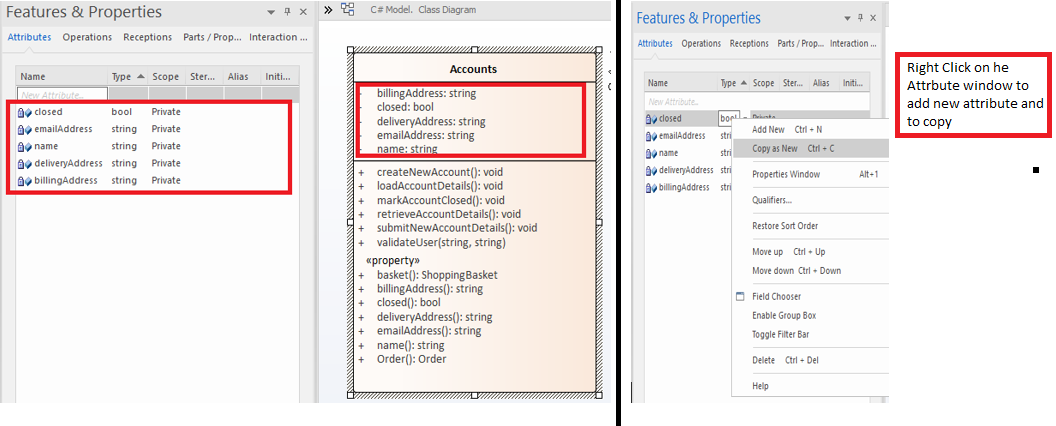
Figure 64 Attributes Window

Tip #69: Operations Window

Use Features & Properties window to Add/Edit/Delete Operation. Select the element and Press “F10” to open up operations tab in features window.

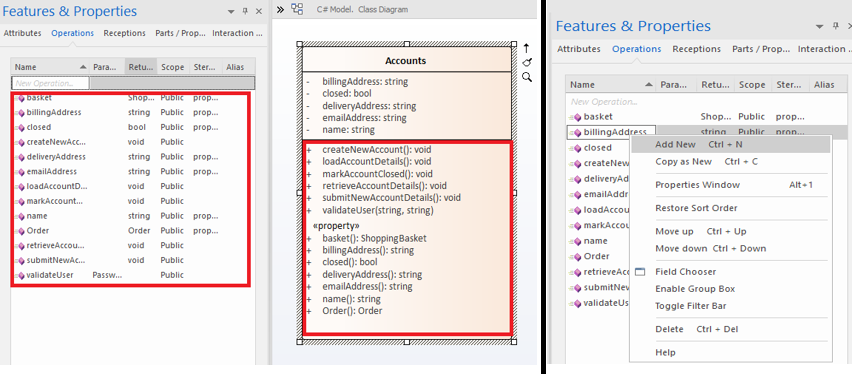
Figure 65 Operations Window

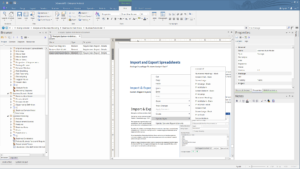
Tip #70: Generate Excel Report from Query

Generate CSV report with from query results. Use Ctrl+F | Run a Search. Export results using CSV Import/Export Option

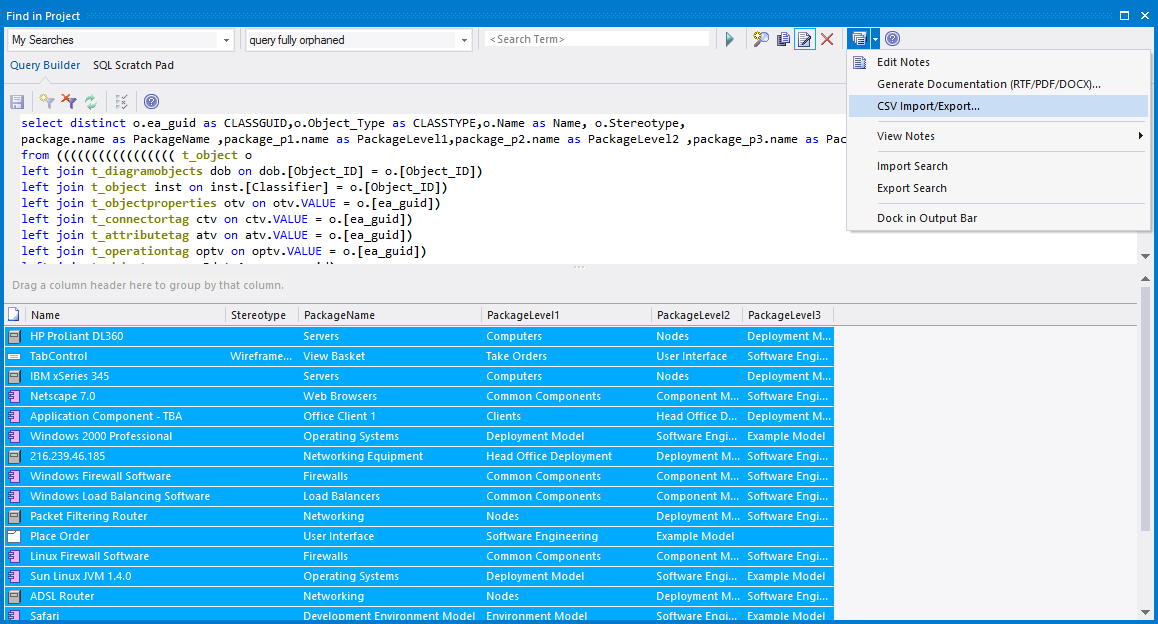
Figure 66 Generating Excel Report from Query

Tip #71: Change Line Style

Change line styles for multiple connectors at a time using “Relationships Window”. Select a few objects in the diagram, see all its connectors in the relationship window -> Right click -> Lines Style -> Choose desired line style.

Figure 67 Change Line Style

Tip #72: Apply Line Style

Use “Apply Line Style to -> All connectors of same type / stereotype” to quickly apply line styles to multiple connectors in a diagram.

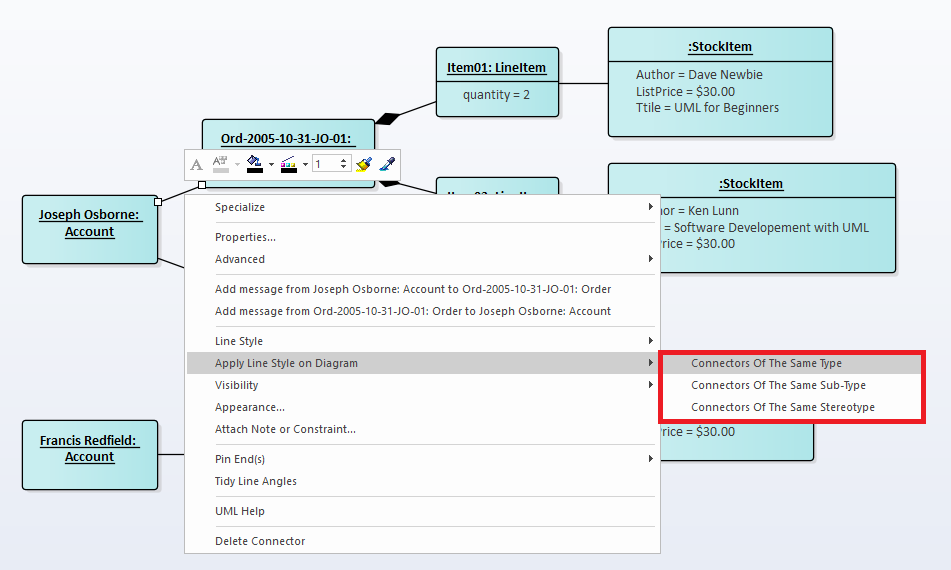
Figure 68 Apply Line Style

Tip #73: Switch Between Windows

Use “Ctrl + Tab” to switch between open windows within Enterprise Architect. One of the less known, highly useful feature to flip between item diagrams.

Figure Switch Between Windows

Tip #74: Instant Copy

Select an object in diagram, hold ctrl and drag to a new position to create object as new (copy)

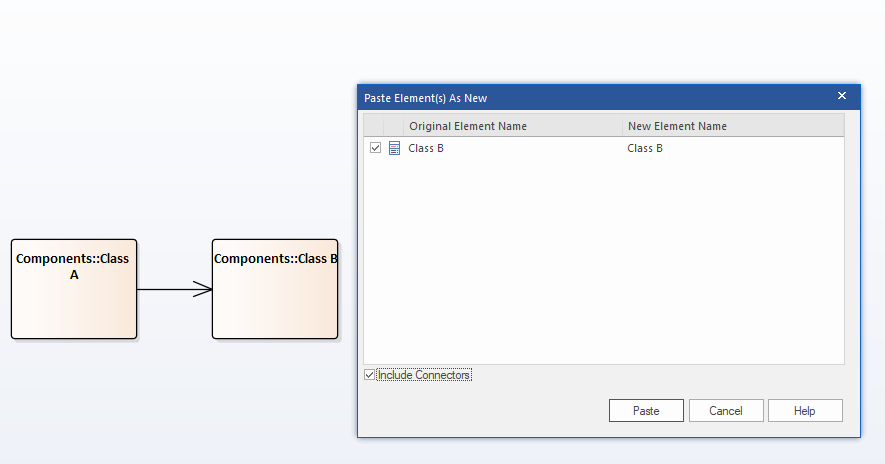
Figure 70 Instant Copy

Tip #75: Add Attributes Inline

Add attributes in line with “Ctrl + Shift + F9” – one of the most commonly used trick in Class models.

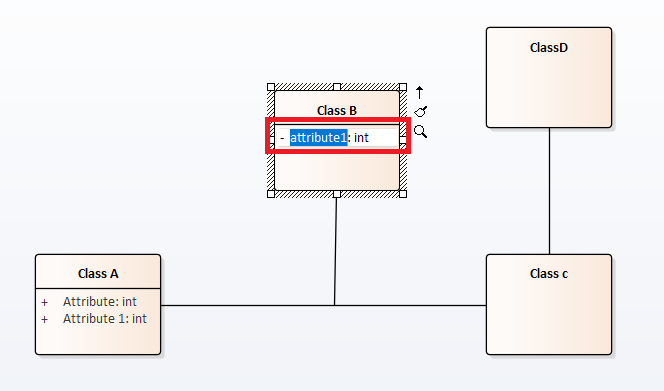
Figure 71 Add Attributes Inline

Tip #76: Add Operations Inline

Add operations in line with “Ctrl + Shift + F10” – one of the most commonly used trick in Class models.

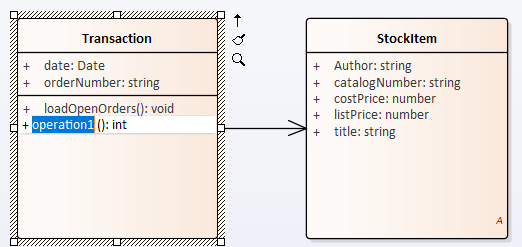
Figure 72 Add Operations Inline

Tip #77: Use Diagram Compare

Use Diagram Compare (Layout | Diagram | Manage | Compare to baseline) option to compare your diagrams to previous state. Handy feature to keep track of diagram changes.

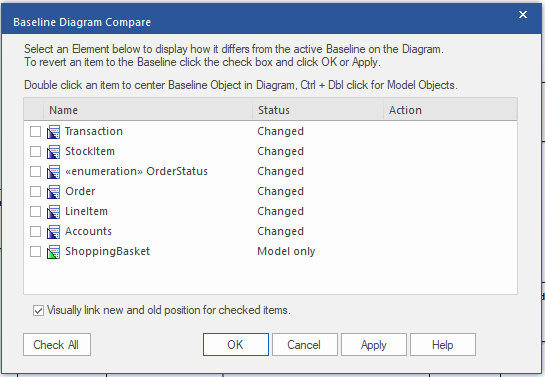
Figure 73 Use Diagram Compare

Tip #78: Diagram Frame

Configure “Diagram Frame” (Start | Preferences | Diagram Tab) to copy images with/without diagram frames.

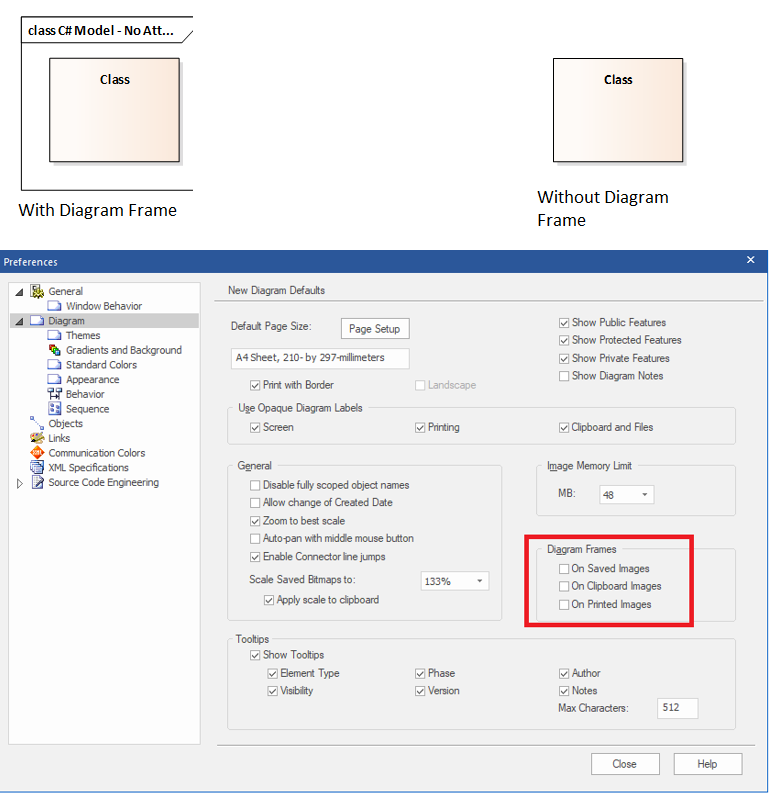
Figure 74 Diagram Frame

Tip #79: Image Memory Limit Property

Increase the Image Memory Limit (Start | Preferences | Diagram Tab) property to get better quality images in HTML / Clipboard

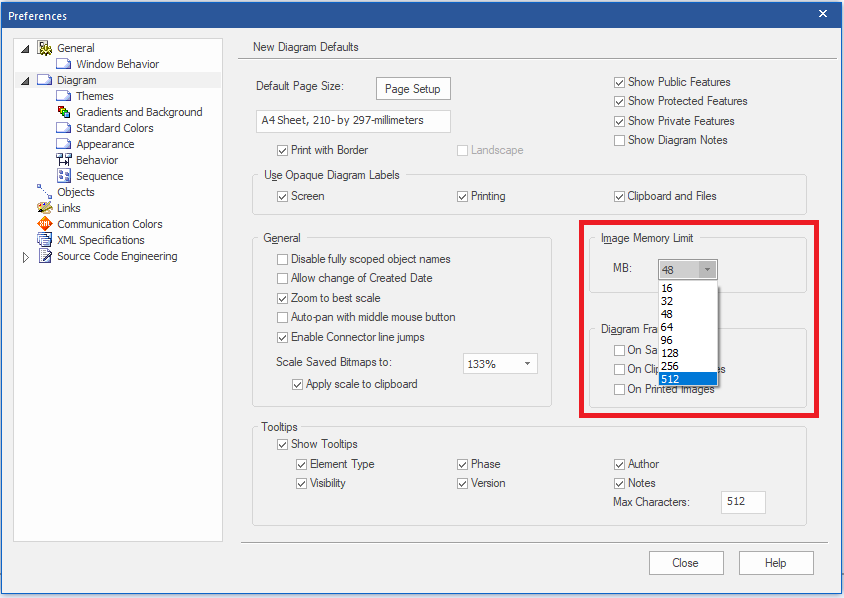
Figure 75 Image Memory Limit

Tip #80: Hide Page Border

Use “Start | Preferences | Diagram Tab” to Show/Hide page border of the diagrams.

Figure 76 Hide Page Border

Tip #81: Auto Group Elements

Use “Start | Preferences | Diagram | Behavior | Auto Group Elements” to set grouping elements as default behavior in all the diagrams.

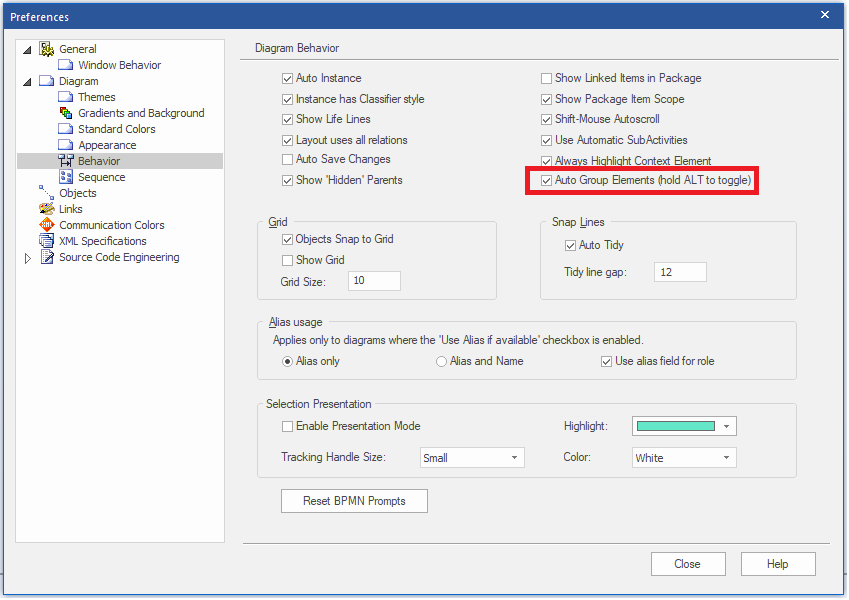
Figure 77 Auto Group Elements

Tip #82: Presentation Mode

Enable “Presentation Mode” to hide popups / on-hover messages, etc. (Start | Preferences | Diagram | Behavior)

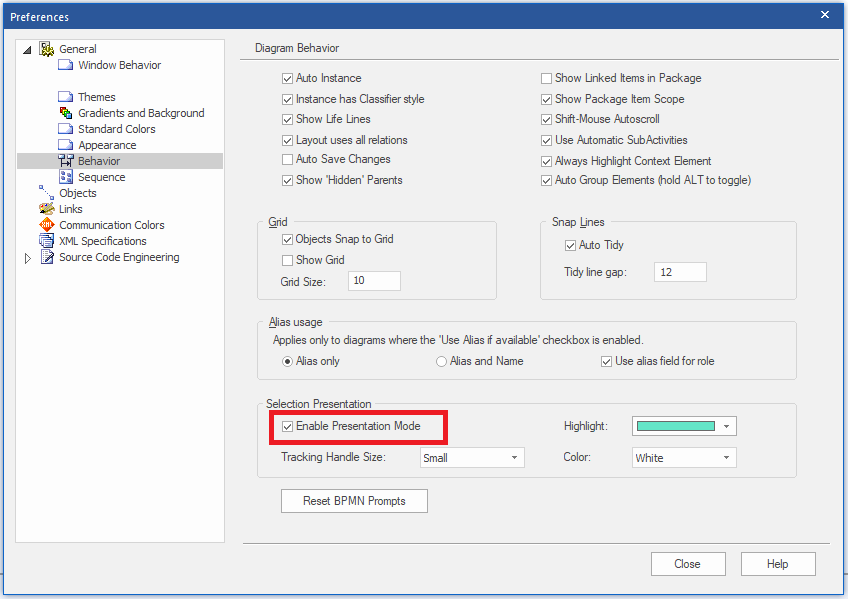
Figure 78 Presentation Mode

Tip #83: Show Direction

Use “Show Direction” (Layout | Helpers | Show Direction) to highlight incoming and outgoing relationships of selected element

Figure 79 Show Direction

Tip #84: Rectangle Notation

Change Element Appearance using “Use Rectangle Notation” icon below quick linker

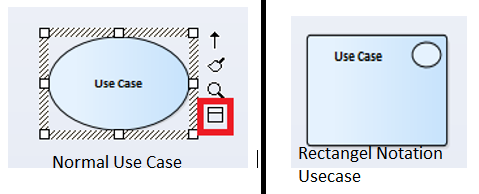
Figure 80 Rectangle Notation

Tip #85: Show Status Colors

Display element status on diagrams using “Show Status Colors” (Start | Preferences | Diagram | Objects).

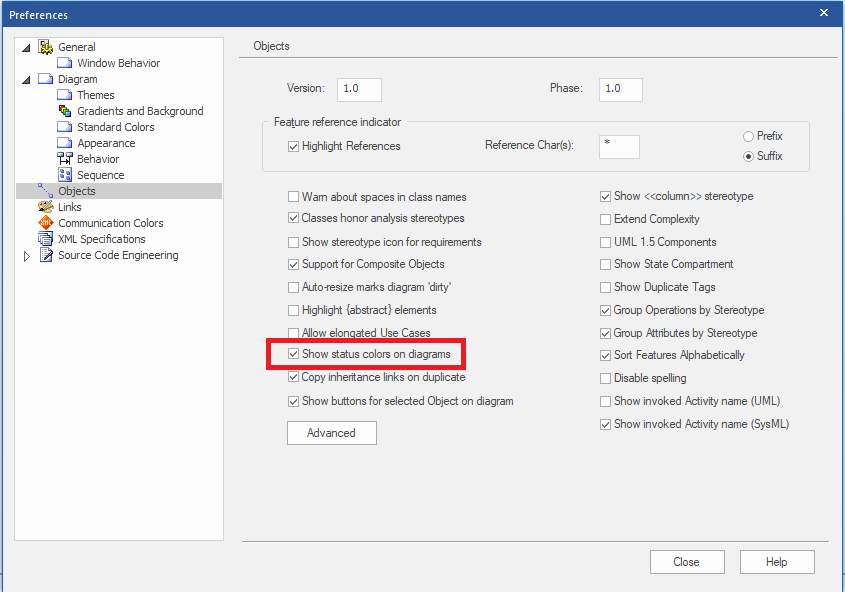
Figure 81 Show Status Colors

Tip #86: Set Line Style/Width

Use “Pen Width”, “Routing” options (Start | Preferences | Links) to set line style / line width across all diagrams

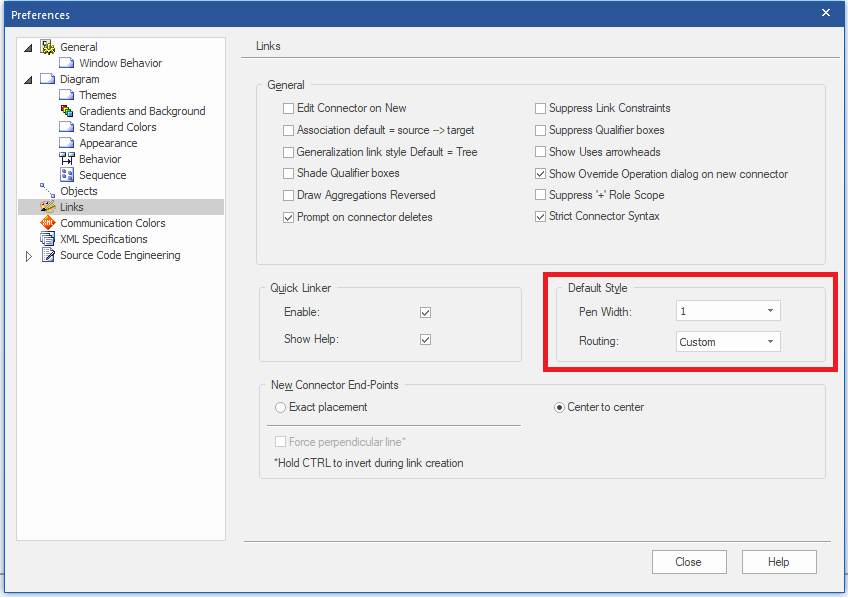
Figure Set Line Style/Width

Tip #87: Compact EAP

In EAP projects, doing a Compact .EAP File (Configure | Integrity Check | Manage .EAPX/.EAP File | Compact .EAPX/.EAP File) on a regular basis helps to reduce the size of file in large models.

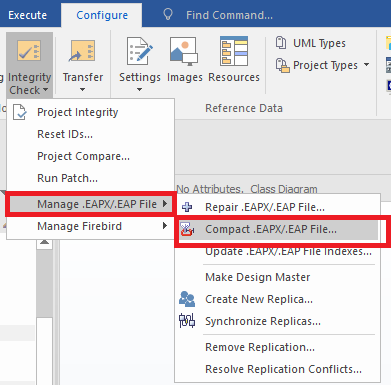
Figure 83 Compact EAP

Tip #88: Diagram Filters

Use Diagram Filters, and set mode to “Hide” this will allow normal “Context Filtering” to hide non-context items (Default behavior is greying out)

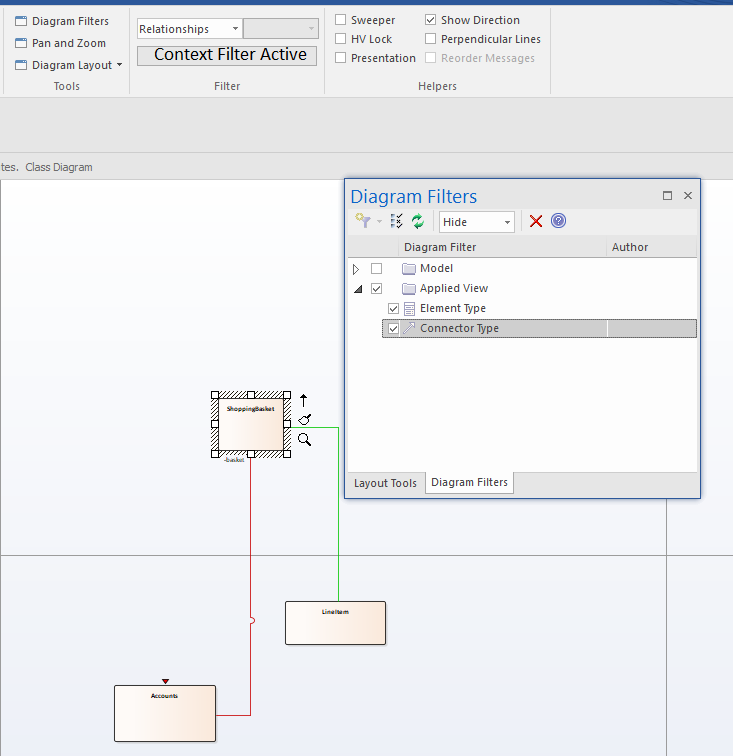
Figure 84 Diagram Filters

Tip #89: Reorder Messages

Hold “Alt” and move messages to reorder messages in Sequence Diagrams.

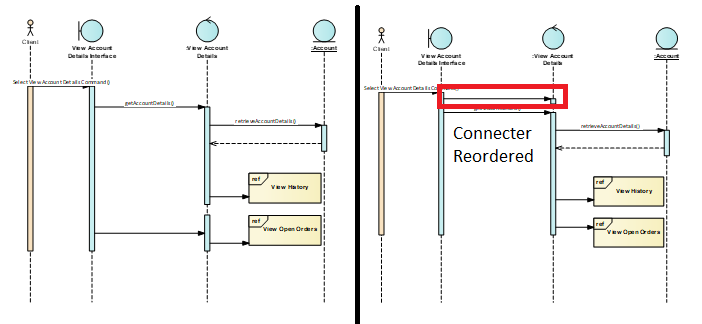
Figure 85 Reorder Messages

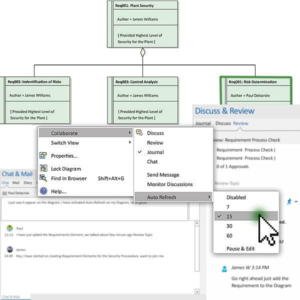
Tip #90: Recently Modified Elements

Set Auto notifications on new items in the model by using “Recently Modified Elements” Search in “Model Views” and setting auto-refresh. To identify the recently modified elements, create a “New Search folder” under “View Folder” in Model Views. To check the Recently modified elements (Start | Explore | Browse | Model Views).

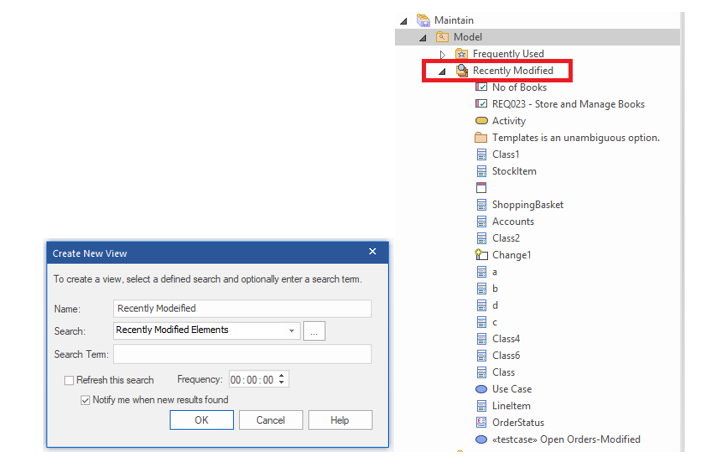
Figure 86 Recently Modified Elements

Tip #91: Create Element from Text

Select a piece of text in an application (e.g. web browser, word document, notepad++). Then drag and drop the selection to the diagram view in EA, to create an element with Name.

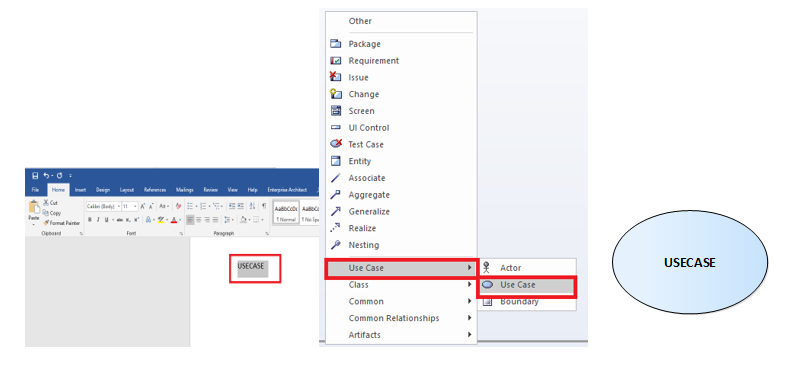
Figure 87 Create Element from Text

Tip #92: Enable Tool Tips

Enable tool tips in Enterprise Architect 14 using “Show Tips in Status Bar (restart) option” (Start | Visual Style).

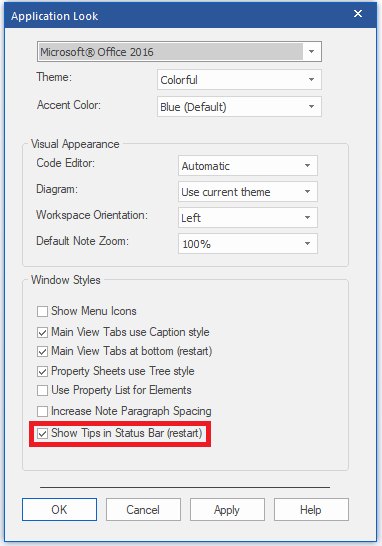
Figure 88 Enable Tool Tips

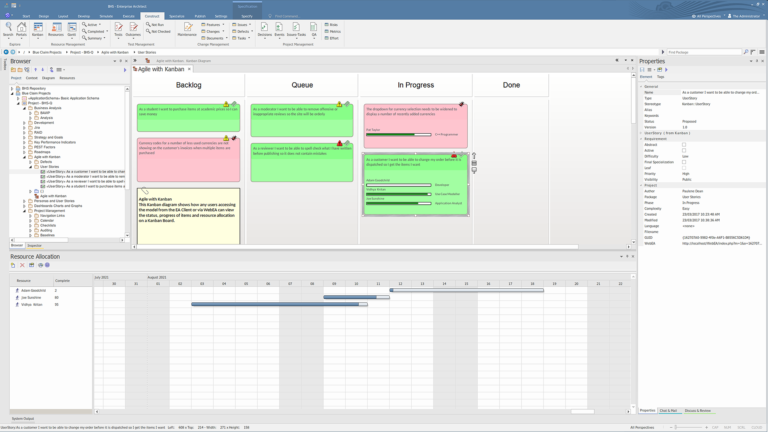
Tip #93: Kanban Charts

Use Kanban charts (driven by Default properties / Tagged Values) to categorize elements. To Create Kanban Charts, Right-click on diagram workspace select “Kanban” from context menu. Configure properties to categorize. Drag and drop the element in the Kanban workspace.

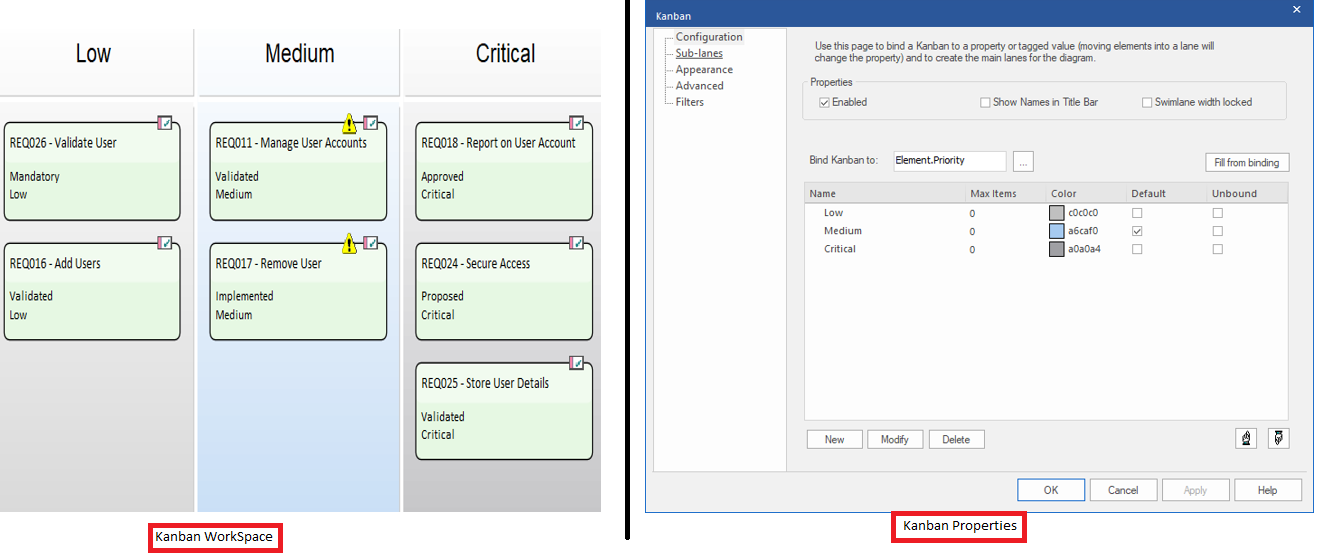
Figure 89 Kanban Charts

Tip #94: Save Server Connection

Save your server connection as an EAP file. EA icon Drop Down (Left Top)| Save as Shortcut

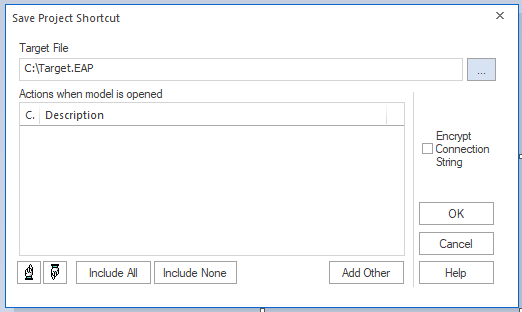
Figure 90 Save Server Connection

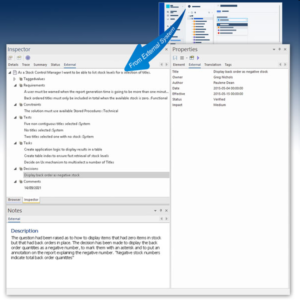
Tip #95: Inline Reader

Inline Reader (Simplified version of Specification window) option represents artifact name and notes along with diagram. To access the Inline Reader, open diagram and select (Design | Diagram | View as | Toggle Inline Specification View).

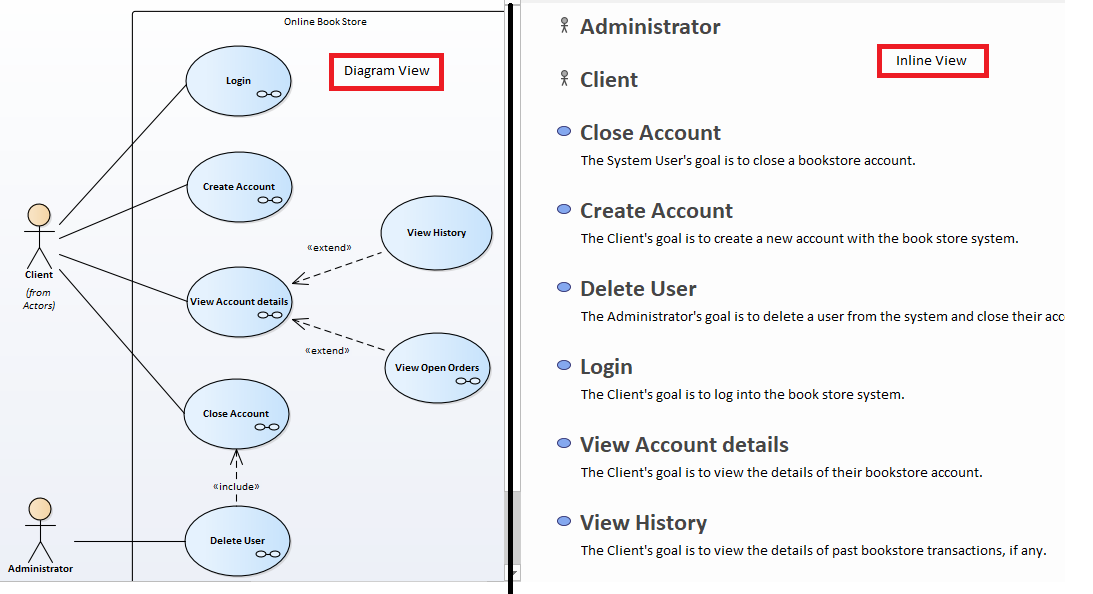
Figure 91 Inline Reader

Tip #96: Clone Element

To clone the element, open the cloned diagram. Select a element Right Click on the Element | Clone Element as New Version. Enter value for version and click OK.

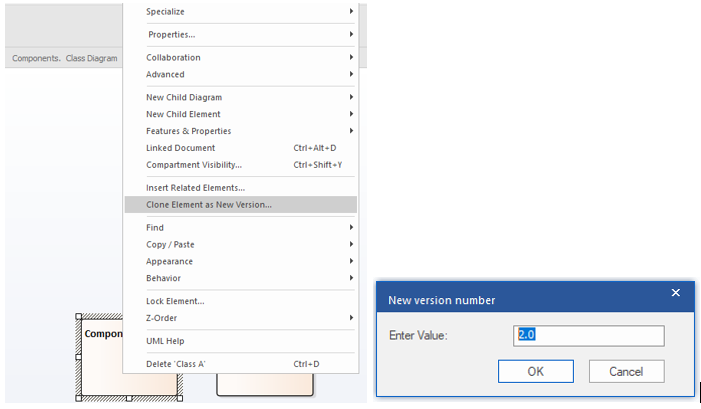
Figure 92 Clone Element

Tip #97: Create Charts

Charts in Enterprise Architect can help you manage projects, communicate strategy, identify trends and track KPI’s. Drag and drop the standard chart artifact from the tool box, double click on the artifact to open the properties. Configure Properties, type of chart. Data represented in chart can be defined from current model/external model/query/csv.

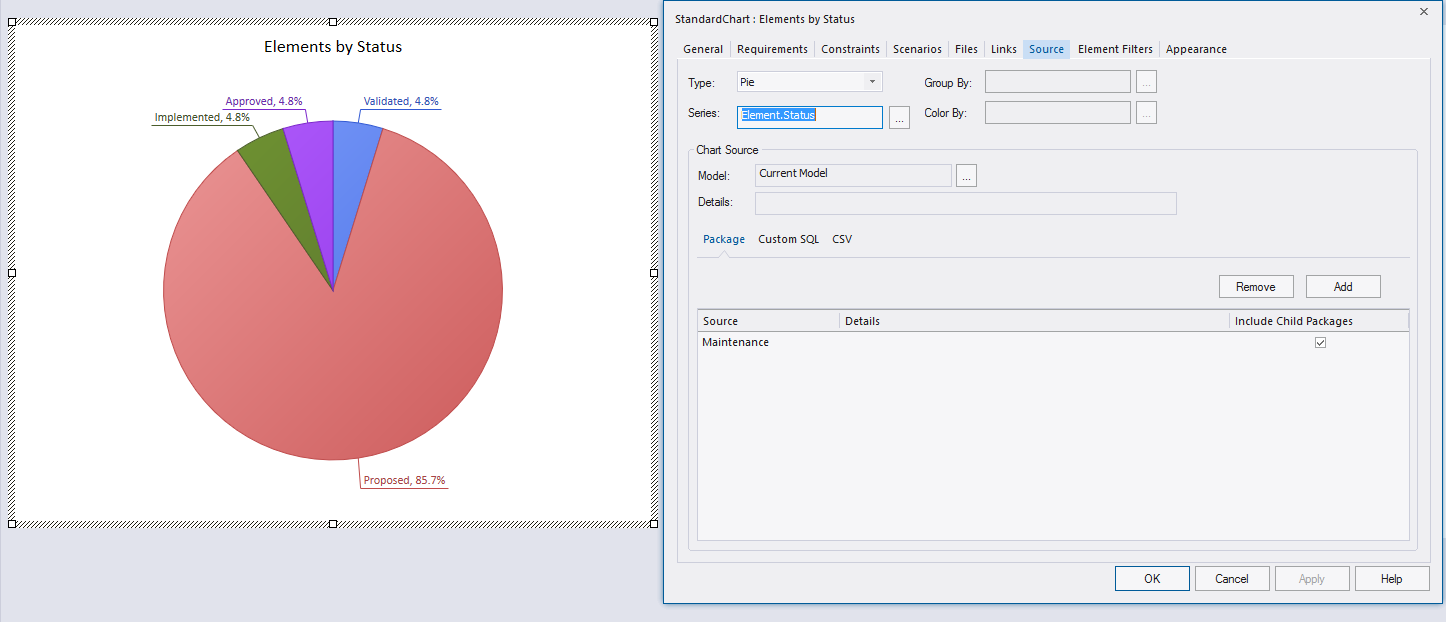
Figure 93 Create Charts

Tip #98: Save Relationship Profiles

Configure Relationship Matrix (Design | Matrix) using source/target package, element type, connector type and direction and save it as profiles (Options | Profiles | Save as New Profile) to publish in report.

Figure 94 Save Relationship Profiles

Tip #99: Add Elements from Project Browser

In the project browser, click on “drop-down | New Element”. Use “Save” option to create multiple elements.

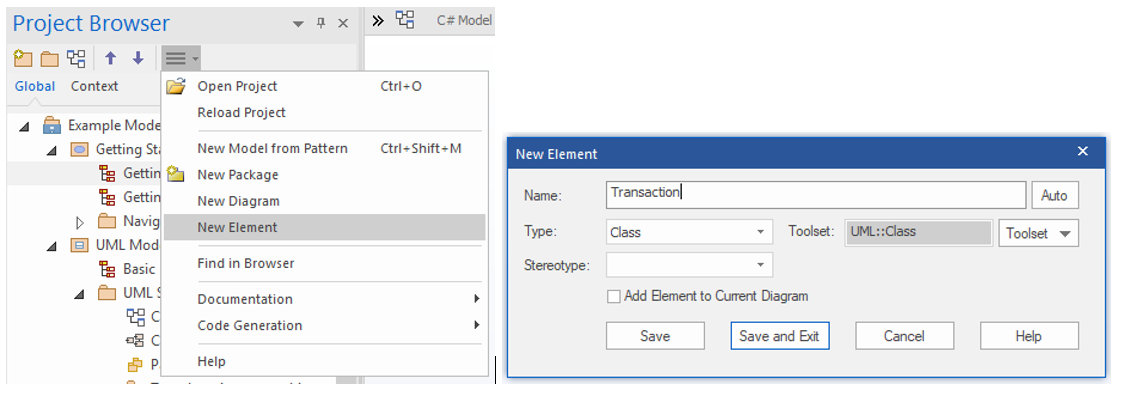
Figure 95 Add Elements from Project Browser

Tip #100: Sequence Numbering

Enable Show Sequence Numbering checkbox (Start | Preferences | Diagram | Sequence) to display interaction sequence between lifelines.

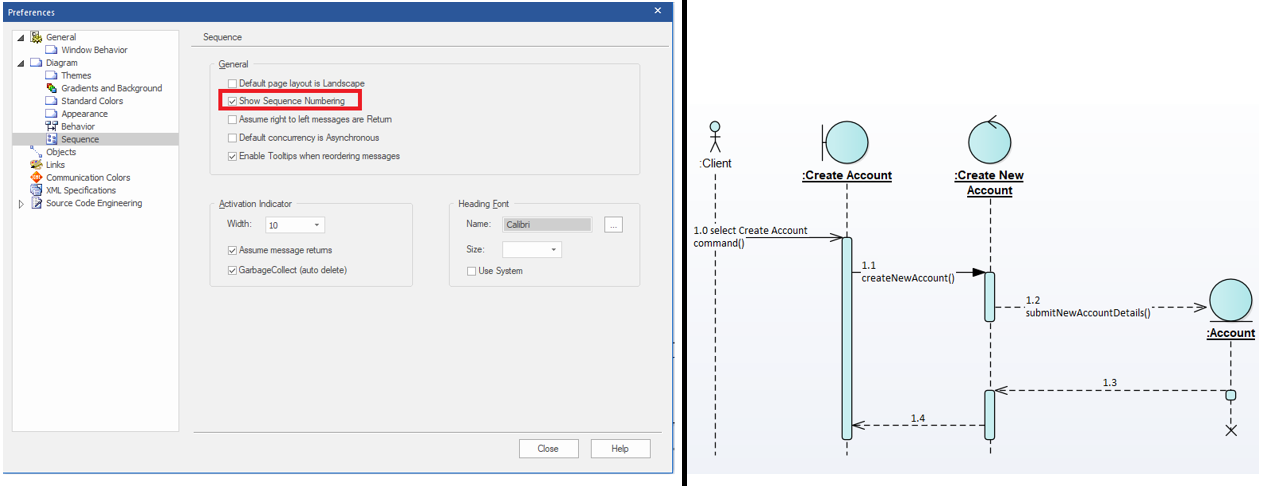
Figure 96 Sequence Numbering

Document GenerationSparx Systems Enterprise Architect

Quick Reports Through Custom Documentation in Enterprise Architect 16

Custom Documentation

  • Sparx Systems Enterprise Architect has a powerful feature to generate a quick report through the ‘Custom Document’ feature.
  • Beneficial among businesses and firms not only because of the ease of generating reports but also because they are usually quite accurate and uniform.
  • Helps the business to stay competitive by making the right data available to the right people at the right time.

What’s new in Custom Documentation in Sparx Enterprise Architect 16?

  • New custom document templates and sample document contents are available through Model Wizard and can be accessed from a Document Publishing perspective.
  • This new document templates allow you to produce high-level design, and functional, and business requirement documents.
  • Creating a Custom Document is fairly simple, and you can generate a document with a few clicks by simply dragging and dropping a model content from the Project Browser.
  • It Dynamically updates the entire document or a particular section, ensuring that it reflects the latest changes in the Model. So that, you can save time and avoid regenerating a document then copy-paste the changes in the existing word documents.
  • Warnings are now displayed when data is lost when updating a dynamic part.
  • Ad hoc reporting features allow users to customize to insert their own words, images, logo, and other contents to their own requirements.
  • Improved content list, which now includes the element and template for each dynamic part.
  • During document generation, a progress indicator will bring better feedback.
  • Numerous improvements and usability improvements have been made.

Custom Template

Figure 1: Custom Templates

Further Information
Please contact us or write an email to info@sparxsystems.in to have a live demo about the new EA 16 features and capabilities.

Sparx Systems Enterprise Architect 16

ENTERPRISE ARCHITECT 16.0 – A Quick Glance

Enterprise Architect Version 16  has undergone significant changes, plenty of enhancements, and an array of new features is made available to the users which will fulfill their expectations.

Here’s a gist of the new features that will entice users to upgrade their Enterprise Architect to the newest edition.

New and expanded collaborative tools

Enterprise Architect now includes a new set of Collaboration tools to provide a rich, collaborative team-based modeling approach. 

  • Chat with team members in real time. 
  • Keep a diary based personal model to record thoughts, ideas, and experiences.
  • Model based Mail allows communication with other modelers and groups.
  • Element Journal keeps track of ad hoc thoughts and ideas on a daily basis.
  • Create topics for formal element Discussions and respond to them.
  • The Enhanced Review Systems, provide, collect, and manage formal feedback.

Collaborate tools have been restructured into the following new windows

  • ‘Chat & Mail’: Chat, Mail, Diary, Recent.
  • ‘Discuss & Review’: Journal, Discuss, Review.
  • ‘Discuss & Review History’: Journals, Discussions, Reviews.

Journals, Reviews, and Discussions for effective team collaboration

Simplified model reviews, reduces project timeline in half. Hardcoded review indicators for determining the status types of review artifacts. The improved user interface allows users to join an active review and leave a review on closing the model. Filter the reviews based on the status of the discussion, approval status, priority, and most recent replies.

Construct History window

New Construct History window allows the user to keep track of the work in real time. Maintain an up-to-date picture of resource/task allocation, current testing, and current maintenance concerns. Whether the user is tracking software development, model design, deployment, project management, or any other situation, the Construct History keeps the user up to date on daily progress and development. A crucial management perspective for validating and guiding models and initiatives as they develop.

Enhanced Auditing

Enterprise Architect 16 has a faster auditing feature that ensures model quality is maintained swiftly, as well as agile change management. Model administrators and managers will have a better understanding of the changes. Track down changes and simply study and search for important model changes over time. Find out who made a change to an element, keep track of changes over time, and keep up with changes made by an offshore team.

Prime control over user permissions

Sparx Enterprise Architect 16 enhances the model governance by making it much more secure to safeguard your model/project. From Release 16.0 onwards, in the Corporate, Unified, and Ultimate Editions, if security is enabled, access restrictions can be applied to specific users and groups, to prevent certain actions. Prevents data loss in the model/project at the user level on top of the model security authorization and also prevents the unwanted destruction of model data. Aimed at preventing the inadvertent deletion of model content.

Auto-Refresh Diagrams

In real time, the new Auto-Refresh diagram feature makes the standard Enterprise Architect diagram as a shared whiteboard, allowing users to collaborate and co-author diagrams. Set a time period for Auto-Refresh on the diagram and allow the team to keep track of changes as they occur. By combining Chat, Discussions, and/or Review, users can create their own real-time, distributed, and dynamic modeling environment.

Auto-Reload changed Diagrams

New Auto Reload functionality in Sparx Systems Enterprise Architect ensures the diagram you’re working on is the most recent version. One can reload any diagrams that are open while others make modifications by enabling this functionality in Enterprise Architect. Enables quick communication with coworkers and ensures that the graphical reports provided by EA are up to date.

Grid Style – Make a spreadsheet out of your diagram

Enterprise Architect has always allowed modelers to customize the appearance and position of elements in diagrams, and the New Grid Style Diagram option allows you to manage and organize diagrams by sorting diagram elements into cells within a grid. Users can create a spreadsheet, a dashboard, or even a home page for a model with a new Grid Style Diagram. The grid capability works together with the new scripting API to make it easier to dynamically change the look of diagram parts when the diagram is loaded.

Scriptlets – A Step Beyond Static View

Sparx Systems Enterprise Architect 16 now includes a New Scriptlet element that provides a dynamic view of the diagram. Scriptlet is a JavaScript-based powerhouse that allows users to access the underlying diagram and element API for customizing element appearance, text, tagged values, and other properties. Scriptlets are executed automatically when the diagram containing them is reloaded or they can be executed manually on demand.

Each Scriptlet has access to three global objects in addition to the standard automation environment. They are:

  • theDiagram – an automation Diagram interface to the diagram on which the Scriptlet resides
  • theElement – an automation Element interface to the Scriptlet artifact itself
  • theInstance – an automation DiagramObject interface to the Scriptlet artifact itself

New features in Custom Documentation

One of the major changes in version 15 has been improved to provide an even more compelling solution for creating highly customizable reports. Some of the major improvements include in version 16:

  • Ability to choose and use a template when creating a new document.
  • More information on how to set up the sections
  • Improved content list, which now includes the element and template for each dynamic part.
  • During document generation, a progress indicator will bring better feedback.
  • Warnings are now displayed when data is lost when updating a dynamic part.
  • Diagram toolbox can now be used to create custom document elements.
  • Numerous improvements and usability improvements have been made.
  • Expansive and easily accessible tips to assist.

External Data tab in Inspector window

PCS-based integrations with other systems like Jira give a multi-faceted view of the modeler’s data. A genuinely global perspective is supported by building model elements based on constructions and entities stored in other systems.

The Inspector window’s “External Data” tab has been improved to allow users to go even further into the information saved outside and connected to the model’s “proxy” element. It’s a useful and necessary tool for integrating the model with external systems. It now adds the ability to view comments from external data entities in Enterprise Architect’s Notes window.

Enhanced Technologies

Customizable Quick Access Toolbar

Add favorite and often used Ribbon commands (including menu buttons) to the new Quick Access Toolbar. Instant access to everything the user needs for the job. Full Screen and WorkSpace layout buttons are present by default.

  • Build up own set of handy tools.
  • Choose “Add to Quick Access Toolbar” from the context menu when the user right-click on a Ribbon item.
  • Easy to use and effective

64-Bit Application Support

Enterprise Architect has been significantly redesigned into a brand new 64-bit version as well as a legacy 32-bit version. The new 64-bit version has several speed enhancements to deal with significantly bigger data sets, reports, files, and repositories. A clear, quick, and scalable system capable of handling the most difficult and complicated jobs.

With the future increasingly concentrating on 64-bit platforms, Enterprise Architect is poised to face the challenge and produce amazing outcomes in record speed.

  • Increase memory capacity.
  • In comparison to 32 bit processing, 64 bit processing is more efficient.
  • Larger report creation jobs can be supported.
  • Larger XMI import/export operations are supported.
  • Larger diagrams can now be exported and saved.
  • Larger Simulations can be built and run.
  • Large Code Miner databases can be built and searched.
  • Benefit from the functionality and features of the 64-bit operating system.

New standard file based repositories

Enterprise Architect 16 includes new file-based standard repositories.

  • QEA files – Fundamental personal file-based version.
  • QEAX files – Shared files with tiny workgroups are supported.

The new QEA/QEAX “mini-repository” is based on the tried-and-true, secure, and open source SQLite database. These serverless repositories are compatible with Enterprise Architect 16 32 and 64 bit editions. QEA/QEAX files are the most basic and straightforward starting point for your personal/workgroup modeling design journey. With support for basic replication and simple shared model access, a QEA mini-repository will be the preferred starting place for many modelers.

Simplified way of connecting New and existing DBMS

In addition to the previous connection methods that required additional ODBC or OLEDB drivers to be loaded, Enterprise Architect 16 adds a “native” connection mechanism to both 32 and 64 bit versions. The native connection approach makes it easier to connect to current and new database repositories without having to install drivers for each DBMS or establish DSNs. EA connects to the database once the user enters all of the database’s details on the Native Connection window.

Code Engineering

When the ‘Search Intelli-sense’ context menu option is selected in an Enterprise Architect code editor, Enterprise Architect no longer displays a submenu with all the mysql queries named in the Sparx query library, but instead acts on the search term using the query selected in the ‘Intel’ tab of the ‘Find In Files’ control. New C++17 language features are supported, as well as round-tripping the context specifier on a variable or function.

  • Create a Code Miner repository from a code base.
  • Use one of the language grammars provided.
  • To find and analyze the code, use the MySQL query language.
  • Even with enormous code bases, results are returned in milliseconds.
  • Connect to EA’s code editors to give on-the-fly assistance. 
  • Make a code base available as a service, either locally or remotely.
  • Updates that are quick and have a low impact only contribute fresh modifications and additions to the compilation
  • To parse any structured data and to create own grammar.

Expanded JavaScript Library

The new default scripting language for Enterprise Architect 16 has been changed to Javascript.  The current VBScript and JScript libraries have been moved to JavaScript as part of this upgrade. The new examples and libraries make it easy to get started with scripting. JavaScript is the best (and sometimes only) solution for model-based add-ins, scriptlets, generic script code, simulation element behavior, and other similar applications. JavaScript is the greatest choice for developing dynamic model-based code to fine-tune and bring the model to life. It is one of the world’s most popular coding languages. The new routines and examples library is an excellent place to start.

Gantt Chart view in Resource Allocation window

The revised Resource Allocation docked window now works as a Gantt Chart, giving users a better visual experience while assigning and managing jobs in the model.

  • Get a clear picture of what’s going on with any element.
  • Drag and drop to quickly change the start and end dates.
  • It’s simple to add and change tasks.
  • On work items, the user can zoom in and out.
  • For rapid visual reference, percent completion is placed on tasks.

Native XEA file exchange format

A new quick and convenient alternative to XMI and XML formats for big package data sharing. Using the XEA format speeds up model archiving as well as the export and import of Enterprise Architect repositories.

New UI theme – Dark Sapphire

Introducing “Dark Sapphire,” a new dark aesthetic style meant to reduce visual contrast and give a more comfortable reading experience. The new theme may be applied to all Enterprise Architect panels and visual controls.

Choose the Dark Sapphire option as the Theme in the Visual Style settings for any of the following:

  • Microsoft® Office 2016,
  • Microsoft® Office 2019, 
  • Microsoft® Visual Studio 2013 or
  • Microsoft® Visual Studio 2019

New Model Patterns for Systems Engineers

With the addition of new model patterns, you can jumpstart your Systems Design. Enterprise Architect 16’s library of reusable patterns and content that fosters efficiency and productivity continues to grow. In System Design, you have quick and easy access to popular modeling situations.

  • AUTOSAR
  • SysML patterns
  • Modelica case studies
  • DMN patterns
  • Scriptlets
  • SysPhS library
  • Octave Solver

Introducing NIEM 5

A model-based approach to the development of standardized NIEM schemas that can be used and reused will be employed to achieve trustworthy information exchange. Begin by importing the most recent NIEM 5.0 reference model from the Model wizard. The beginning model patterns and the reference model make core and domain-specific terminology readily available, assisting in the development of common vocabularies and guaranteeing efficient information sharing between businesses.

Status tab in Inspector window

Examine and analyze the status and priority of all items in a diagram quickly. A useful triage tool for determining what is urgent and what can wait.

  • Display a list of all diagram elements.
  • Pay attention to each element’s Status and Priority settings.
  • Concentrate on the most critical challenges.
  • To drive modeling and design, add Priority and Status types to the model.

Note: The property Priority is available for Requirement, Feature, Change, Issue.

Configuring AutoName using stereotype

Auto-naming has been enhanced to target specific element types as well as stereotypes. For example, Users may now specify Auto-Naming for standard Requirements independently from SysML Requirements by choosing both the stereotype and the type.

  • Improved control over the automatic naming of new components
  • Distinguish between elements based on both element type and stereotype.
  • Similar kinds from various profiles are auto-named in their own distinctive way.

Further Information
Please contact us or write an email to info@sparxsystems.in to have a live demo about the new EA 16 features and capabilities.

User Permission

Enhanced User Security in Enterprise Architect 16 

User Security in Enterprise Architect is a method of restricting the use of data update functions across the model via access rights for each function, as well as safeguarding individual parts and diagrams from modification using user locks.

  • The primary goal is to avoid unintended data alterations and to prohibit access to sensitive information.

What’s new in Sparx Enterprise Architect 16 

  • Sparx Enterprise Architect 16 enhances the model governance by making it much more secure to safeguard your model/project.
  • From Release 16.0 onwards, in the Corporate, Unified, and Ultimate Editions, if security is enabled, access restrictions can be applied to specific users and groups, to prevent certain actions.
  • Prevents data loss in the model/project at the user level on top of the model security authorization and also prevents the unwanted destruction of model data.
  • User limitations prevent a user from completing certain tasks, independent of their other user and group security rights.
  • Restrictions can be applied for deleting packages, diagrams, elements, connectors, attributes, and operations.
  • They may also be used to limit XMI Import, restore from a Baseline, and remove a Baseline. Basically, anything that could result in ‘data loss’.
  • These restrictions are aimed at preventing the inadvertent deletion of model content.

Figure 1 User restrictions in Sparx EA 16

Restrictions 

Restriction Prevents the user from
Delete Package Deleting Packages.
Delete Diagram Deleting diagrams.
Delete Element Deleting elements.
Delete Attribute Deleting attributes from elements, or columns from data tables.
Delete Operation Deleting operations from elements, or constraints from data tables.
Delete Connector Deleting connectors.
Import XMI Importing XML Package files (but does not prevent version control imports).
Restore from Baseline ‘Restoring’ a Package from a previously-saved Baseline.
Delete Baseline Deleting saved Package Baselines.

Further Information 
Please contact us or write an email to info@sparxsystems.in to have a live demo about the new EA 16 features and capabilities.