S
p
a
r
x
S
y
s
t
e
m
s
I
n
d
i
a

Contacts

No 58A, New No 73,
Thirumangalam Road,
Villivakkam,
Chennai-600 049

info@sparxsystems.in

Add-ins

MDG Integration for Microsoft Office – Excel BPMN Visualizer

The latest MDG Office Integrations (v1.4.40) provides an enrichment feature named “BPMN Visualizer,” which allows the user to push the BPMN elements from the Microsoft Excel document into Sparx Enterprise Architect Model and vice versa.

Key Features of BPMN in MDG Office Integration

  • Simplified Approach that eliminates the necessity for Profile Creation during import and export for mapping items. This drastically minimizes user time and the possibility of manual errors.
  • Through a single click of “Excel to EA” menu, users can quickly synchronize BPMN Elements, seamlessly updating and aligning data between Excel and the Enterprise Architect model.
  • The visual representation of diagrams from the EA model, as well as the related preconfigured mapping table, can be displayed within Excel.
  • The capability to incorporate multiple diagrams is supported when a package is selected. This means that all diagrams within the chosen packages are exhibited, accompanied by their respective predefined mapping tables in separate sheets.

To import BPMN data into Enterprise Architect from Excel

Excel Ribbon

 Figure 1 – Excel Ribbon

BPMN Visualizer in Excel Interface

BPMN Visualizer‘BPMN Visualizer’:  Import and Export between Excel and Enterprise Architect of BPMN element and their connectors.
Hardware RetailerAllows users to select a Package or BPMN Diagram to Load from the EA Model to the Excel with the respective diagram image.

Once Enterprise Architect model is connected, the Excel sheet is loaded with diagram and its predefined mapping table.

BPMN Element data along with diagram

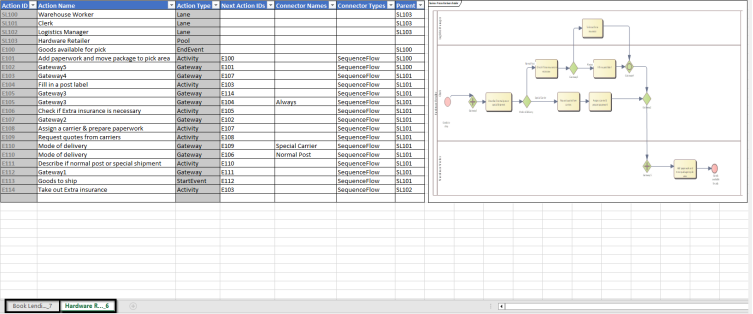
Figure 2 – BPMN Element data along with diagram

Excel column definition

The table below describes the details of the predefined columns in the Excel

Action IDThe Unique ID of BPMN Elements. It’s used to map the connectors and parent.
Action NameName of the BPMN Element
Action TypeType of the BPMN Element
Next Action IDsTarget BPMN Element to connect based on the Action ID.
Connector NameName of the BPMN Connector
Connector TypeType of the BPMN Connector
ParentThe parent of a selected BPMN Element based on the Action ID.

Note

  • The Excel sheet contains only the ‘BPMN 2.0 Technology’ based Elements and Connectors.
  • Format of Excel sheet name – ‘DiagramName_DiagramID’.
  • The supported element types are Activity, Gateway, StartEvent, IntermediateEvent, EndEvent, DataStore, DataObject, BusinessProcess, BPELProcess, GlobalTask, Pool, and Lane.
  • The supported connector types are SequenceFlow, Message Flow, ConversationLink, DataAssociation and Association.

Element and Connector Creation in Excel

  • To create a new element, enter a name in the ‘Action Name’ column(mandatory). By default, the ‘Action Type’ is ‘Activity’. Users can change the type using a drop-down list.
Adding-Element-and-its-Connectors-in-Excel

Figure 3 – Adding Element and its Connectors in Excel

  • ‘Next Action ID’ creates a connector between two BPMN elements. Select the ‘Next Action ID’ checklist box and select the ‘Action ID’ to connect. By default, the connector type is ‘Sequence Flow’
  • The ‘EA to Excel’ icon is used to restore the produced items to their original state as in the Enterprise Architect Model.
  • After Creating Element and Connector, select the ‘Excel to EA’ icon. It will Create the new elements and connectors under the selected package in Enterprise Architect and the respective diagram is updated in the Excel sheet.
Updated Element and Connector data in Enterprise Architect

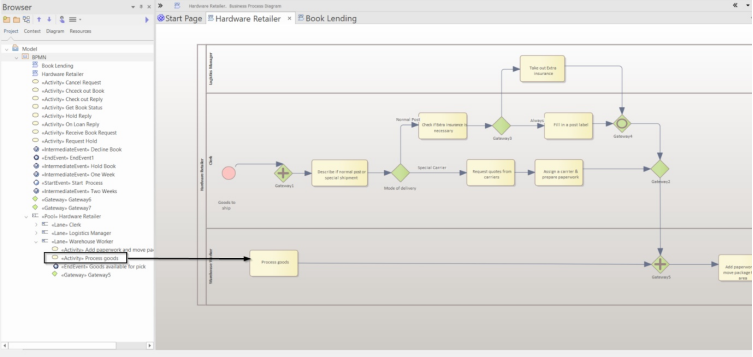
Figure 4 – Updated Element and Connector data in Enterprise Architect

Further Information

Please contact us or write an email to info@sparxsystems.in to have a live demo about the new EA 16 features and capabilities.

Add-ins

Integrate IBM Doors ng with Sparx EA Jazz Integration

Sparx EA Integration with IBM DOORS

The Sparx Enterprise Architect models integrate with external providers or third-party providers via Pro Cloud Server. Enterprise Architect serves as an accumulator, handing components into a single repository and enabling the relatedness of the components, rather than managing the master records for these objects. A variety of third-party providers can be integrated with Enterprise Architect including Jazz Integration with IBM Rational DOORS Next Generation’s requirements management tool, Jira & Confluence, Polarion, etc.,

Setting up the integration for IBM Rational Doors NG in Pro Cloud Server

Prerequisites

In order to set up integration between IBM Rational DOORS NG and Enterprise Architect, you must first:

  • Prior to using Jazz IBM Rational Doors Next gen, you must first register.by clicking this link and sign up to jazz account.
  • Be using a licensed installation of Pro Cloud Server with the Integration Plug-ins component.
  • Select the ‘Enable Pro Features (OSLC, WebEA and Integration)’ option in the Pro Cloud Server configuration for each Database Management System hosting your Enterprise Architect models.
  • Have network access between the PCS server and IBM Rational DOORS Next Generation’s.
  • Have user credentials to access the external data.
  • Be using Enterprise Architect Corporate, Unified, or Ultimate edition v14 or later.

Step-by-Step Instruction

  • Open the Pro Cloud Config Client window.
  • Select the ‘Integration’ tab and select the ‘Enable Integrations’ checkbox.
  • Click on the Add button. The ‘Add Data Provider’ dialog displays. Select the ‘Enabled’ checkbox.
  • In the ‘Name’ field, type an appropriate connection name (For Ex: ‘IBM Doors’).
  • In the ‘Provider’ field, click on the drop-down arrow and select ‘Jazz’, this automatically adds ‘Jazz’ to the ‘Prefix’ field as well.
  • In the ‘Integration Plugin’ panel, in the ‘Port’ field, type the number of the Port that the Integration Server will use to communicate with the Jazz IBM Doors Plug-in.
  • In the ‘Protocol’ field, click on the drop-down arrow and select the protocol that the Jazz IBM Doors Plug-in will use to communicate with Jazz IBM Doors

     –  For a Jazz IBM Doors Cloud default installation, this must be ‘HTTPS’.

  • In the ‘Server Name/IP’ field, type the server’s name or IP address that the Jazz IBM Doors Plug-in will use to communicate with Jazz IBM Doors.
  • In the ‘Port’ field type the number of the Port that the Jazz IBM Doors Plug-in will use to communicate with Jazz IBM Doors.

     –  For a Jazz IBM Doors Cloud default installation, this must be ‘443’.

  • Enter the base URL field with the appropriate jazz account URL.
  • Select the ‘Create Items’, ‘Modify Items’ and/or ‘Post Discussions’ checkboxes as necessary, to allow users of the Jazz IBM Doors Plug-in to create and/or update items and/or create Discussion posts in Jazz IBM Doors using Enterprise Architect.
  • If you want the Jazz IBM Doors Plug-in to ignore SSL-related errors that occur as a result of communicating with Jazz IBM Doors, select the ‘Ignore SSL Errors’ checkbox.
Edit Data Provider
  • You can leave other fields blank or set to their default values. Click on the OK button to complete the configuration. This returns you to the ‘Integration’ tab of the Pro Cloud Server Configuration Client window.

Identify Enterprise Architect models to Jazz IBM Doors NG

On the ‘Integration’ tab of the Pro Cloud Server Configuration Client window, you will now see:

  • The ‘Data Providers’ panel listing Jazz IBM Doors as a data Provider.
  • The ” Jazz IBM Doors ‘’ is bound to:’ panel displaying a checklist of the Enterprise Architect models from your Pro-enabled Database Manager(s).
  • You can either click on the checkbox against each Enterprise Architect model you want to bind to Jazz or click on checkbox the to select all of them at once.
Integration
  • Click on the Exit button.
  • Restart the PCS Service to apply the changes you have made.
  • You can now go into one of your Enterprise Architect models and check the integration with Jazz IBM Doors.

Integrate IBM Doors Integration with Enterprise Architect

In Enterprise Architect open one of the models, you have selected in the list ‘ Jazz IBM Doors ‘ is bound to. See the image below,

External Data
  • Select the ribbon option Specialize > Tools > System Integration > Open External Data.
  • In the toolbar of the External Data window, click on the drop-down arrow to the right of the ‘globe’ icon.
  • Select ‘Jazz IBM Doors’ from the list; this adds the provider to the breadcrumb trail in the toolbar.
  • Click on ‘ Jazz IBM Doors ‘ in the breadcrumb trail to display a list of Jazz providers that have been configured and bound to this model. If nothing is listed then no provider has been bound to this model.
  • Click the Provider that was set up and bound to this model, to display a list of Jazz IBM Doors projects that are now available for selection to work within this Enterprise Architect model.

Further Information

Please contact us or write an email to info@sparxsystems.in to have a live demo about the new EA 16 features and capabilities.

Add-ins

MDG Integration for Microsoft Office – BPMN Visualizer

BPMN Visualizer is a powerful tool that makes it easy to import BPMN contents from Microsoft Visio into Enterprise Architect using MDG Integration for Microsoft Office. The BPMN Visualizer has a user-friendly interface that simplifies the import process.

Key features in MDG Integration for Microsoft Office – BPMN Visualizer

  • It allows the user to import Visio BPMN shapes and connectors, along with their corresponding property values into Enterprise Architect.
  • We can also Import Non-BPMN Shapes from Visio document by mapping the defined EA BPMN Types and Stereotypes. Otherwise, it will be ignored.
  • It supports .vsd and .vsdx files.

Introducing the Interface

  1. Select the Microsoft Visio Document that contain the BPMN information that needs to be imported.
  2. Choose the profile that has been defined for the selected Visio document. If you don’t have a profile, click on ‘Create New’ option to Create a new profile

  3. Select Import to create the BPMN Information into model elements in Enterprise Architect.
Import Visio Interface

Figure.1 Import Visio Interface

Profile Mapping

Users can easily and adaptably map Visio documents to EA models using profiles. This makes it more effective.

To create a new profile, Specialize -> BPMN Visualizer -> Profile Manager -> Create New

Create new profile

Figure.2 Create New Profile

Profile Information: 

Profile Name The name of the profile
Description A brief description of the profile 
File Name Visio document path 
Only Show Unmapped Objects This option is used to display Unmapped Objects Separately. 
Checked – It only display the unidentified objects for mapping. 
Unchecked – It will display all objects from the Visio
GroupBy Type This option is used to group based on shape type. If the option is checked, it maps the same definition for all similar types 
Skip Unmapped Objects while Importing Used to skip the dialog that displays unidentified shapes while importing.  
Checked – Unidentified shapes will be ignored while importing. 
Unchecked – Unmapped objects window will get pop’s up to map the objects while importing. Refer here

Unmapped objects during import: 

It is used to map unidentified shapes like non-BPMN from a selected Visio document into EA BPMN element types and stereotypes. 

Mapping the Unmapped Shapes from Visio

Figure.3 Mapping the Unmapped Shapes from Visio

Table information in Profile Mapping 

Visio Shape Type Denotes the type of shapes present in the Visio Document 
Shape Name Displays the name of each shape from the document 
Object Type Display the EA BPMN element types that will be created in the EA Models. This column can also be modified via dropdown menu 
StereotypeDisplay the EA BPMN stereotypes that will be created in the EA Models. This column can also be modified via dropdown menu
Page Name Displays the name of the page where each shape is located within the Visio document 

By following the above simple steps, the user can import the Visio BPMN stencils and their relationships into Enterprise Architect with the help of profile mapping as displayed below.

Import Visio BPMN Stencils as EA Artifacts

Figure.4 Import Visio BPMN Stencils as EA Artifacts

Further Information 

Please contact us or write an email to info@sparxsystems.in to have a live demo about the new EA 16 features and capabilities.

Sparx Systems Enterprise Architect 16

Reusable Asset Service (RAS) in Sparx Enterprise Architect

Reusable Asset Service (RAS) in Sparx Enterprise Architect

  • Sparx Enterprise Architect supports the Reusable Asset Service feature, which offers a straightforward and practical method for modelers to share or download reusable model structures, information, as well as corporate directives and standards.
  • Distributed teams can access the shared repository as it will be connected to Pro Cloud Server.
  • The RAS gives distributed teams convenient access to a single ‘source of truth’ for shared data, including project milestones, architectural frameworks, and industry standards.

Reusable Assets

Pro Cloud Server repository encompasses a Reusable Asset Storage.

Reusable Assets can consist of:

  • Packages containing elements, diagrams and structures (as drawn from any point within the Browser window).
  • A variety of text, coding, and graphic file types, such as.qea and.eap files.
Reusable Asset Service

Figure :1 Reusable Asset Service

Key-Feature in RAS

Features Description
Register Assets The assets that can be created include:
●      Packages – including diagrams and subordinate Packages
●      Baseline Packages
●      Files
Browse Assets Any user, regardless of password protection, can freely browse and identify the contents of a Package held in a Storage – including displaying the diagrams – without importing the material into a model.
Import Content Any user with access to the Pro Cloud Server repository and a password (if required), can import an Asset into their repository.
Dependencies Any dependencies within a stored Package are viewable, providing a quick means to visually see what the Asset requires.
View Diagrams Any diagrams set in an Asset are logged and can be viewed providing a quick means to check and visually compare the Asset diagrams against updates to diagrams in the current model.
Compare Where a user that has imported an Asset Package into their model, they can compare their model Package against any version of the Asset Package, to check for and assess any differences between them.
Required Technologies For a Package Asset that has specific Technologies these are displayed for clarification of what is required on importing the Asset.
Reviews Reviews and comments can be posted against a Package.

Five simple steps to compare/merge between versions using RAS in Sparx Enterprise Architect :

  1. Creating a RAS repository using PCS.
  2. Configuring the RAS in the Main Repository and registering the assets in the Main Repository.
  3. Import branches to other local repository by configuring the same RAS in that repository.
  4. Make some changes in the local repository and register it in RAS configuration.
  5. Compare/merge/restore the changes from RAS configuration to Baseline repository.

Further Information

Please contact us or write an email to info@sparxsystems.in to have a live demo about the new EA 16 features and capabilities.

Add-insSparx Systems Enterprise Architect

MDG Integration for Microsoft Office – Excel Importer

The Excel importer in MDG Integration for Microsoft Office is a powerful tool for quickly importing and managing large amounts of data into models. It helps you to save time and reduce errors by automating the process of importing data from an Excel worksheet into Sparx Enterprise Architect. 

Key features in MDG Integration for Microsoft Office – Excel Importer 

  • Excel importer is a powerful and flexible tool for importing data from Excel worksheets into Enterprise Architect model elements more efficiently and accurately. 
  • It Includes importing worksheet information as UML Elements, Connectors, Attributes, TestScript, Usecase, Glossary, and tagged values to Enterprise Architect.
  • It is also possible to import hierarchical data from Microsoft Excel into Enterprise Architect. 

Introducing the Interface

  1. Select the Excel document that contains the information to be imported. 
  2. Choose the profile that has been defined for the particular document.
  3. Optionally set hierarchical composition.
  4. Preview the ‘About to be imported’ model content.
  5. Import the document to create model elements in Enterprise Architect.

Figure 1. Excel Importer Interface

Profile Mapping

Profiles in MDG Integration for Office give users flexible and simple ways to map the EA models with an Excel worksheet by providing a step-by-step approach. This results in more efficiency and effectiveness. 

Two types of profiles are supported by the Excel Importer

  • Object profile – Allows the user to import the Object and its properties into Enterprise Architect Model. 
  • Connector profile – Allows the user to import the Connector and its properties to the existing objects in the Enterprise Architect Model.

Figure 2. Excel Profile Mapping

Step 1. Get Started 

Get started wizard is categorized into two sections: 

  • Profile Information 
  • Settings

Profile Information 

Basic information about the profile – Profile Name, Description, and Excel document path. 

Settings 

If the Element Type Information (Eg: Class, Requirement, etc), is missing from the Excel worksheet then uncheck the ‘My Data has Element Type Information’ checkbox. This will enable the Element Type combo box and stereotype text fields.

  • Element Type – The Enterprise Architect element types are listed here. Select a single Element type from the Excel worksheet to import the whole sheet.
  • Stereotype – It allows the user to manually enter the stereotype for the object import. 

Step 2. Map Element Type 

It allows users to choose a column name that specifies the element type to be created in Enterprise Architect

Note:  Map Element Type wizard is displayed only if the ‘My Data has Element Type’ Information is checked in the previous (Get started) screen.

Step 3. Map Element Properties 

The Element Information in the Excel is to be mapped to the appropriate EA Element Property by using a drop-down list 

Note: Configure Connectors This button should be enabled only when a user mapped any of the columns as a “connector” in the EA Element Property. By default, the connector has some pre-selected values to import. We can change the selected values by clicking on the “Configure Connector” button.

More Properties – In the EA Element Property drop-down, we have an option called More Properties.  Selecting ‘More Properties ‘from the drop-down, shows the below properties to map to import into EA.

  • Tagged Values 
  • Use case
  • Glossary
  • Attributes
  • Methods
  • TestScript

Parent Package Mapping – Map the Parent information column to ‘SET_AS_PARENT _PACKAGE_1’ from the EA Element Property drop-down under ‘MULTI-LEVEL HIERARCHY’. 

When ‘SET_AS_PARENT _PACKAGE_1’ is mapped, the ‘Create parent package if not exists’

The option will get enabled and checked by default. We can also change this setting if needed.

  1. If a parent exists in the selected sheet, it creates the object under this parent, or
  2. If the parent already exists under the selected package in EA, it creates the object under the parent, or
  3. It creates the parent as a package in Enterprise Architect and then creates the object under this parent package

Step 4. Review and create

It provides a summary of the mappings defined in the profile as well as a preview of the final model structure corresponding to the sample document. 

By following the four simple steps above, we can easily create a profile. Selecting the Created Profile from the profile dropdown menu is necessary when using the EA Excel Importer. This profile allows the user to import Excel data into EA as Artifacts and connections. It will import as shown below. 

Figure 3. Import Excel Worksheet as EA Artifacts  

Further Information

Please contact us or write an email to info@sparxsystems.in to have a live demo about the new EA 16 features and capabilities.

Add-insSparx Systems Enterprise Architect 16

MDG Integration for Microsoft Office – Word Importer

Sparx Enterprise Architect is a powerful modeling platform that helps organizations to create and manage their models. It also provides a range of features such as EA Word Importer, which helps in integrating Microsoft Office documents with the models created using Sparx Enterprise Architect.

Key features in MDG Integration for Microsoft Office – Word Importer

  • Word Importer offers a powerful interface for instantly converting Word documents into Enterprise Architect model elements.
  • The tool brings Requirements, Use Cases, Glossary, Processes, Classes, Connectors, and other data from Word documents into Enterprise Architect as model elements, Connectors, and Tagged Values.
  • It greatly reduces the time and effort involved to translate the information available in requirements documents, use case documents, test plan documents, etc.

Introducing the Interface

Word Importer lets users import Word documents in four simple steps.

  1. Select the word document that contains the information to be imported.
  2. Choose the profile that has been defined for the particular document.
  3. Preview the model contents to be imported.
  4. Click Import to create model elements in Enterprise Architect from the selected word document.


Figure 1. Word Importer Interface

Word Importer Interface provides a step-by-step approach for mapping items like section tables and delimited name-value pairs from Word Documents to model Enterprise Architect elements and properties through profiles.

Profile Mapping

  • Profile mapping helps to map the word document styles and structured information to Enterprise Architect Object & its Properties.
  • Profile is reusable for all Word documents which are in similar structures.

Figure 2. Word File Getting Started.

Step 1. Get Started

Get started wizard is categorized into three sections:

  • Profile Information
  • Element Properties
  • Element Definitions Table (Excel-like).

Profile Information

Basic information about the profile – Profile Name, Description, and Word document path.

Element Properties Mapping

It gives users the flexibility to map additional details in Word documents as Element Properties.  The additional details in the Word document are expected to be given as name-value pairs separated by delimiters.  Delimiters symbols can also be provided in the “Delimited by” field.

The delimited name-value pairs could be.

Element Definition table (Excel)

It allows the user to select whether the table information provided in Word Document contains Headers in the first row or Headers in the first column.  The below-mentioned options are available in the Element Definition Table section.

  • None
  • Excel-like tables with a header in the first row
  • Excel-like tables with a header in the first column

Step 2. Map Headings

It allows users to map the document headings to the corresponding Sparx Enterprise Architect Element types.

Step 3. Map Properties

The Map Properties window lists all unique properties identified across the word document. Users can map these identified properties to the corresponding Sparx Enterprise Architect Element properties.

Note: Configure Connectors – This button should be enabled only when a user needs to map any of the columns as a “connector” in the EA Element Property. By default, the connector has some pre-selected values to import when using this button.

More Properties – In the EA Element Property column, we have an option called More Properties. By selecting ‘More Properties ‘from the drop-down, it displays ‘Additional Properties ‘.

In ‘Additional Properties ‘, the Properties drop box contains,

  • Tagged Values
  • Use case
  • Glossary

Step 4. Map Tables

It allows the user to specify how element definitions specified in table format in the Word Document are mapped during the import process.

Step 5.Set Hierarchy

It creates a hierarchical structure in the Project Browser while importing from the Word document that reflects the structure of the model.  This helps to keep documents organized and easily accessible, improve collaboration among stakeholders, and better manage project tasks and issues.

Step 6. Review and create

It provides a summary of the mappings defined in the profile as well as a preview of the final model structure corresponding to the sample document.

 By following six simple steps, EA Word Importer allows us to create a profile successfully.  The Created Profile should be chosen in the EA Word Importer starting interface (refer Figure 1).  Using this Profile, allows the user to create EA Artifacts and their relationships from Word Document as displayed below.

Figure 3. Import Word Document as EA Artifacts using MDG Integration – Word Importer

Further Information

Please contact us or write an email to info@sparxsystems.in to have a live demo about the new EA 16 features and capabilities.

Sparx Systems Enterprise ArchitectSparx Systems Enterprise Architect 16

Enhanced Time Aware Modeling in Sparx Enterprise Architect v16.1

Time is a key aspect of the virtual world, and it is also a concern in models that represent the world. Time Aware Modeling is a powerful and expressive technique for defining and visualizing how model changes over time. The technique works by allowing a modeler to clone a package, diagram or element in a model also maintaining traceability to both earlier and later versions of model elements.

Key-Feature Benefits

  • Easier to Analyse “As-Is” and “To-Be” model versions.
  • Make updates to later versions without changing the ‘As-Is’ diagrams.
  • Gain more control over how your entire model developed and that can be tracked.
  • Create traceability diagrams that show each phase of the evolution of the elements.

Figure 1: Clone Structure as New Version

New Improvements in Sparx Enterprise Architect v16.1

  • Exposed Interface element types are copied with cloned diagrams.
  • Fixed error when cloning an element with embedded elements on a diagram enabled with ‘Collapse Embedded Elements’ option
  • Traces created using abstraction connectors between cloned elements are showcased as a unique meaning in the traceability window.
  • Annotation Elements are now cloneable artifacts.
  • Support for Time Aware Modeling Version Structure branching has been included, along with support for Connectors to Connectors.

The basis of time-aware modeling is to clone a Package structure (Packages and diagrams only) as a new version, and then to replace specific portions of the old version with new elements and relationships using either the “Clone as New Version” capability or merely adding new material to the model as needed.

Note: This approach maintains traceability to both earlier and subsequent work while allowing for very selective incremental model adjustment or development.

Figure 2:Traceability Window

Further Information

Please contact us or write an email to info@sparxsystems.in to have a live demo about the new EA 16 features and capabilities.

Add-insSparx Systems Enterprise Architect

Recalibrate Connectors Information using MDG Integration – Excel Importer

Connectors, which link elements, are commonly described as lines on diagrams showing how the elements relate to one another. In natural languages, the Connectors are verbs that define how the nouns relate to each other if the elements are nouns. Now, we’ll take a closer look at importing the connector information using MDG Integration in Enterprise Architect.

MDG Integration for Microsoft Office – Excel Importer

The Excel Importer tool allows the user to import Excel workbook contents as model elements. It also involves adding/updating UML Elements, Connectors, Attributes, Methods, Test Scripts, Use Cases, Glossary, and Tagged Values to Enterprise Architect.

Profiles are used to define the mapping between the Excel document and the Enterprise Architect model

Two types of profiles are supported by the Excel Importer

  • Object profile – Allows the user to import the Object and its properties into Enterprise Architect Model.
  • Connector profile – Allows the user to import Connector and its properties to the existing objects in the Enterprise Architect Model.

Recalibrate Connector Information using Connector Profile

The connectors between the model elements are shown in the image below. (Connector Name, Stereotype, Alias, etc.,) needs to be updated for connectors using MDG Integration – Excel Importer.

                              Figure.1  Model Elements with Connectors.

The below image displays the excel sheet with connector information to be updated between the specific model elements. The Connectors largely depend on the source GUID and target GUID since they specify how the elements are related to each other.

Note: Source GUID and Target GUID are mandatory to create and Connector GUID is mandatory to update the Connector.

Figure 2.  Connector informatin in Excel

Mapping Connector Information in Connector Profile

The Connector Information in the excel is to be mapped to the appropriate EA Connector Property by using a drop-down list and select ‘more properties’ options (Connector Source & Target Information)

Figure 3.  Connector Profile Property Mapping.

You can update the below properties for the connectors that are imported into the model.

Connector InformationSourceInformationTargetInformationConstraints
AliasSource_Access,Target_Access,Pre-Condition
NameSource_Aggregation,Target_Aggregation,Post-Condition
NotesSource_Alias,Target_Alias,
SourceSource_AllowDuplicates,Target_AllowDuplicates,
SourceGUIDSource_Changeable,Target_Changeable,
StereotypeSource_Constraints,Target_Constraints,
StyleSource_Containment,Target_Containment,
TargetSource_Derived,Target_Derived,
TargetGUIDSource_DerivedUnion,Target_DerivedUnion,
GUIDSource_MemberType,Target_MemberType,
Tagged valuesSource_Multiplicity,Target_Multiplicity,
Source_Navigability,Target_Navigability,
Source_Ordered,Target_Ordered,
Source_Owned, Source_Role,Target_Owned, Target_Role,
Source_RoleType,Target_RoleType,
Source_Scope,Target_Scope,
Source_Stereotype,Target_Stereotype,
Source_QualifiersTarget_Qualifiers

After importing the Excel using the created Connector profile, the connector Name, Stereotype, and Alias information are updated for its respective connector.

Figure 4.  Updated Connector Information using MDG Integration – Excel Importer.

Further Information  :

Please contact us or write an email to info@sparxsystems.in to have a live demo about the new EA 16 features and capabilities.

Integrations

ServiceNow Integration with Sparx Enterprise Architect

Sparx Enterprise Architect can be used to capture models that are associated with the ServiceNow tables and other artifacts. The capacity to connect the components of all models to one another is the key strength of Sparx Systems Enterprise Architect, the more time analysts and designers spend in creating attractive, well specified models, the greater the potential future benefit from any further changes to the systems. With Sparx Systems Pro Cloud Server users can easily integrate with ServiceNow to fetch tables into their Cloud model.

ServiceNow

ServiceNow is a ticketing system for customer service that processes and catalogues service requests. You can create queries for incidents, changes, problems, and other services using tools like ServiceNow. ServiceNow has had its roots in ITSM since 2012. With the advent of cloud computing and changing technology, however, it carved out a niche as a cross-departmental platform that operates as an enterprise cloud solution built on top of all other applications. Its method of developing business processes that optimize information extraction distinguishes it as a one-of-a-kind provider in today’s modern cloud space.

Key features of Integrating ServiceNow with Sparx Enterprise architect

  • Map Enterprise Architect elements to their ServiceNow counterparts.
  • Users can easily create a new Enterprise Architect element linked to a ServiceNow item.
  • It provides better customer service while lowering maintenance costs.
  • Customization is simple and easy with the help of ServiceNow integration.
  • Users can link an existing element in Enterprise Architect to a ServiceNow item or create a new element in Enterprise Architect linked to a ServiceNow item.
  • Changes to the Enterprise Architect element can be reflected in the ServiceNow item.
  • Users can create a new ServiceNow item that is linked to an Enterprise Architect element.
  • Conduct a traceability analysis.
Simple steps for configuring Snow Integration in PCS:
  1.  Open Pro Cloud Config Client in Desktop.
  2.  Click on the Integrations Tab in the config client window and enable the Integrations button.
  3.  Click on Add button to Add the data provider
  4.  Check ‘Enabled’ option
  5.  Type the name for the provider (For ex: ServiceNow) in the field.
  6.  Select ServiceNow in the provider drop down box
  7.  In the ‘Server Name/IP’ field, type the server name or IP address that the ServiceNow Plug-in will use to communicate with ServiceNow
  8.  In the port field Enter “443”
  9.  In User Name field and Password enter the given credentials, (Under provider Server)
  10. If needed, select the check box create items and modify items to create elements and modify
  11.  Leave the check box ignore SSL Errors
  12.  You can ignore other options and once you have finished. Click the “OK” button, which redirects to the Integration tab.
  13. The ServiceNow Data Provider will be active, you must bound it to the Db by checking the check box or you can select all checkbox by selecting this option.
  14.  Once you have selected, you must restart the PCS by heading to the task manager, click on the services tab and restart “Sparx Systems Professional Cloud”.

Further Information

Please contact us or write an email to info@sparxsystems.in to have a live demo about the new EA 16 features and capabilities.

Sparx Systems Enterprise ArchitectSparx Systems Enterprise Architect 16

Quicklinkers in Sparx Enterprise Architect

Quicklinkers is a popular and helpful capability for developing domain-specific MDG technologies. Each rule has its own set of characteristics, such as specified connectors between stereotypes, filtering in classifiers, defining stereotyped Relationship between stereotypes, and so on.

In the UML profile, each rule may be constructed between the stated stereotypes. Methods for defining Quicklinkers rules are

  • Meta-Constraint
  • Meta-Relationship
  • Stereotyped Relationship
Methods of Quick Links

            Figure 1.  Methods for Quicklinkers

Meta-Constraint

  • A Meta-Constraint specifies a rule between two specified Stereotypes.
  • The value should be assigned in the tag ‘umlRole’ on the meta-constraint connection.

To create a Meta-Constraint

  • In the below example we are extendinggeneralizing two stereotypes named Application and ApplicationInstance from ArchiMate_ApplicationComponent.
  • Creating a new meta-constraint with type filter between the created stereotypes.
  • The created meta-constraint will be used to specify the type for the target Stereotype element when it is dropped from the Browser window into a diagram.
Meta Constraints in QuickLinkers

Figure 2.  MetaConstraints

Profile Meta Constraints

Figure 2.1  Profile MetaConstraints

Creating Meta Constraings in Quicklinks

Figure 2.2 – Creating MetaConstraints

Pasting the Meta Constraints in Quick Linkers

Figure 2.3  Pasting the Constraints

Added metaconstraints in quicklinkers

Figure 2.4  Added MetaConstraints

Meta-Relationship

A valid UML Connector between two defined Stereotypes is specified using Meta-Relationship.

The name of the UML Connector should be set in the value of the tag ‘metaclass’ on the Meta-Relationship connector.

To create Meta- Relationship

  • Creating a new metarelation with Association connector between the created stereotypes.
  • The created metarelation will be used to create an Association connector in quick links.
Meta Relationships

Figure 3: MetaRelationship

Profile Meta Relationships

Figure 3.1  Profile MetaRelationship

 Adding the Metarelationship Quicklinker

Figure 3.2   Adding the Meta Relationship QuickLinker

Meta Relationships Created

Figure 3.3   Meta Relationship Created.

Stereotyped Relationship

Stereotyped Relationship defines a stereotyped connection between two specified Stereotypes.

The name of the stereotyped connection is set in the value of the tag ‘stereotype’ on the Stereotyped Relationship connector.

To create Stereotyped Relationship

  • Create a new stereotyped relationship between the already defined element stereotypes.
  • The created stereotyped relationship will be used to connect the target stereotype element with created connector stereotype – composedOf
Stereo Typed Relationships in Quicklinkers

Figure 4.  Stereotyped Relationship

Profile Stereotyped Relationships

Figure 4.1  Profile Stereotyped Relationship.

Added Stereotyped Relationships

Figure 4.2  Added Stereotyped Relationship.

Creating Elements using stereopyed quicklinks

Figure 4.3  Creating Elements using Stereotyped Quicklinks.

Stereotype Relationships Created
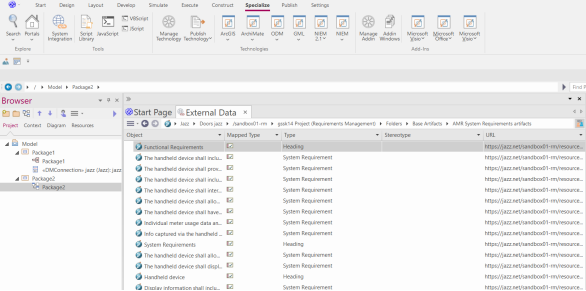
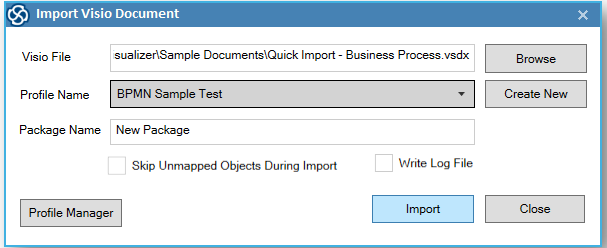
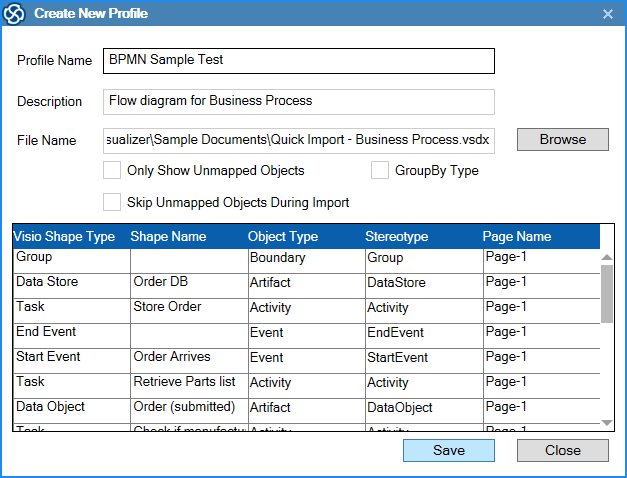
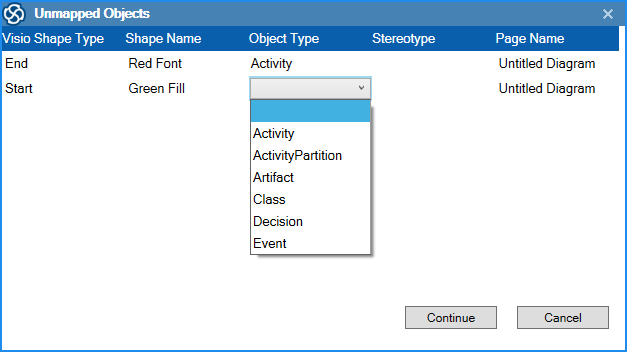
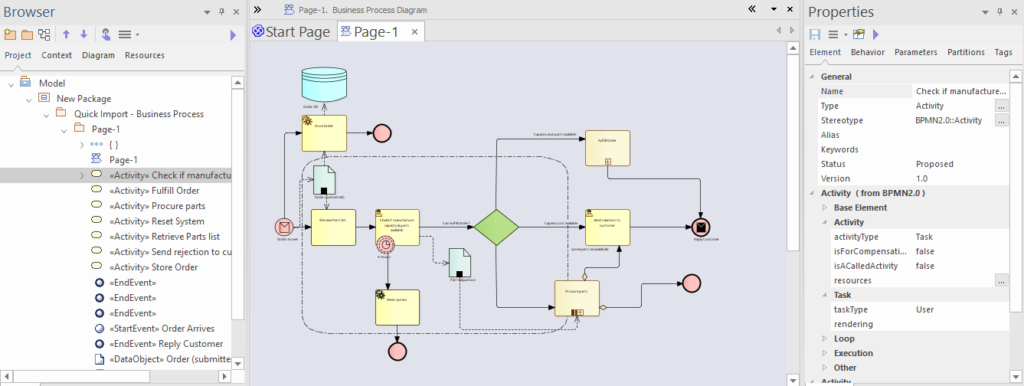
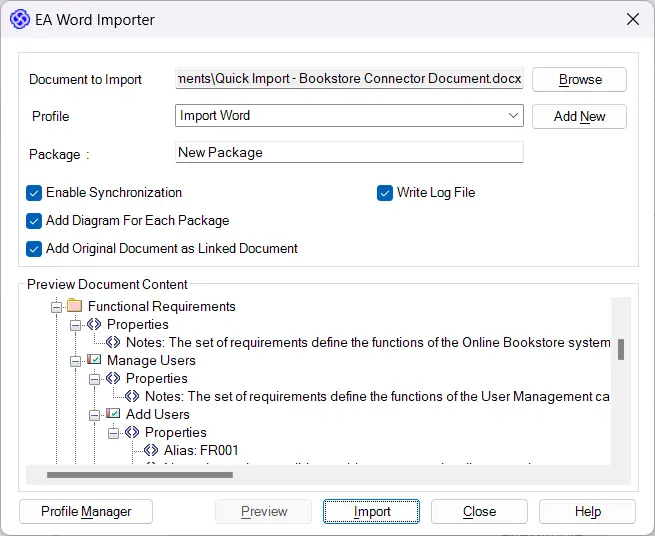
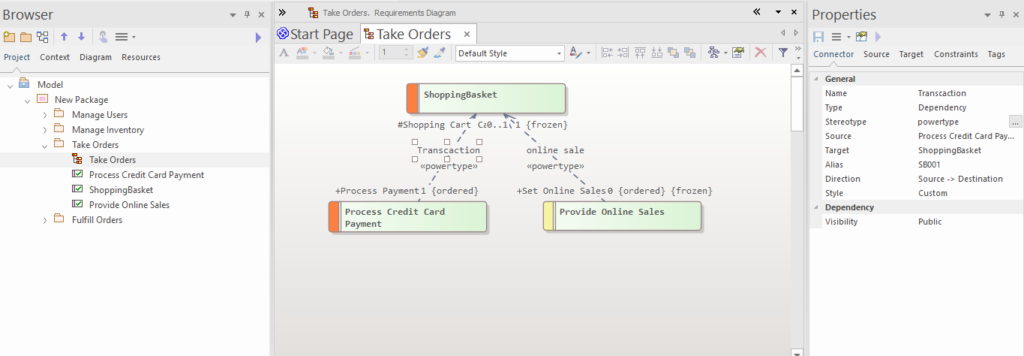
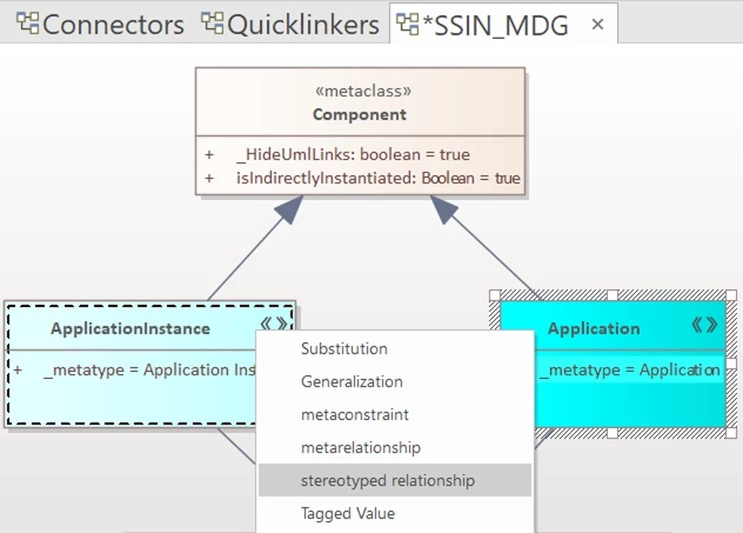
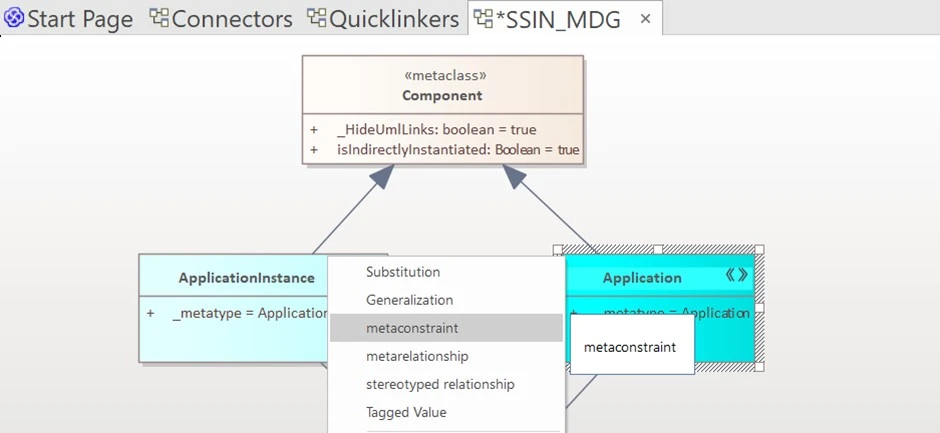
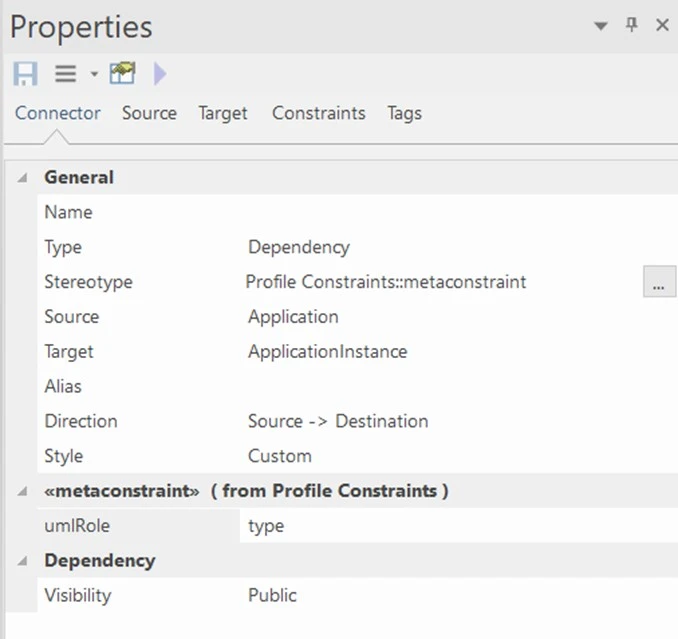
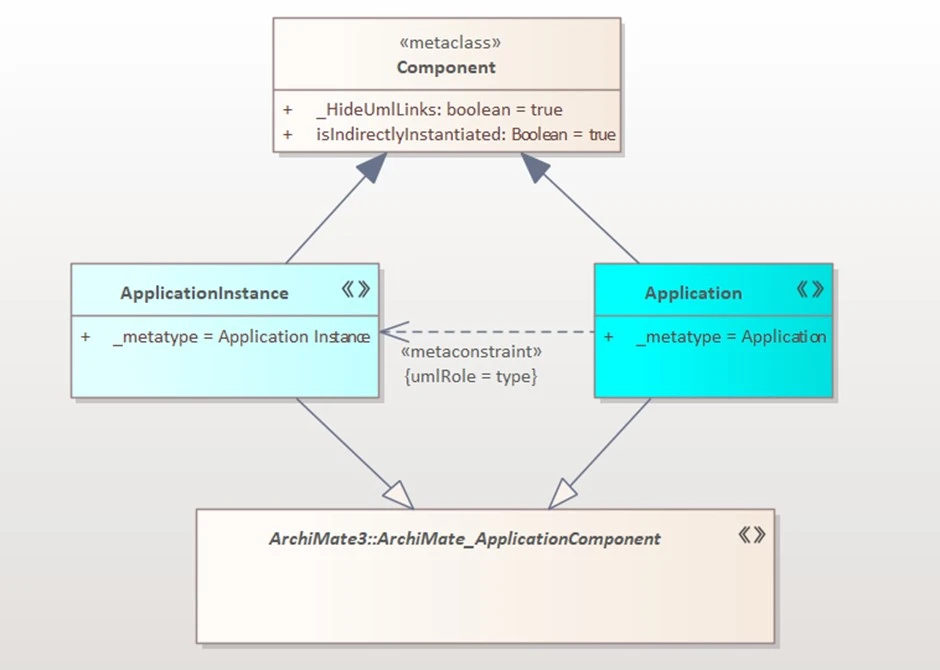
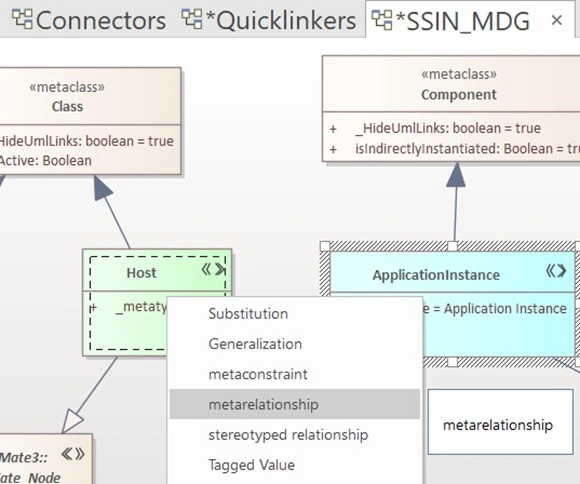
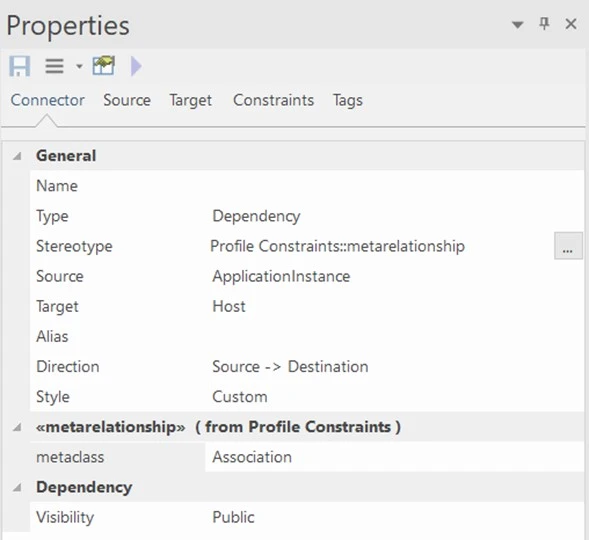
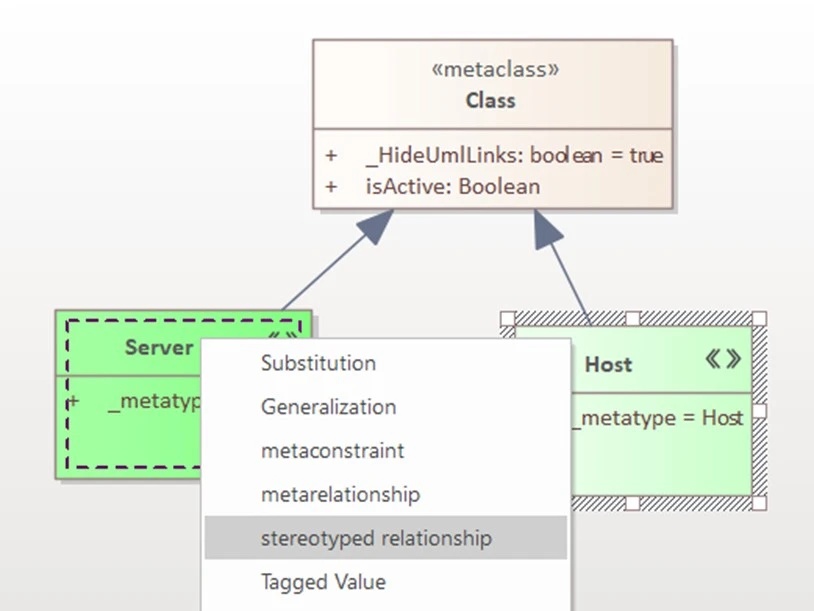
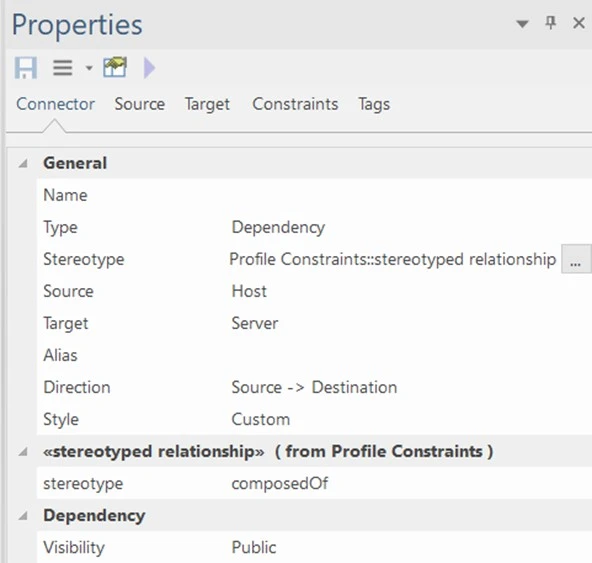
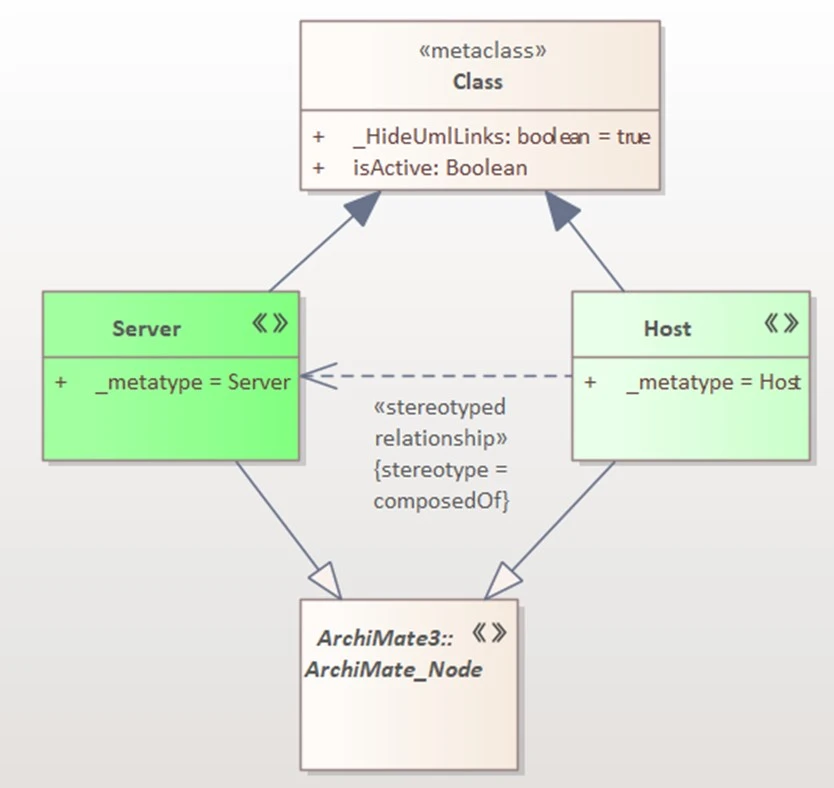
Figure 4.4  Stereotype Relationship Created.

Further Information

Please contact us or write an email to info@sparxsystems.in to have a live demo about the new EA 16 features and capabilities.

1235